
Android activity lifecycle if one of the most asked questions in Android Developer interviews. It is also the one to mess up easily.
You must have already seen this activity lifecycle diagram from developer.android.com and many android development books.
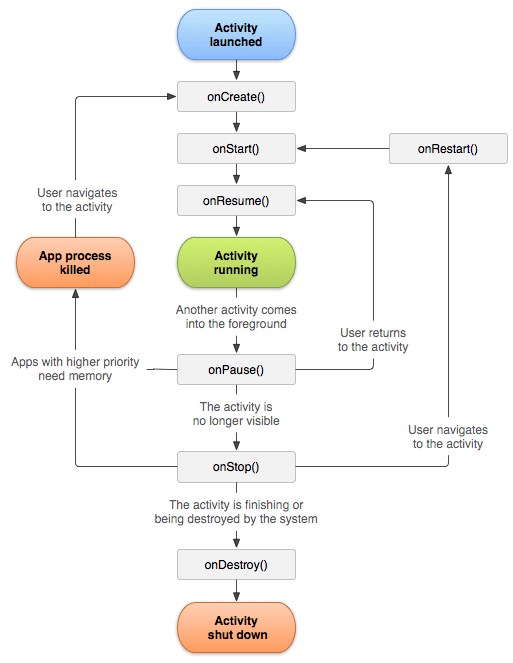
But this is not enough. This diagram just outlines the activity lifecycle callback sequence through it being created to being destroyed. But it doesn’t show how it behaves with more than one activity.
In this post, we’ll take an in-depth look at the android activity lifecycle by actually creating an application and using Log Statements. We’ll put log statements all over the app in lifecycle methods to check their behaviour.
These are the activity lifecycle callbacks we’ll be taking a look at:
- onCreate
- onStart
- onResume
- onSaveInstanceState
- onPause
- onStop
- onDestroy
- onRestoreInstanceState
The Setup
We’ll be having two activities: 1. ActivityA(MainActivity) 2. ActivityB and we’ll be exploring the following situations in the activity lifecycle.
- Starting ActivityA (on app launch)
- Starting ActivityB over ActivityA
- Pressing back (returning) from ActivityB to ActivityA
- Pressing back (exiting app) from ActivityA
- Rotating phone in ActivityA (changing orientation)
- Pressing home button
First create an Android Studio project. In the MainActivity.kt file, add the following methods:
class MainActivity : AppCompatActivity() {
    var TAG = "AndroidVille"

    override fun onCreate(savedInstanceState: Bundle?) {
        super.onCreate(savedInstanceState)
        setContentView(R.layout.activity_main)
        title = "Activity A"
        Log.d(TAG, "Activity A: onCreate")
    }

    override fun onStart() {
        super.onStart()
        Log.d(TAG, "Activity A: onStart() ")
    }

    override fun onResume() {
        super.onResume()
        Log.d(TAG, "Activity A: onResume() ")
    }

    override fun onPause() {
        super.onPause()
        Log.d(TAG, "Activity A: onPause() ")
    }

    override fun onSaveInstanceState(outState: Bundle) {
        outState.putString("androidville", "Hello there")
        super.onSaveInstanceState(outState)
        Log.d(TAG, "Activity A: onSaveInstanceState() ")
    }

    override fun onRestoreInstanceState(savedInstanceState: Bundle) {
        super.onRestoreInstanceState(savedInstanceState)
        Log.d(TAG, "Activity A: onRestoreInstanceState() ")
    }

    override fun onRestart() {
        super.onRestart()
        Log.d(TAG, "Activity A: onRestart() ")
    }

    override fun onStop() {
        super.onStop()
        Log.d(TAG, "Activity A: onStop() ")
    }

    override fun onDestroy() {
        super.onDestroy()
        Log.d(TAG, "Activity A: onDestroy() ")
    }

    fun launchNewActivity(v: View) {
        startActivity(Intent(this, ActivityB::class.java))
    }
Now create another activity (ActivityB), and add the same methods, but this time, replace the “ActivityA” text with “ActivityB” in all the log statements.
package com.example.androidactivitylifecycle

import androidx.appcompat.app.AppCompatActivity
import android.os.Bundle
import android.util.Log

class ActivityB : AppCompatActivity() {
    var TAG = "AndroidVille"

    override fun onCreate(savedInstanceState: Bundle?) {
        super.onCreate(savedInstanceState)
        setContentView(R.layout.activity_b)
        title = "Activity B"
        Log.d(TAG, "Activity B: onCreate")
    }


    override fun onStart() {
        super.onStart()
        Log.d(TAG, "Activity B: onStart() ")
    }

    override fun onResume() {
        super.onResume()
        Log.d(TAG, "Activity B: onResume() ")
    }

    override fun onPause() {
        super.onPause()
        Log.d(TAG, "Activity B: onPause() ")
    }

    override fun onSaveInstanceState(outState: Bundle) {
        outState.putString("androidville", "Hello there")
        super.onSaveInstanceState(outState)
        Log.d(TAG, "Activity B: onSaveInstanceState() ")
    }

    override fun onRestoreInstanceState(savedInstanceState: Bundle) {
        super.onRestoreInstanceState(savedInstanceState)
        Log.d(TAG, "Activity B: onRestoreInstanceState() ")
    }

    override fun onRestart() {
        super.onRestart()
        Log.d(TAG, "Activity B: onRestart() ")
    }

    override fun onStop() {
        super.onStop()
        Log.d(TAG, "Activity B: onStop() ")
    }

    override fun onDestroy() {
        super.onDestroy()
        Log.d(TAG, "Activity B: onDestroy() ")
    }

}
Now, we’ll create a Log Filter to just focus on our custom log statements. For this,
- Click on the “Logcat” tab on the bottom of the Android Studio.
- Then click on the dropdown menu next to where it says “Regex”. Then select “Edit Filter Configuration”
- In the popup window, enter the name of the Filter (whatever you like). Enter the TAG of your log statement in “Log Tag”. It should be the same as the TAG variable inside the activities. Then click on “Ok”.
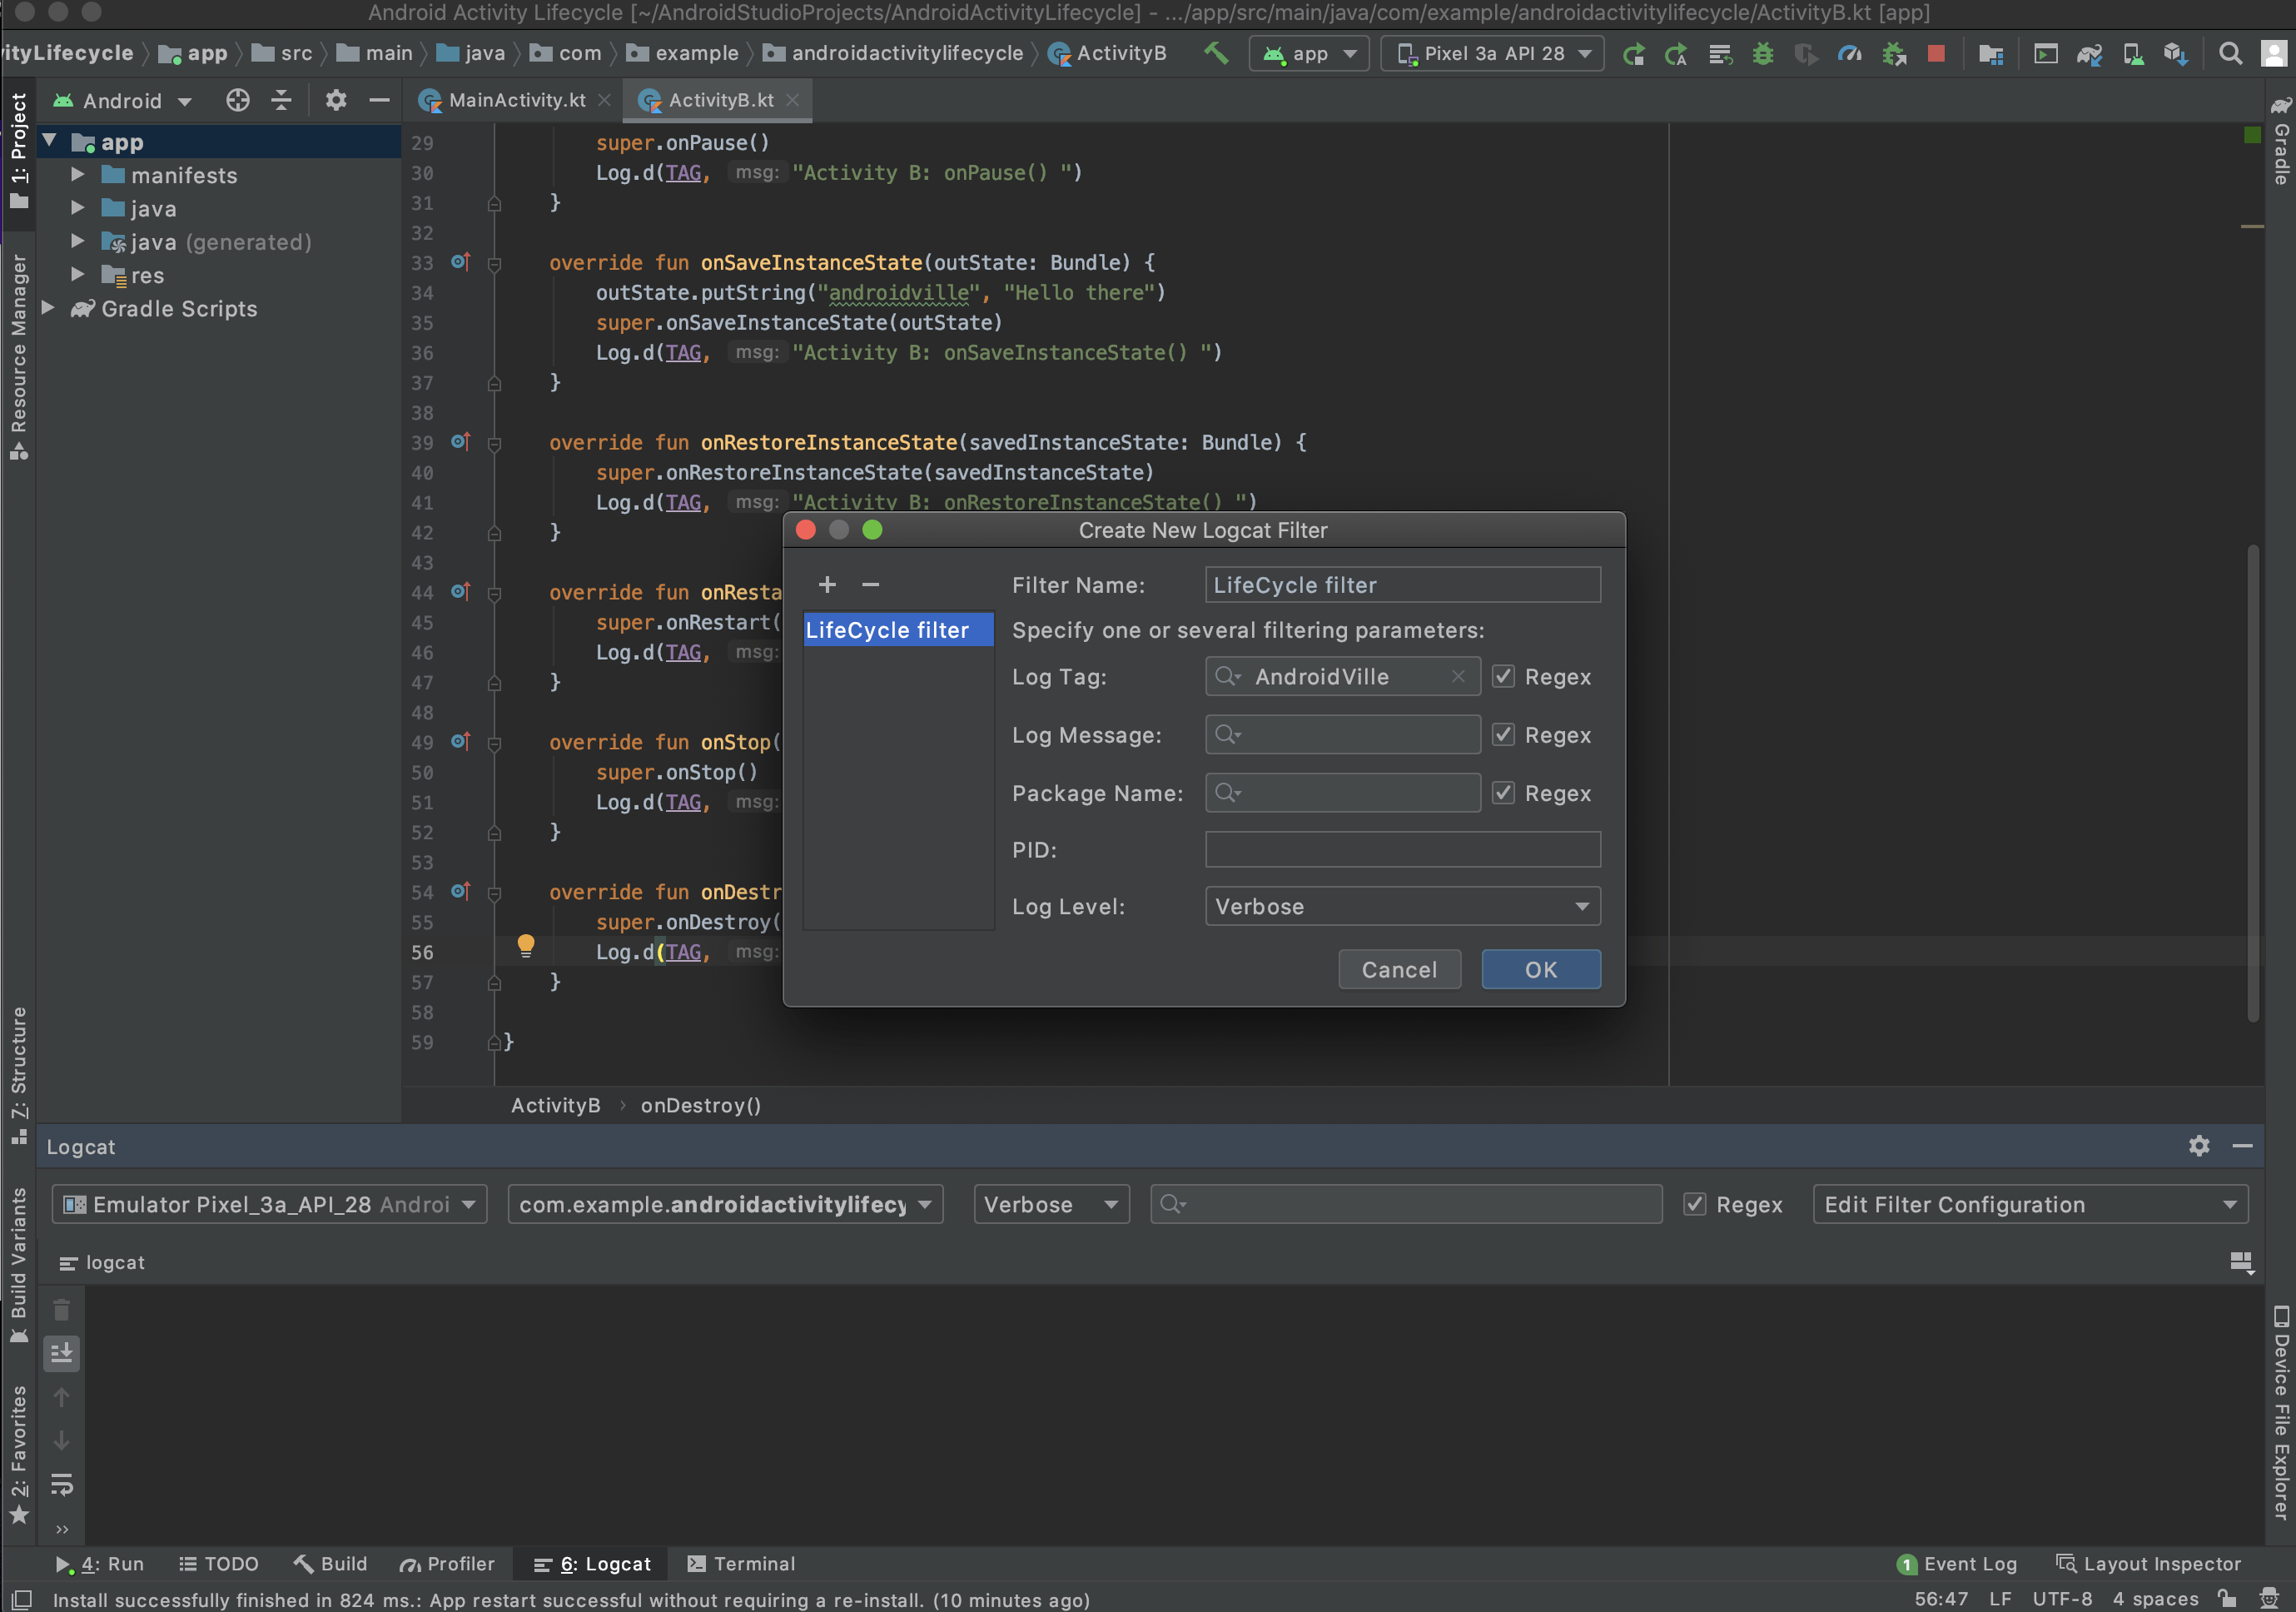
This will help you filter out the unnecessary log statements and focus on the activity lifecycle ones.
Activity Lifecycle (on app launch)
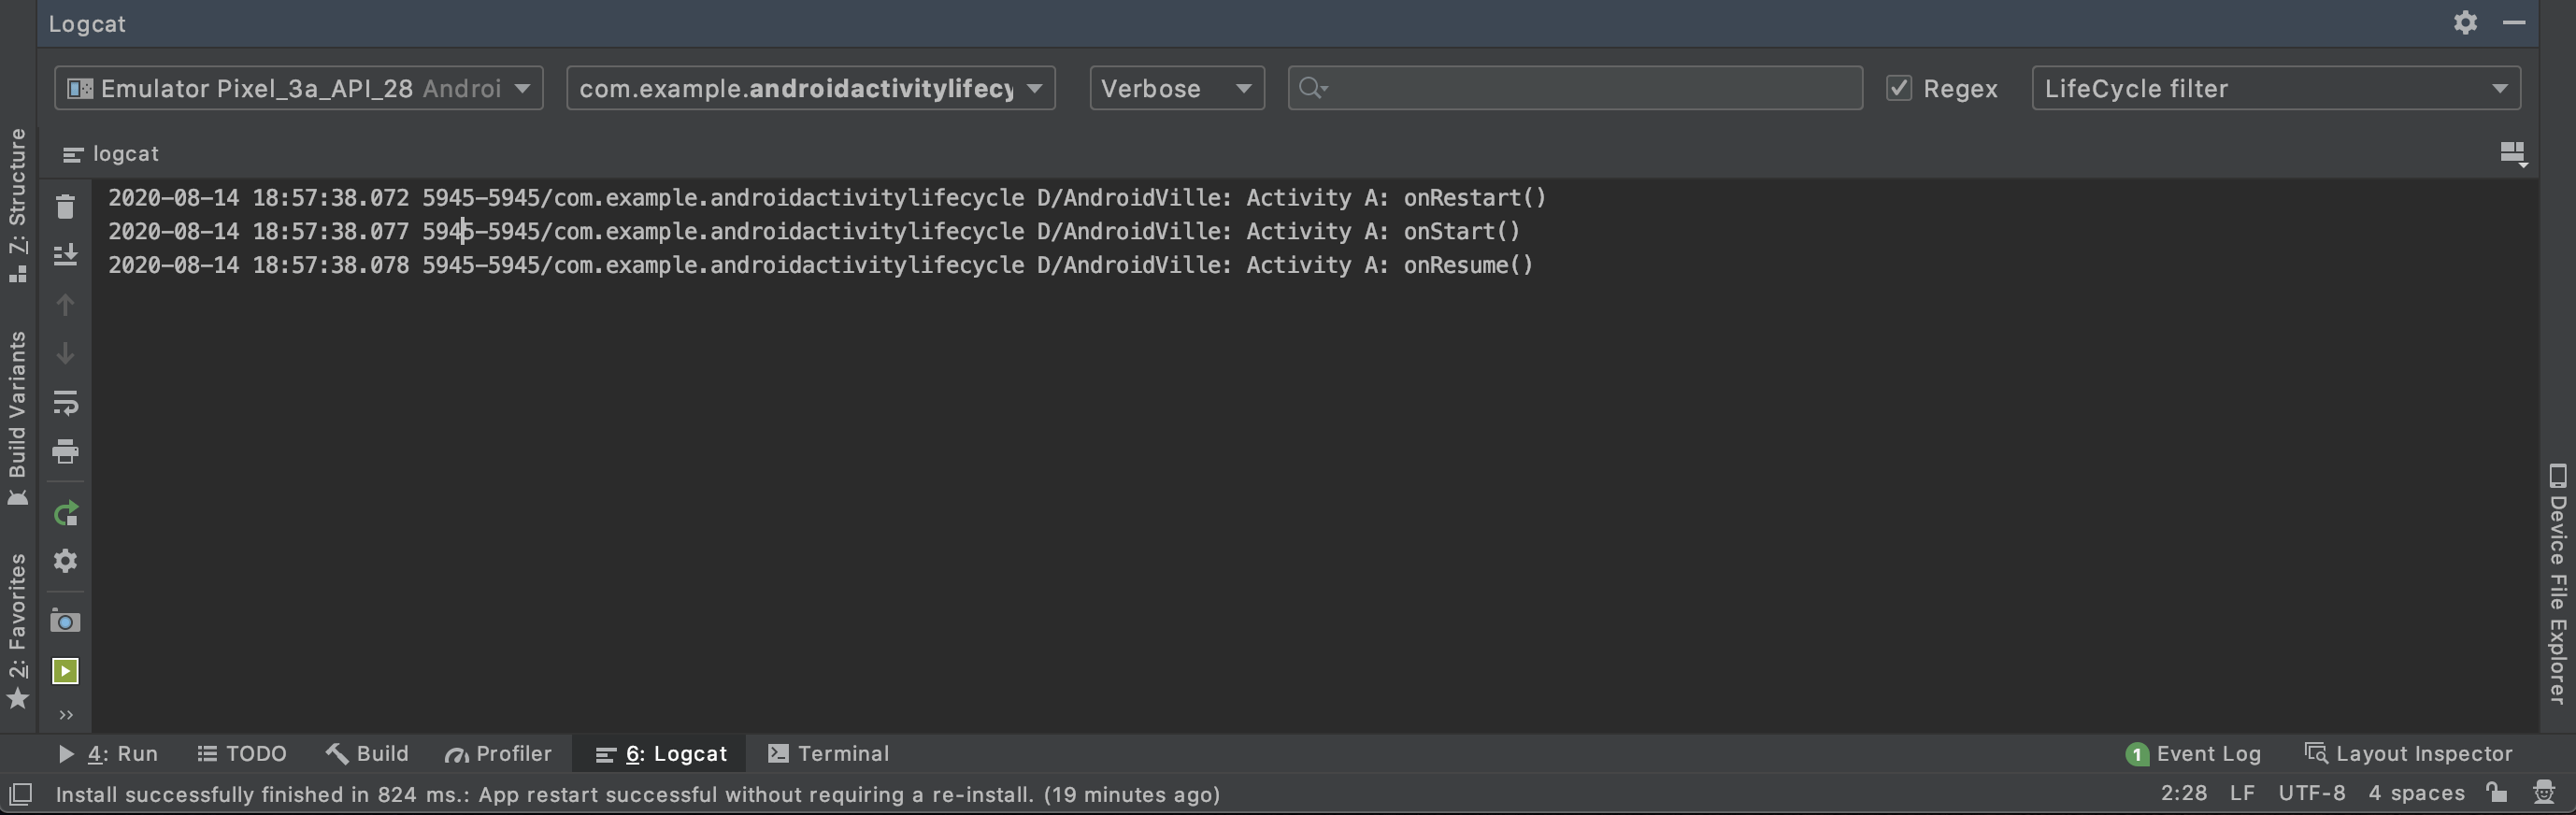
With this setup, we’re ready to explore the activity lifecycle method’s call sequence. Go ahead and run the app, make sure your logcat window is opened up and clean.
When the app launches, this is the callback sequence:
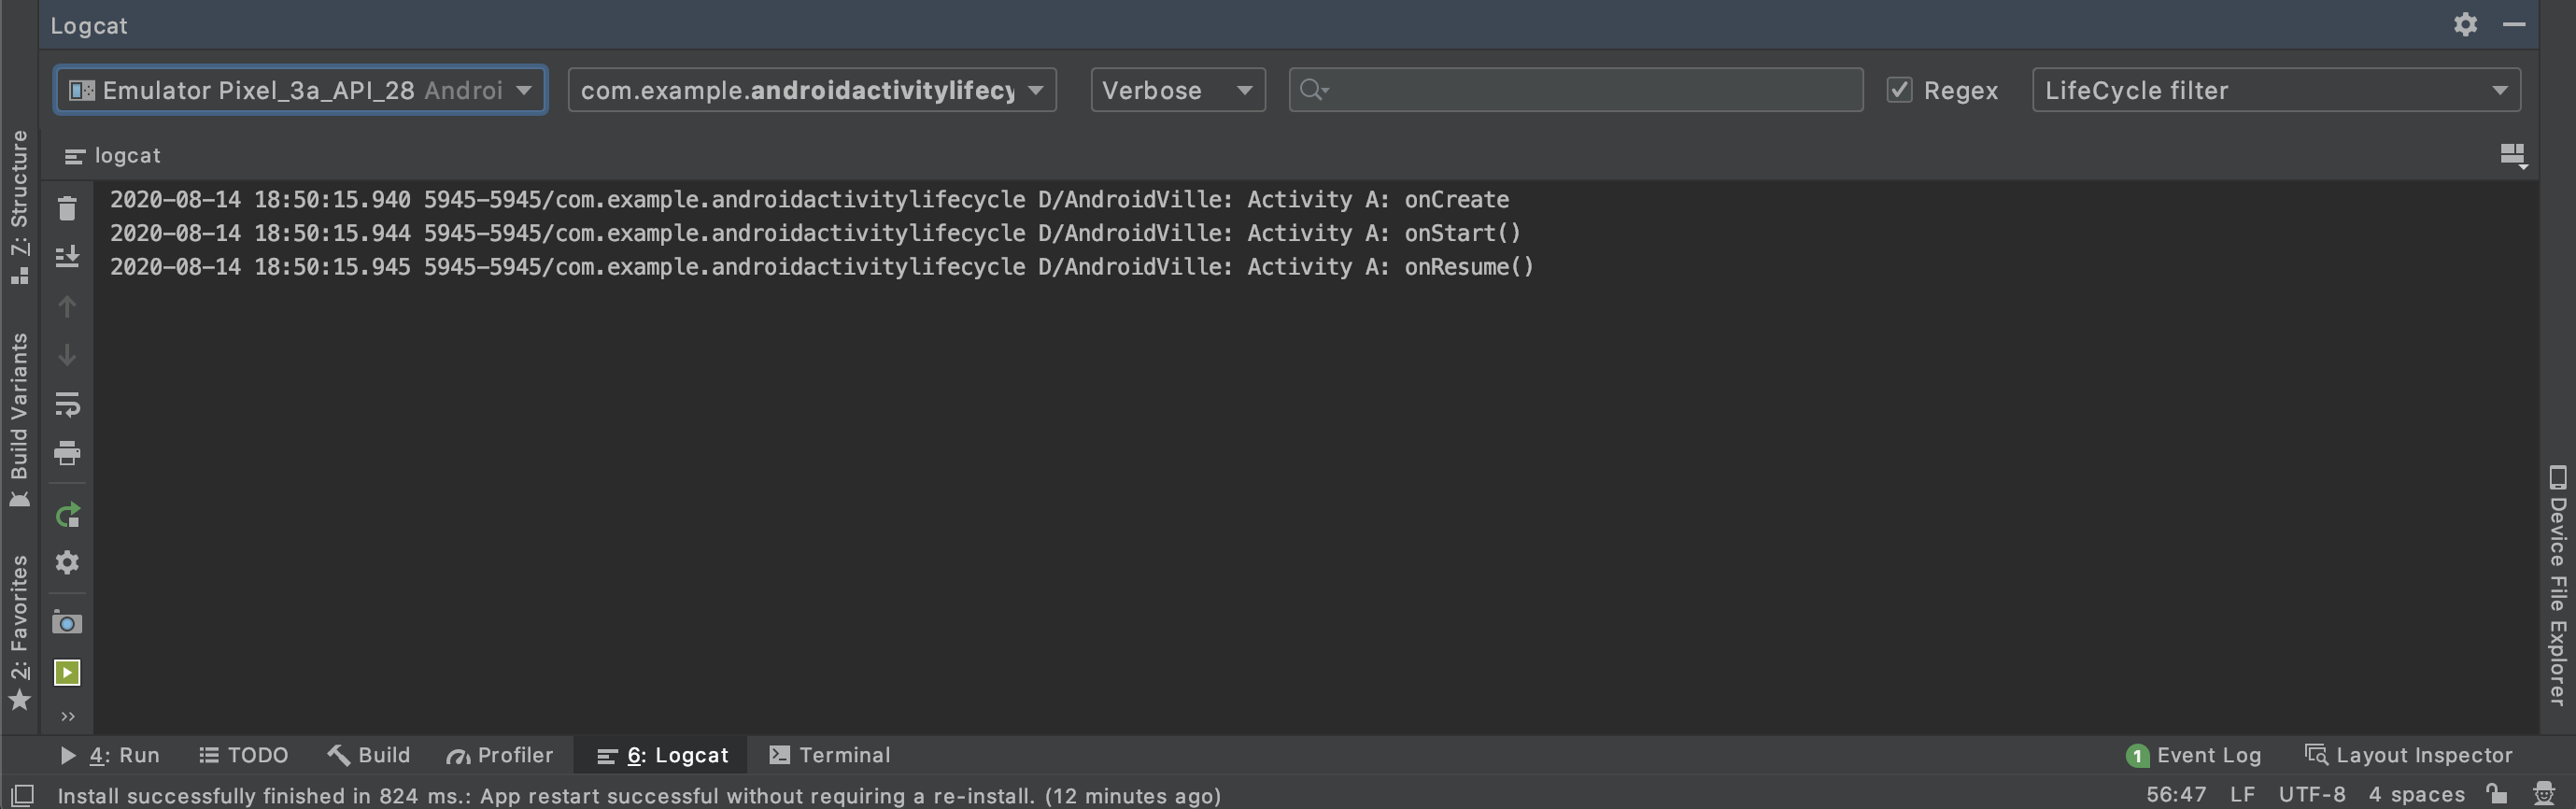
- onCreate
- onStart
- onResume
First, the ActivityA’s onCreate method is called, which sets up the layout of the activity. Then we have onStart which is the place to set up things such as broadcast receivers. And finally onResume when Activity is interactive.
Launching ActivityB over ActivityA *Important*
This is the most commonly asked question about android activity lifecycle. What are the callback methods when one activity is launched above another.
I cannot stress enough the importance of this question and also one that people can get wrong. Because it’s so simple, I used to commit this mistake of saying all methods of ActivityA and then B.
Let’s see what happens here:
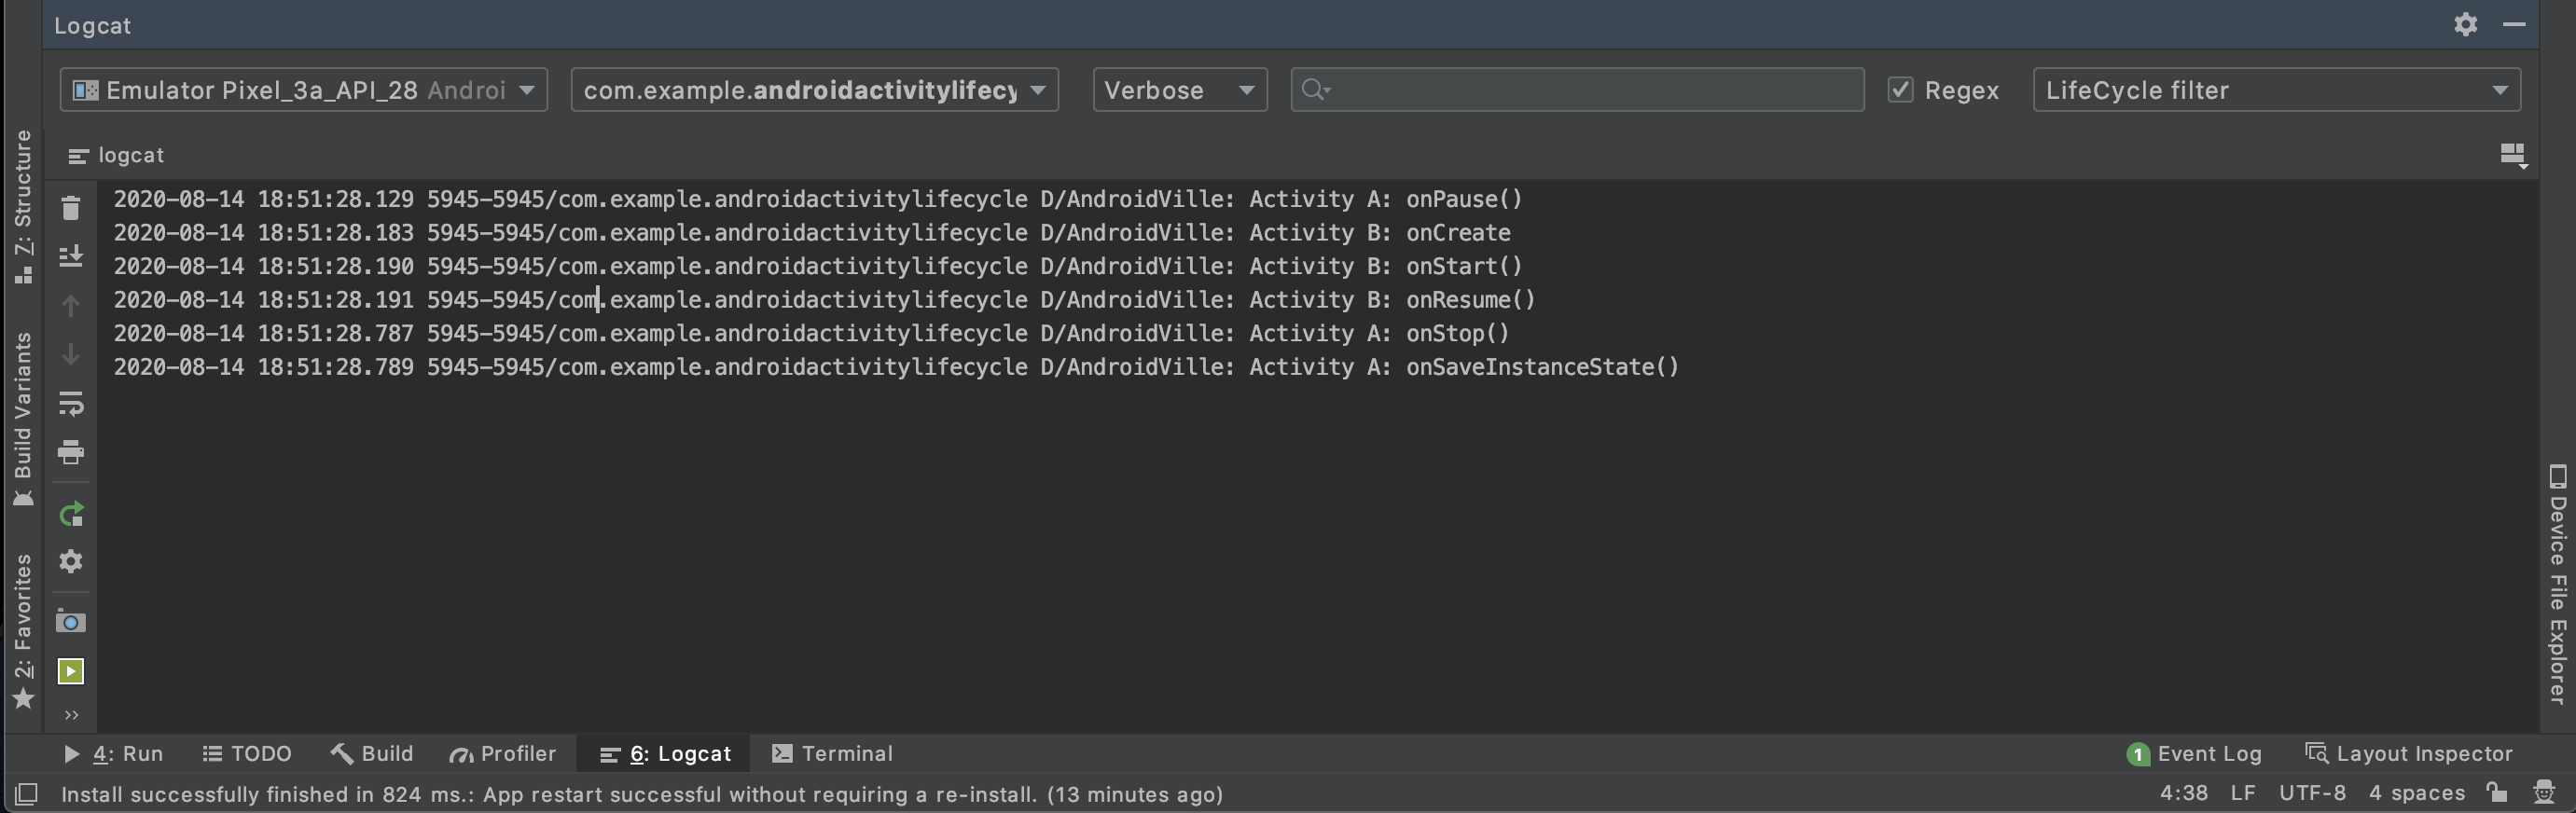
This is the activity lifecycle callback sequence:
- onPause – ActivityA
- onCreate – ActivityB
- onStart – ActivityB
- onResume – ActivityB
- onStop – ActivityA
- onSaveInstanceState – ActivityA
First, the ActivityA is paused, then lifecycle methods of ActivityB are called. But finally the ActivityA is stopped.
Important point to note here is that ActivityA is stopped (not destroyed) after ActivityB has been created and is interactive.
Pressing Back Button from ActivityB
Now when pressing back from ActivityB we land on ActivityA and this is the callback sequence:
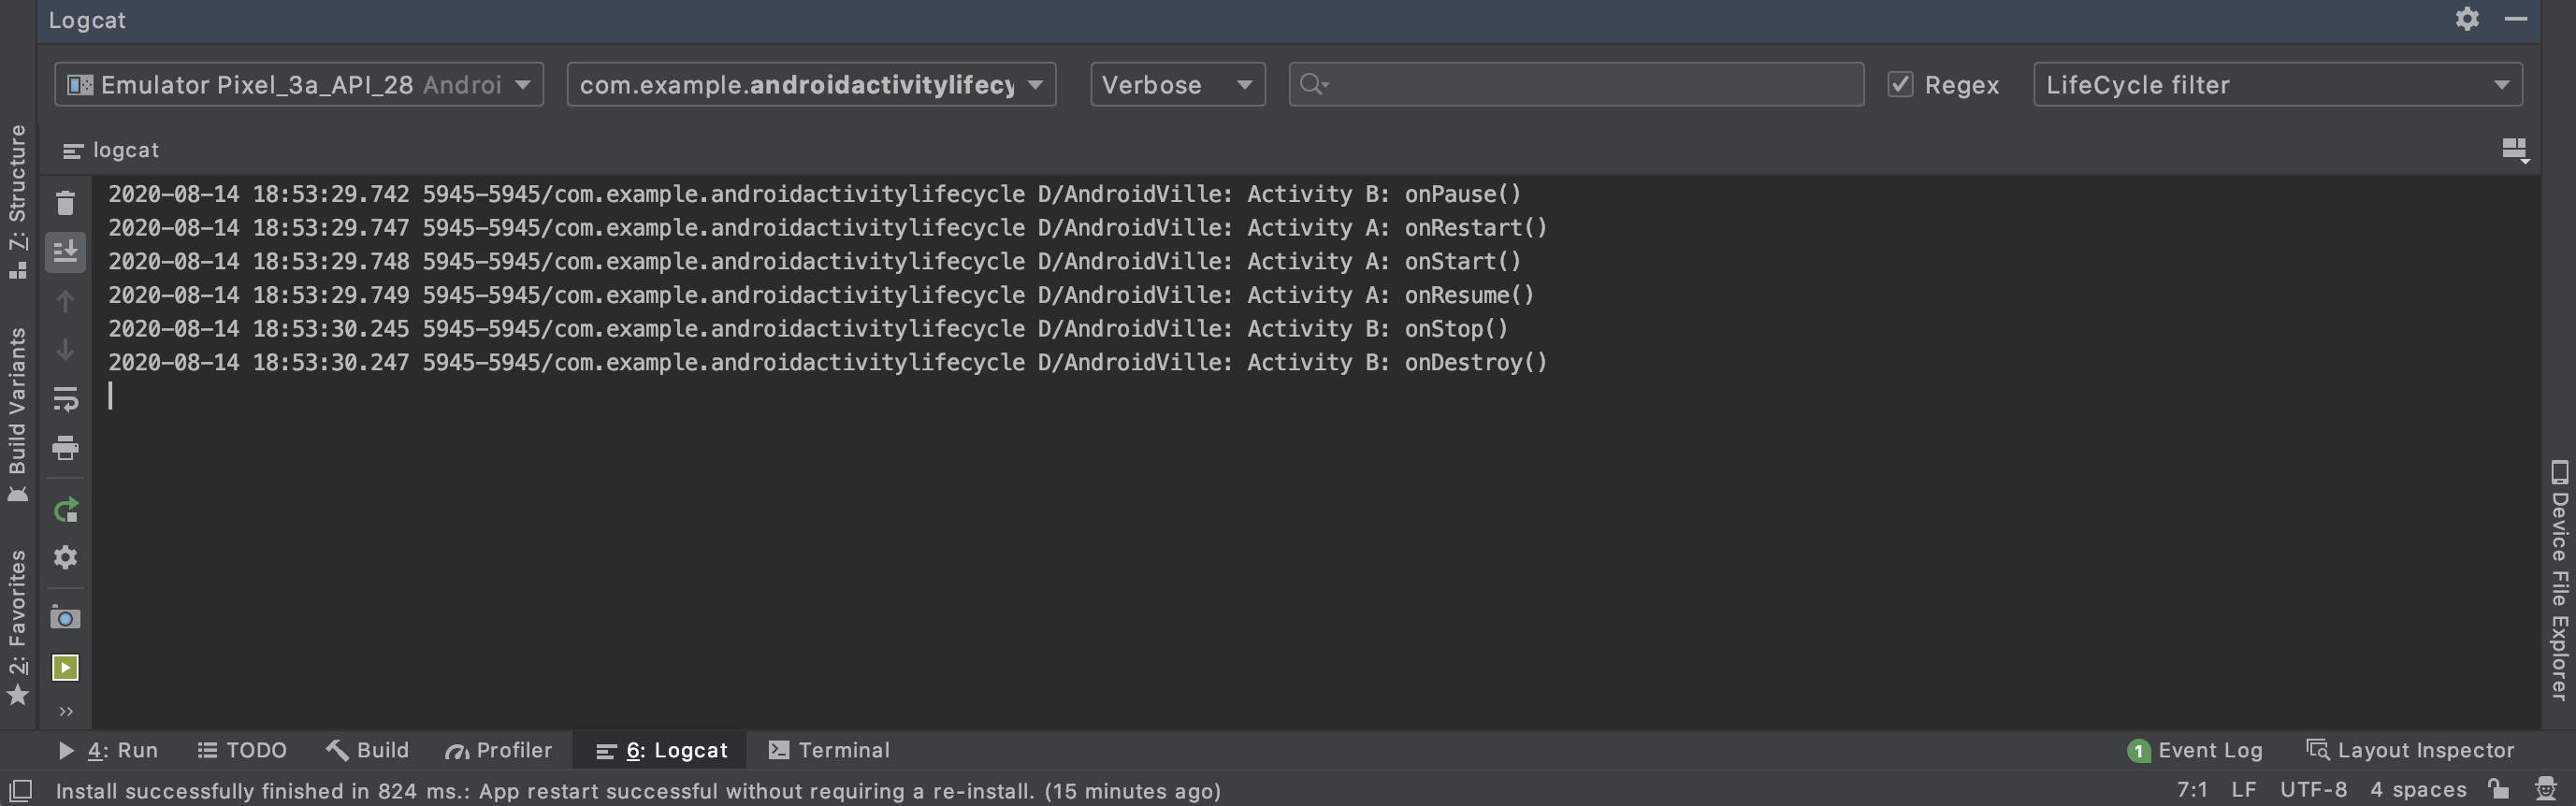
- onPause – ActivityB
- onRestart – ActivityA
- onStart – ActivityA
- onResume – ActivityA
- onStop – ActivityB
- onDestroy – ActivityB
Here we see that at the end, ActivityB is destroyed. Notice that when launching B on A, ActivityA wasn’t destroyed but stopped, and it’s process lived on.
Pressing Back Button from ActivityA
Let’s see what happens when we press the back button from ActivityA (MainActivity).
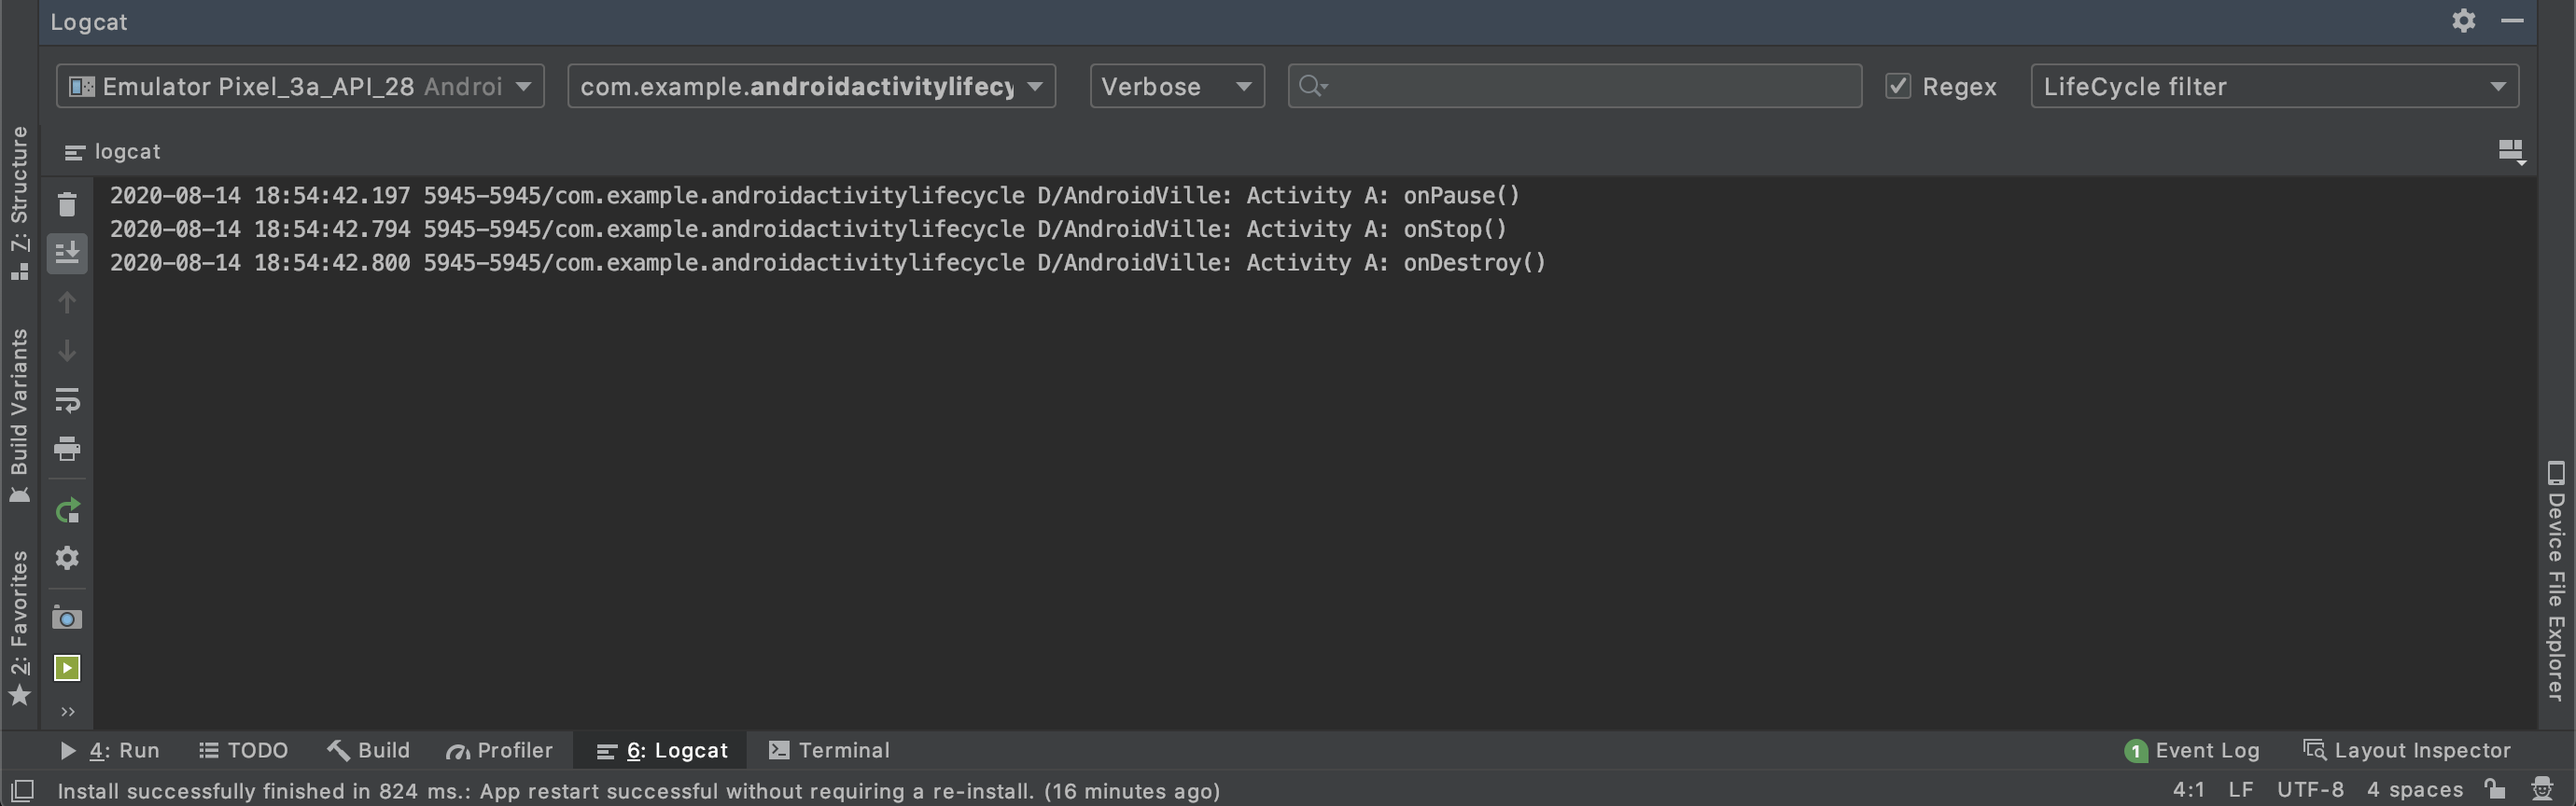
- onPause – ActivityA
- onStop – ActivityA
- onDestroy – ActivityA
Since ActivityA is the last activity, on pressing back button, the app exits and the process of ActivityA is destroyed.
Rotating the device (activity lifecycle in orientation change) *Important*
This is another important scenario in these questions. And this one is a bit unique, which makes use of onRestoreInstanceState. We’ll be rotating the device from ActivityA.
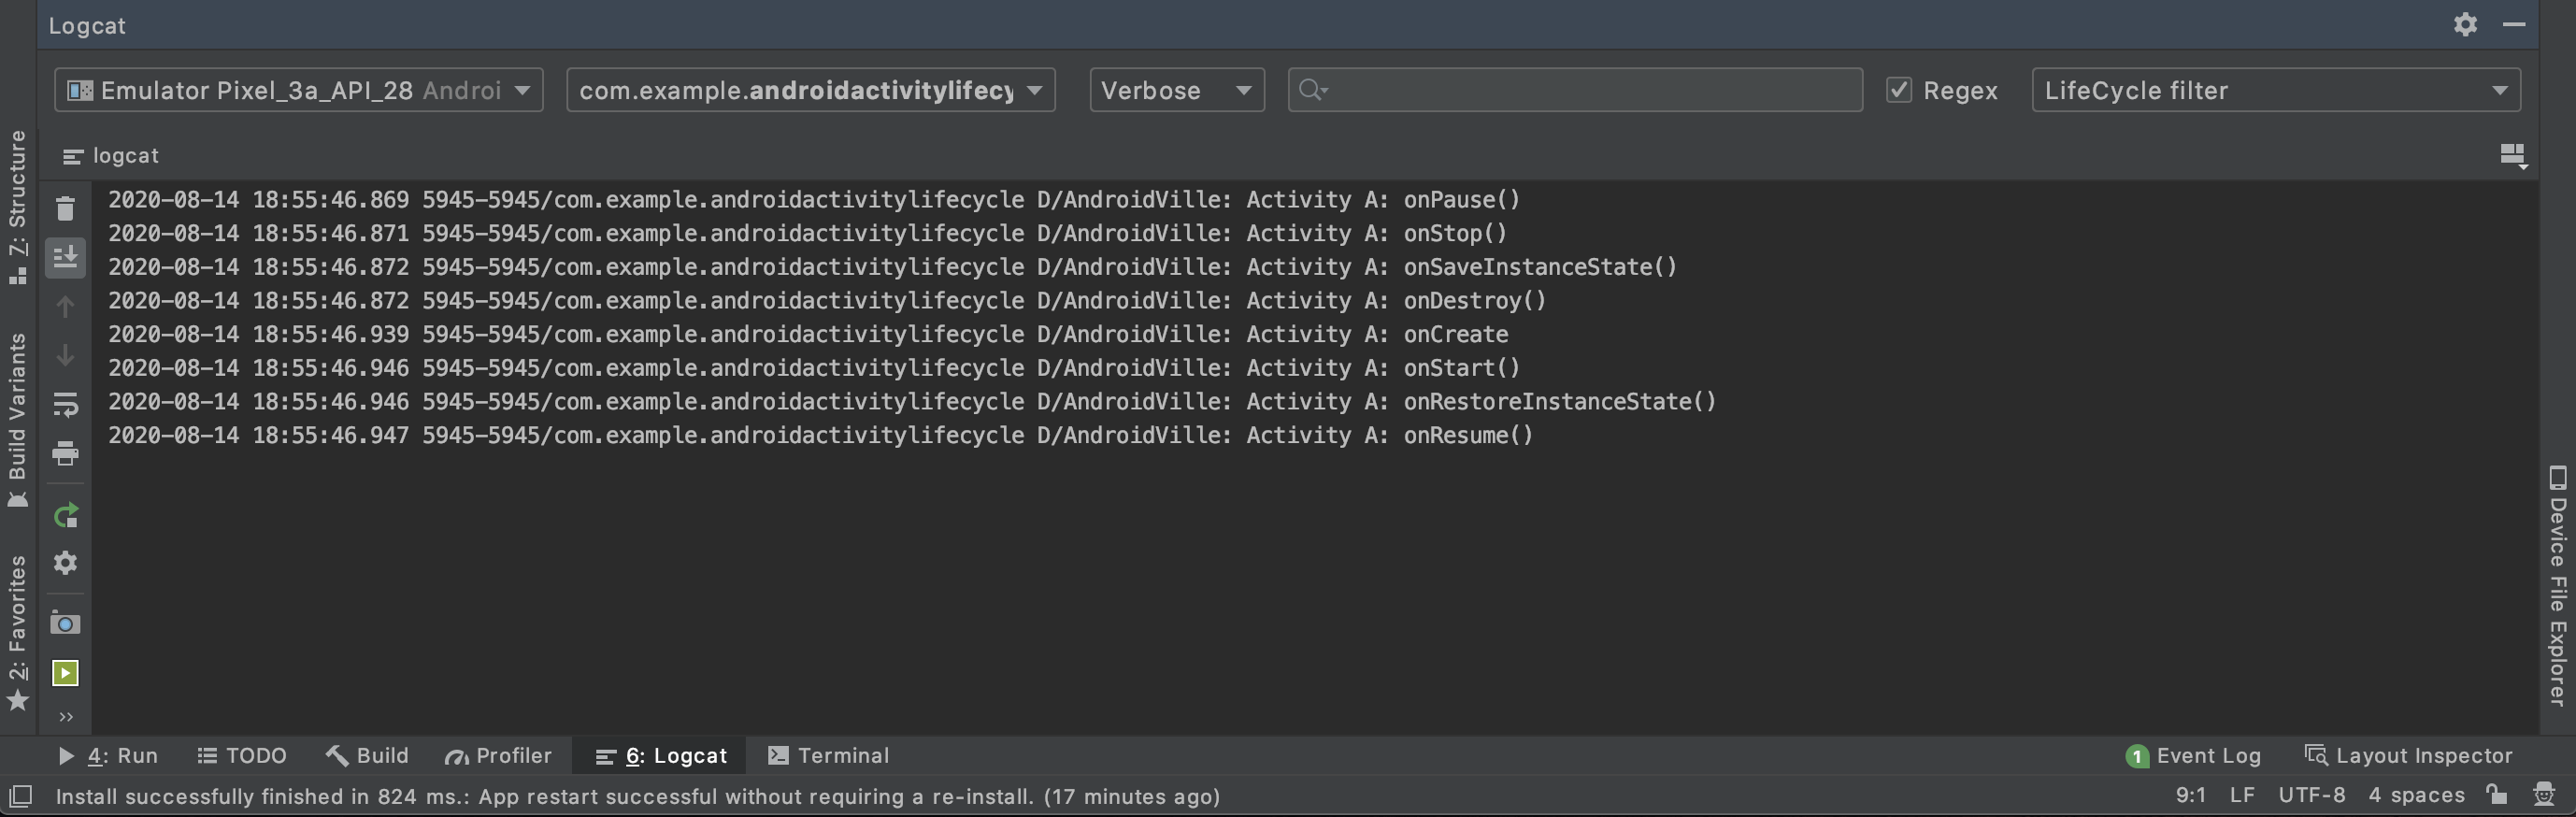
Here are the callback method call sequence:
- onPause – ActivityA
- onStop – ActivityA
- onSaveInstanceState – ActivityA
- onDestroy – ActivityA
- onCreate – ActivityA
- onStart – ActivityA
- onRestoreInstanceState – ActivityA
- onResume – ActivityA
You can get the key value pairs you store from onSaveInstanceState, inside onRestoreInstanceState.
Pressing home button from ActivityA
On pressing home button from ActivityA, you’ll get the following callback sequence:
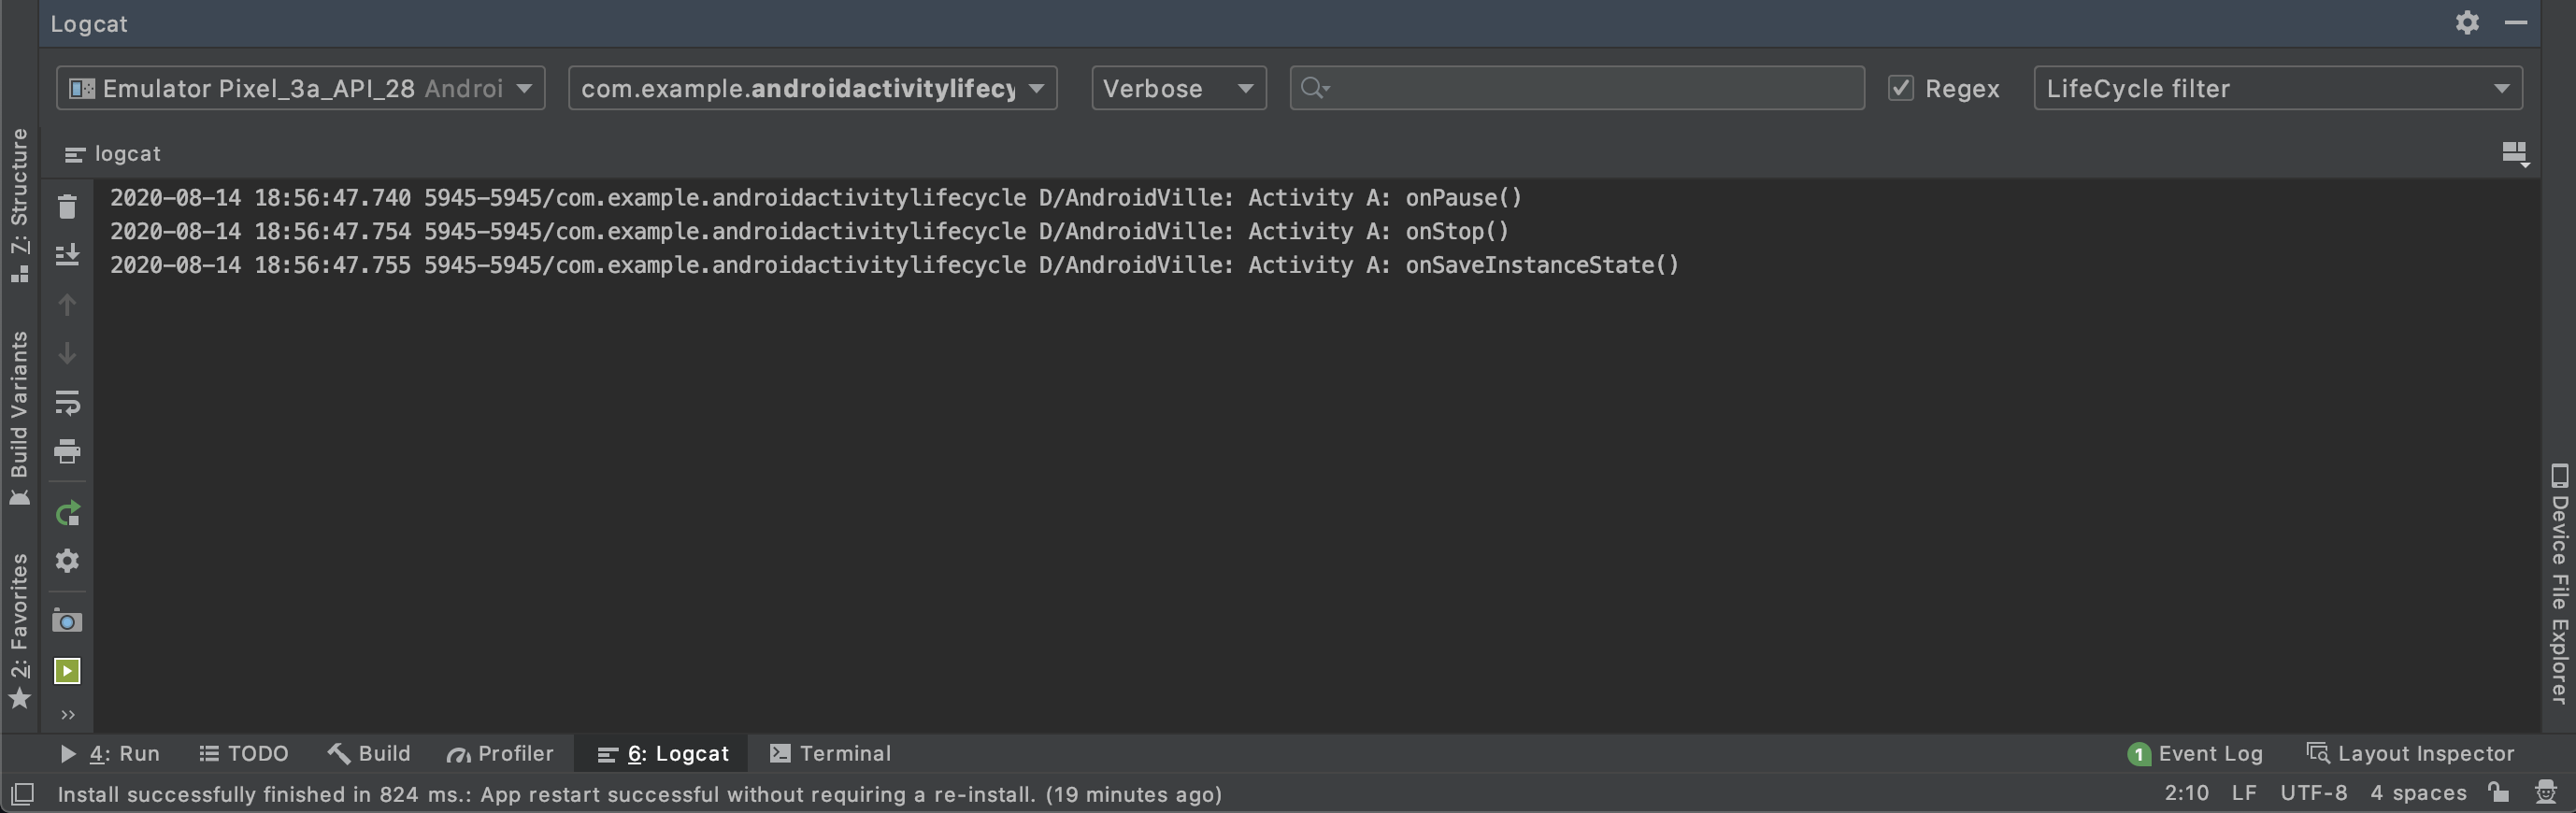
- onPause – ActivityA
- onStop – ActivityA
- onSaveInstanceState – ActivityA
And when you come back from paused state (by pressing recents button on android), following is the sequence:
- onRestart – ActivityA
- onStart – ActivityA
- onResume – ActivityA
So these were some of the scenarios in Android Activity Lifecycle. Let me know if you want me to post some other scenarios as well. In the upcoming posts, I’ll try to make one with fragments lifecycle and how they work with activity lifecycle.
Activity Lifecycle in Android – Hindi Tutorial
Want to be a better developer ?!
AndroidVille is a community of Mobile Developers where we share knowledge related to Android Development, Flutter Development, React Native Tutorials, Java, Kotlin and much more.
We have a SLACK workspace where we share updates related to new job opportunities, articles on Mobile Development/updates from the industry. We also have channels to help you with any questions, dev-help that you require. Just post a question and people would be ready to help you out 🙂
Click on this link to join the AndroidVille SLACK workspace. It’s absolutely free!
If you like any article, do give it a share on Facebook, Linkedin. You can follow me on LinkedIn, Twitter, Quora, and Medium where I answer questions related to Mobile Development, especially Android and Flutter.
If you want to stay updated with all the latest articles, subscribe to the weekly newsletter by entering your email address in the form on the top right section of this page.