
In this flutter push notification tutorial, we’ll be taking a look at how to use firebase messaging in flutter to send push notifications.
Firebase messaging is easy to set up and works seamlessly with flutter using a plugin. There’s minimal requirement to know native Android/iOS development.
So if you don’t know much about android development, you can still go ahead and implement push notifications in flutter using this tutorial.
A prerequisite to this tutorial is to have Android Studio installed on your computer which we will be using to do some native stuff.
Getting Started
Create a new Flutter Project
If you haven’t already set up flutter, have a look at this to get started. Else go ahead and create a new project:
flutter create push_notifications
I’ll be using Android Studio IDE for this tutorial, VSCode is also perfectly fine. Android Studio just makes it easy to write some native code.
Add Firebase Messaging to pubspec.yaml
Next up, add the dependency for flutter firebase messaging to pubspec.yaml file:
dependencies:
  flutter:
    sdk: flutter
  firebase_messaging: ^7.0.0
Once done, run pub get command in the terminal:
flutter pub get
This will add firebase messaging dependency to your flutter app. Next we’ll take a look at how to set up a firebase project for Android.
Setup Android Firebase Messaging
Using Firebase Assistant
Setting up firebase for android is really a breeze with the firebase assistant. Earlier it would require you to manually setup a project and download google-services.json file, but now it does it automatically for you.
Go to tools -> Firebase
This will open up your web browser, now you can select an existing firebase project or create a new one.
Then, select your project and click connect. This connects your app to your firebase console. It’ll also automatically add google-services.json file to your project.
Next, you’ll need to add firebase messaging dependencies. In the next step, the assistant will show you a button “Add FCM”. Click on that and all the dependencies will be added to your project automagically. How cool is that !
Setting up Manually
If for some reason you’re having trouble with the firebase assistant, you can still set up your project manually.
- Go to your firebase console (console.firebase.com)
- Create a new Project or Select an existing one.
- Add an Android App to the project.
- Add your package name (com.example.push_notifications). You can find your package name in /android/app/java/com/example/push_notification{or whatever you named your app}/MainActivity.java. It will be the first line.
- Click on Register App. Then download the config file.
Once you’ve downloaded the google-services.json file, go to {your flutter project}/android/app and move the file here.
Next, we’ll need to add dependencies for android firebase messaging. Open up the Android folder in your flutter project in a new Android Studio window.
Switch to Project View in Studio and go to android/android. Double click the build.gradle file. In the dependencies, add the following line:
classpath 'com.google.gms:google-services:4.3.3'
Now go to android/android/app and open up the build.gradle file and add the following to your dependencies:
implementation 'com.google.firebase:firebase-messaging:20.2.4'
At the bottom of this file, apply the plugin as well by adding the following line:
apply plugin: 'com.google.gms.google-services'
Click on sync and wait for gradle to build completely.
Adding Native Code
Now it’s time we write some Android native code. It’s pretty simple and you don’t need any knowledge about Android development to do this step.
Go ahead and check where your MainActivity.java (or MainActivity.kt) file is located and at the same location create a new Java class called Application.java
package com.example.push_notifications;


public class Application {

}
Then extend it from FlutterApplication class and implement PluginRegistrantCallback. This will show you an error asking to implement the members. Press alt (option key on mac) + enter and implement the member function. Also add the onCreate method to this file.
We’ll register the plugin in registerWith method and set the registrar in onCreate method.
package com.example.push_notifications;

import io.flutter.app.FlutterApplication;
import io.flutter.plugin.common.PluginRegistry;
import io.flutter.plugins.GeneratedPluginRegistrant;
import io.flutter.plugins.firebasemessaging.FirebaseMessagingPlugin;
import io.flutter.plugins.firebasemessaging.FlutterFirebaseMessagingService;

public class Application extends FlutterApplication implements PluginRegistry.PluginRegistrantCallback {
    @Override
    public void onCreate() {
        super.onCreate();
        FlutterFirebaseMessagingService.setPluginRegistrant(this);
    }

    @Override
    public void registerWith(PluginRegistry registry) {
        FirebaseMessagingPlugin.registerWith(registry.registrarFor("io.flutter.plugins.firebasemessaging.FirebaseMessagingPlugin"));
    }
}
Next up, we’ll edit our AndroidManifest.xml file to use this application class.
In the AndroidManifest.xml file, find the <application> tag and change the android:name to use .Application
Also, add the following code in the <activity> tag. This will help you launch the app when you click on the notification. Different callbacks are invoked when you click the notification if the app is terminated or in memory. We’ll discuss that later.
<intent-filter>
    <action android:name="FLUTTER_NOTIFICATION_CLICK" />
    <category android:name="android.intent.category.DEFAULT" />
</intent-filter>
This is how your AndroidManifest.xml would look like finally:
<manifest xmlns:android="http://schemas.android.com/apk/res/android"
    package="com.example.push_notifications">

    <application
        android:name=".Application"
        android:label="push_notifications"
        android:icon="@mipmap/ic_launcher">
        <activity
            android:name=".MainActivity"
            android:launchMode="singleTop"
            android:theme="@style/LaunchTheme"
            android:configChanges="orientation|keyboardHidden|keyboard|screenSize|smallestScreenSize|locale|layoutDirection|fontScale|screenLayout|density|uiMode"
            android:hardwareAccelerated="true"
            android:windowSoftInputMode="adjustResize">
            <intent-filter>
                <action android:name="FLUTTER_NOTIFICATION_CLICK" />
                <category android:name="android.intent.category.DEFAULT" />
            </intent-filter>

            <meta-data
              android:name="io.flutter.embedding.android.NormalTheme"
              android:resource="@style/NormalTheme"
              />

            <meta-data
              android:name="io.flutter.embedding.android.SplashScreenDrawable"
              android:resource="@drawable/launch_background"
              />
            <intent-filter>
                <action android:name="android.intent.action.MAIN"/>
                <category android:name="android.intent.category.LAUNCHER"/>
            </intent-filter>
        </activity>

        <meta-data
            android:name="flutterEmbedding"
            android:value="2" />
    </application>
</manifest>
We’ve finished setting up our firebase messaging for flutter. Finally, we can go ahead and write some flutter code to see what’s required to implement push notification in flutter.
Sending Flutter Push Notification using Firebase
Understanding different types of Notifications
There are two ways of sending notifications in flutter. Segment messages and Topic messages. Let me explain these in a few lines.
Segment messages are those which are configured on the basis of some analytics data. For example, you may want to send notifications to users who added items to the cart and left. Or to users who’ve not made a purchase for quite a long time and you want to send them a PN.
These are some examples of segments. Segments are created on the basis of analytics from your app. So if you’ve created segments, you’ll be able to send segment notifications.
Topic messages are things where you send a notification to users who’ve subscribed to a particular “topic”. For example, in a news application if I subscribe to a topic called SPORTS, then I’d want to receive notifications related to sports.
These are basically segments created not by analytics but voluntarily by users/developers based on their business logic. Users should also have the ability to unsubscribe from any topic.
Sending Segment Notifications through Firebase
We’ll be adding some basic code to the main.dart file and send segment notifications to our app.
Go ahead and add the following code to your main.dart file. It’s a basic app with an AppBar and an empty container. Once added, run your app.
import 'package:flutter/material.dart';

void main() {
  runApp(
    MaterialApp(
      home: PushMessagingExample(),
    ),
  );
}

class PushMessagingExample extends StatefulWidget {
  @override
  State<StatefulWidget> createState() => PushNotificationScreen();
}

class PushNotificationScreen extends State<PushMessagingExample> {

  @override
  Widget build(BuildContext context) {
    return Scaffold(
      appBar: AppBar(
        title: Text("AndroidVille Push Notification"),
      ),
      body: buildBody(),
    );
  }

  Widget buildBody() {
    return Container();
  }

}
And we’re ready to send the segment notification now. Yes, this is really it!. You just need to add firebase messaging in flutter properly and create a simple app. And you’re ready to send notifications to your users.
- Go to your firebase console.
- Select your project.
- On the left hand side, choose Cloud Messaging under Grow.
Click on New Notification. Enter the title and message and click on Next.
Now select your user segment. In our case, it will be all the user’s who’ve installed our app.
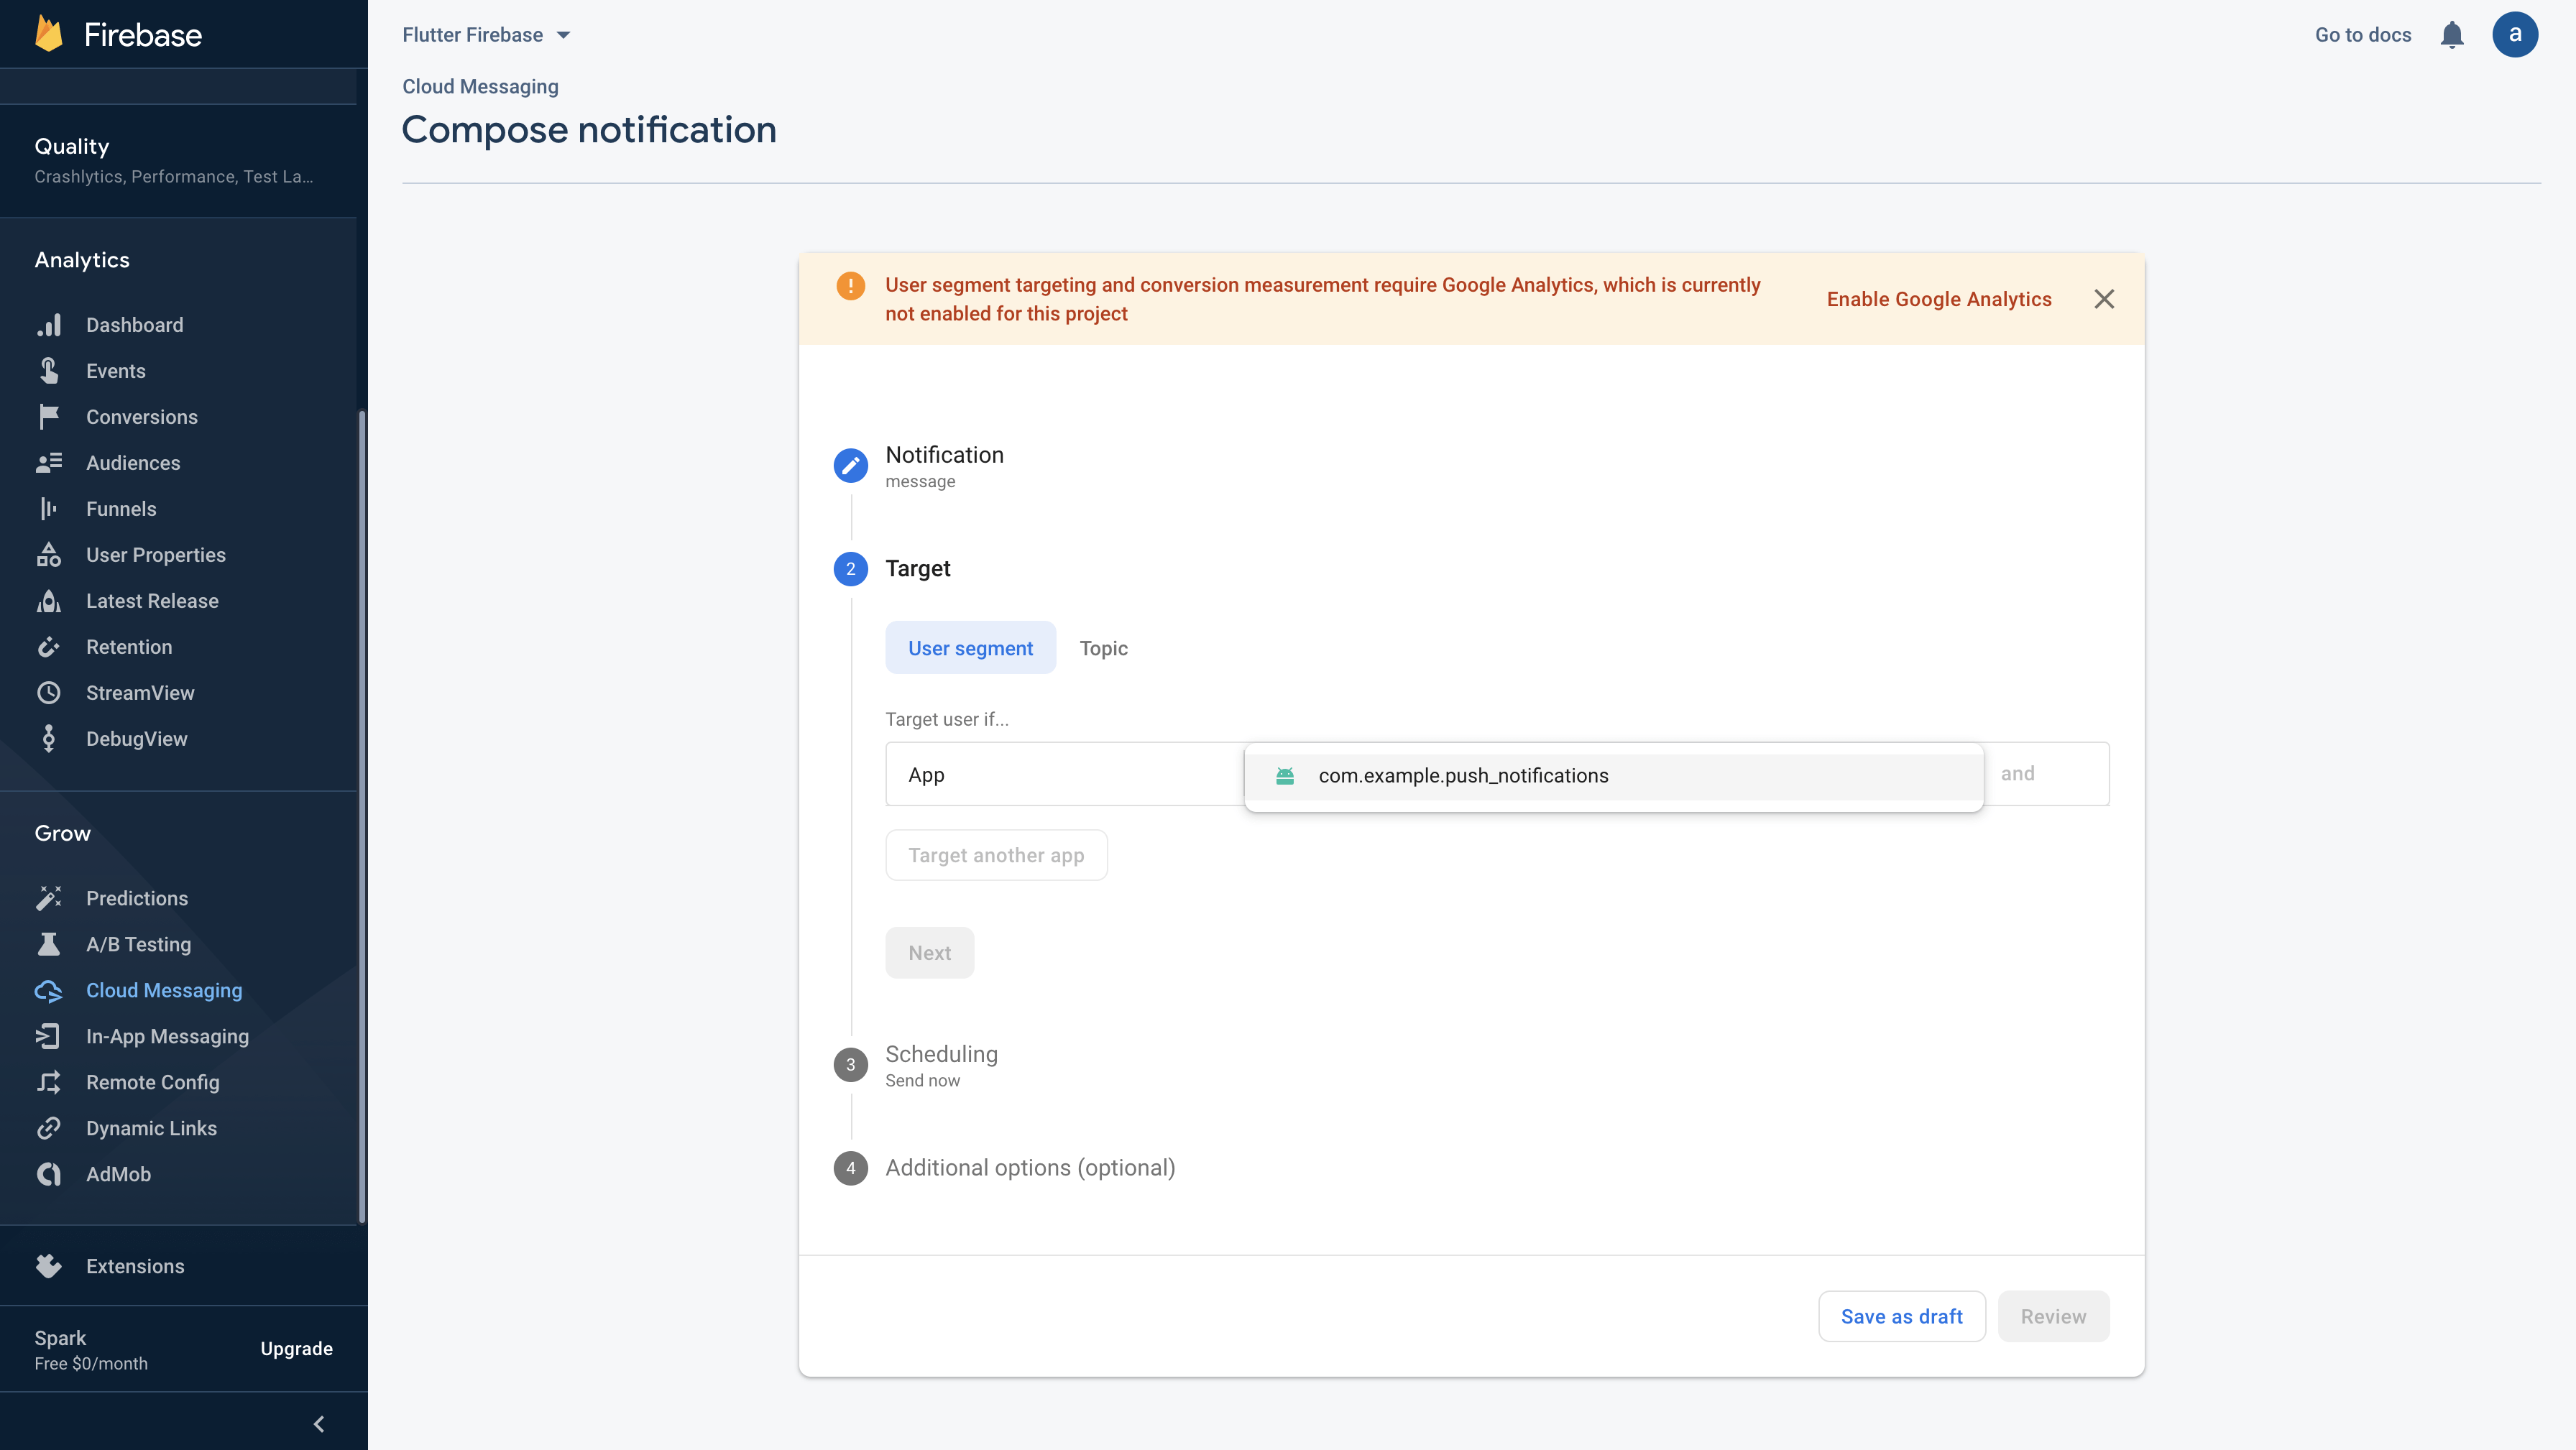
Finally, click on Review and then Publish. Check your android device/emulator and you’ll see the notification in the notification try.
Sending Topic Notifications through Firebase
In order to use flutter firebase messaging to send topic notifications, we’ve to get the user to subscribe to a topic. For our case, we’ll enter the topic manually via a TextField.
Add the following code to your main.dart file. It’s just a basic app with a text field, and two buttons to subscribe and unsubscribe from the topic. This will be all for your main.dart file:
import 'dart:io';

import 'package:firebase_messaging/firebase_messaging.dart';
import 'package:flutter/material.dart';

void main() {
  runApp(
    MaterialApp(
      home: PushMessagingExample(),
    ),
  );
}

class PushMessagingExample extends StatefulWidget {
  @override
  State<StatefulWidget> createState() => PushNotificationScreen();
}

class PushNotificationScreen extends State<PushMessagingExample> {
  final FirebaseMessaging firebaseMessaging = FirebaseMessaging();
  final TextEditingController controller = TextEditingController();

  @override
  void initState() {
    super.initState();
    firebaseMessaging.configure(
      onMessage: (Map<String, dynamic> message) async {
        print("onMessage: $message");
      },
      onLaunch: (Map<String, dynamic> message) async {
        print("onLaunch: $message");
      },
      onResume: (Map<String, dynamic> message) async {
        print("onResume: $message");
      },
    );
    if (Platform.isIOS)
      firebaseMessaging.requestNotificationPermissions(
          const IosNotificationSettings(
              sound: true, badge: true, alert: true, provisional: true));
  }

  @override
  Widget build(BuildContext context) {
    return Scaffold(
      appBar: AppBar(
        title: Text("AndroidVille Push Notification"),
      ),
      body: buildBody(),
    );
  }

  Widget buildBody() {
    return Container(
      height: double.infinity,
      child: Row(
        crossAxisAlignment: CrossAxisAlignment.center,
        mainAxisAlignment: MainAxisAlignment.spaceAround,
        children: [
          Container(
            width: 100,
            child: TextField(
              controller: controller,
            ),
          ),
          RaisedButton(
            color: Colors.white54,
            child: const Text(
              "Subscribe",
              style: TextStyle(color: Colors.lightGreen),
            ),
            onPressed: () {
              firebaseMessaging.subscribeToTopic(controller.text);
              clearText();
            },
          ),
          RaisedButton(
            color: Colors.white54,
            child: const Text(
              "Unsubscribe",
              style: TextStyle(color: Colors.redAccent),
            ),
            onPressed: () {
              firebaseMessaging.unsubscribeFromTopic(controller.text);
              clearText();
            },
          ),
        ],
      ),
    );
  }

  void clearText() {
    setState(() {
      controller.text = "";
    });
  }
}
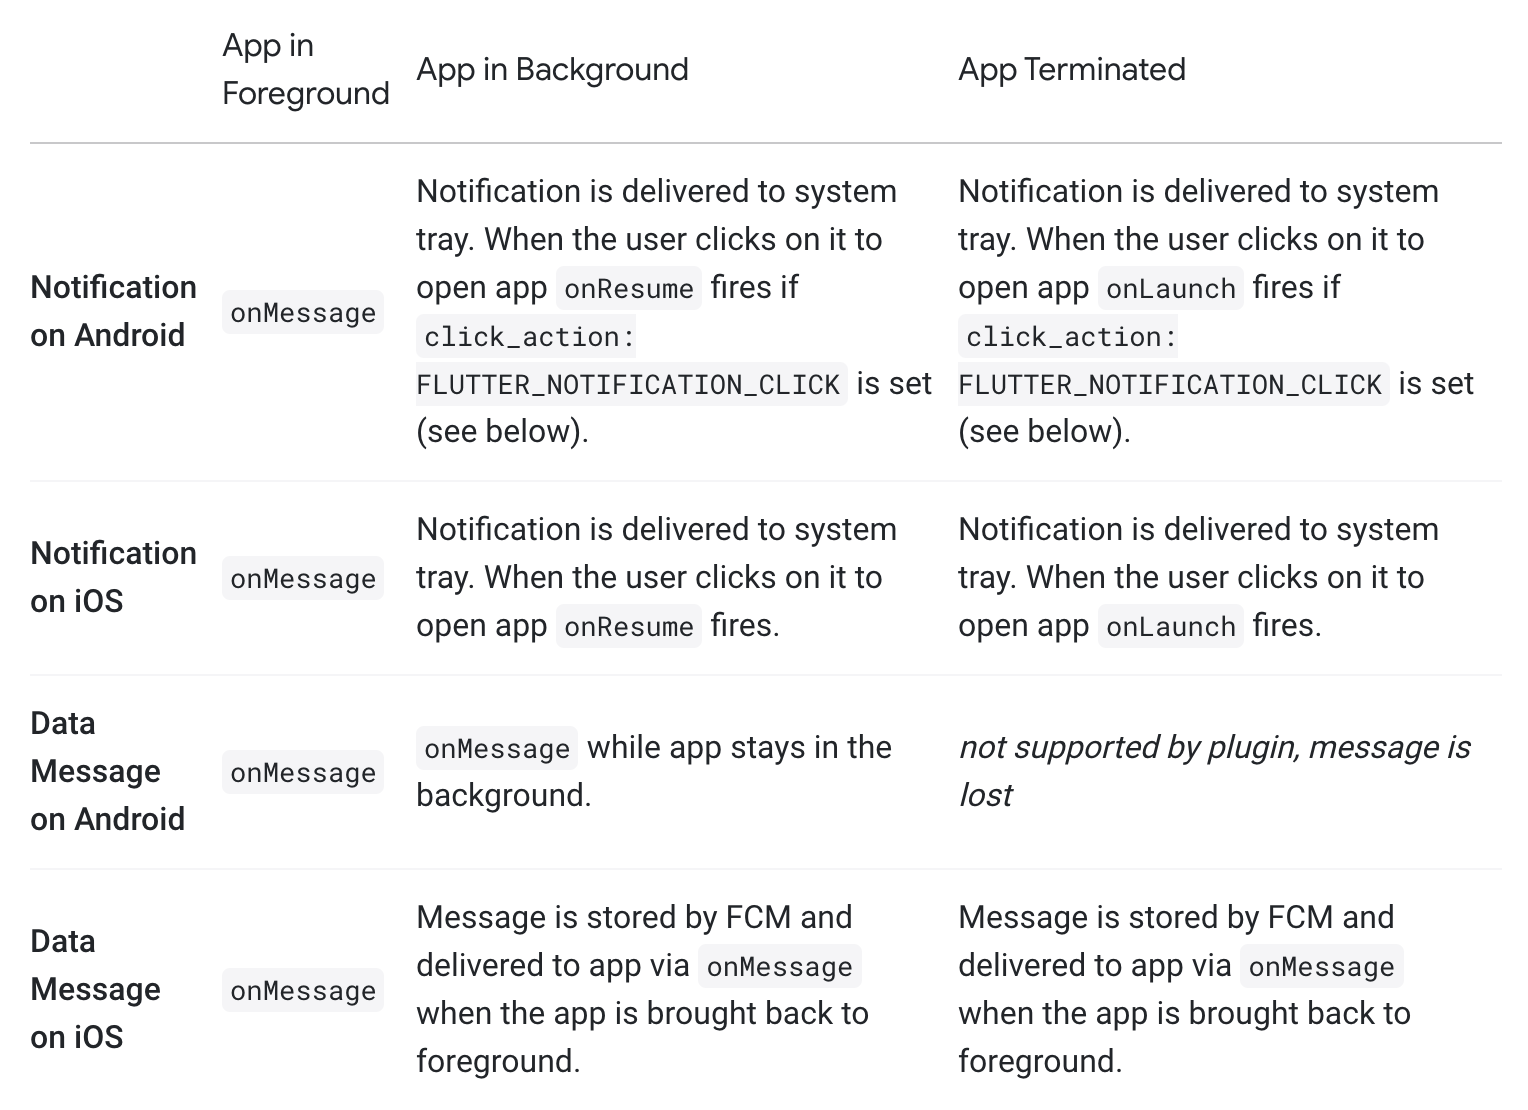
We’ve set up some callbacks to listen to when our notification is clicked/received. There are three important callbacks you should know about:
- onMessage: This is called when the app is running in the foreground and a notification is received.
- onResume: This is called when the user clicks the notification and the app is running in the background (pressed home button).
- onLaunch: This is called when the user clicks the notification and the app is terminated.
Note: An important thing to note here is that onResume and onLaunch will be called only when you send “click_action”: “FLUTTER_NOTIFICATION_CLICK” as a key value pair in notification. Else they won’t be called at all.
The table below sums it up:
And to subscribe/unsubscribe from the topic we’ll use methods on the FirebaseMessaging instance.
I’ll not show how to use TextEditingController to get values from the text field as we’ll focus this post on flutter push notification. You can copy the code from below and you’ll probably understand it as you go along.
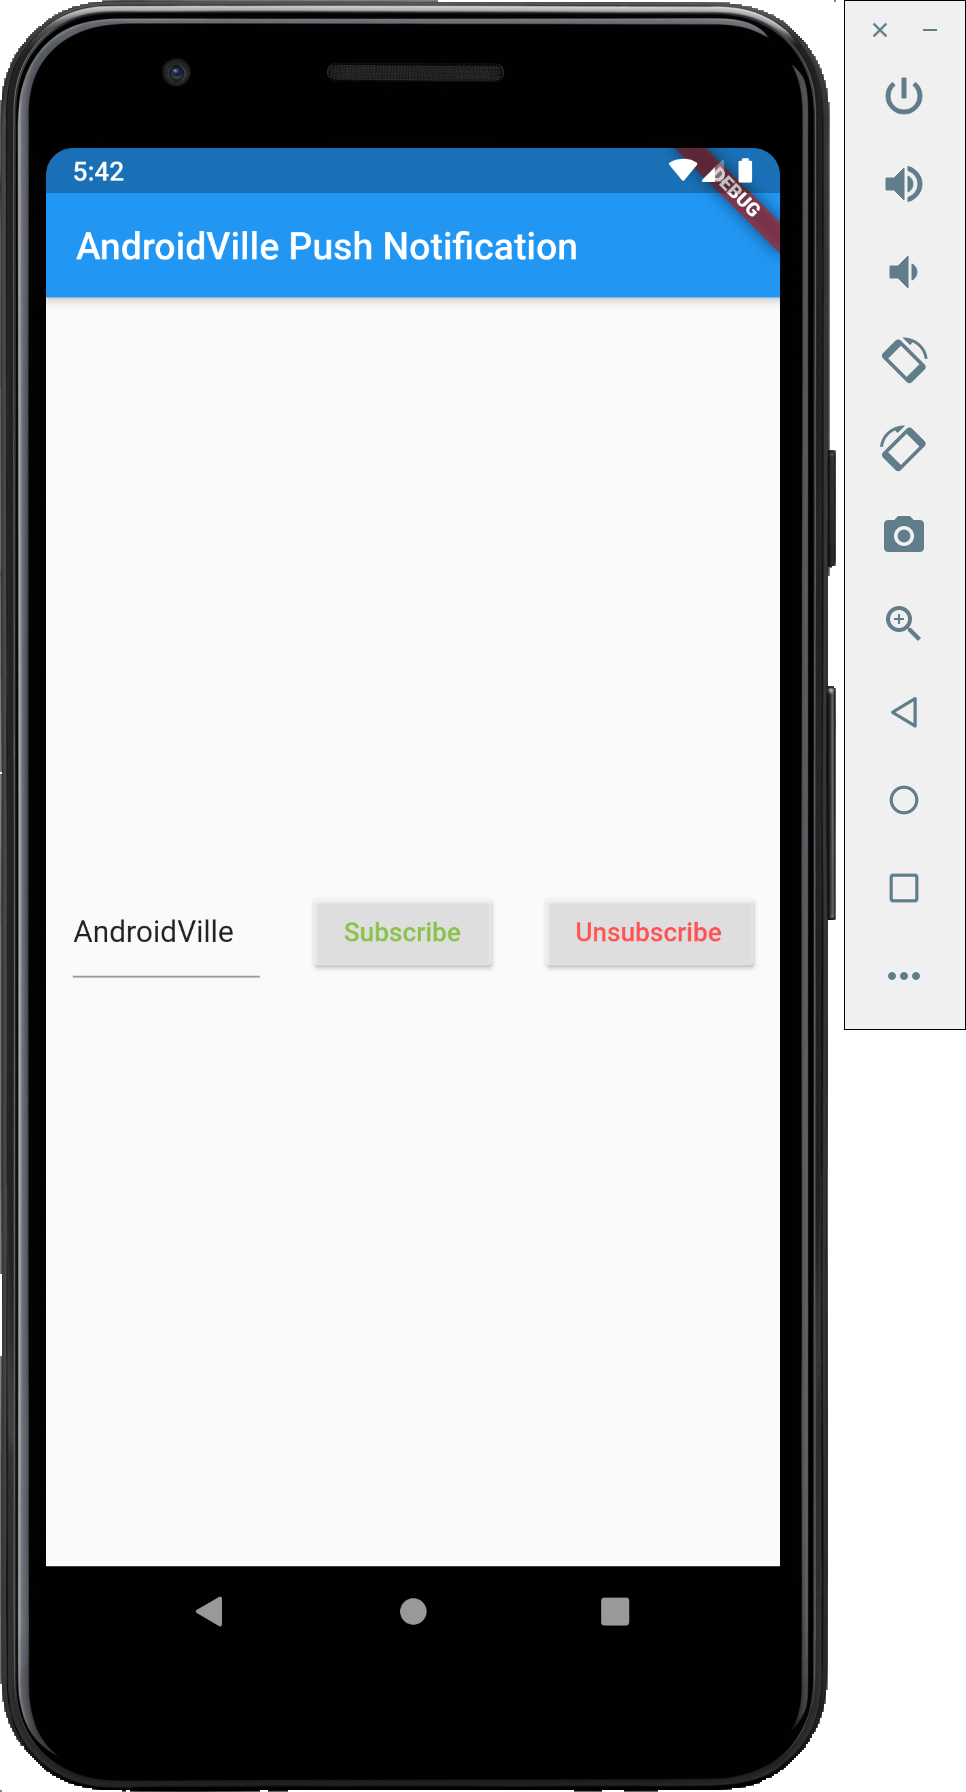
Now run the app and you’ll see the following screen. Enter your topic and click subscribe. This will qualify you for the topic notifications. Click unsubscribe when you want to stop receiving notifications of that topic.
Now to send topic notifications using firebase messaging, login to your firebase console. Go to your Project -> Cloud Messaging. Create a New Notification and in the target section, select Topic and enter the topic you’ve subscribed to, in the app.
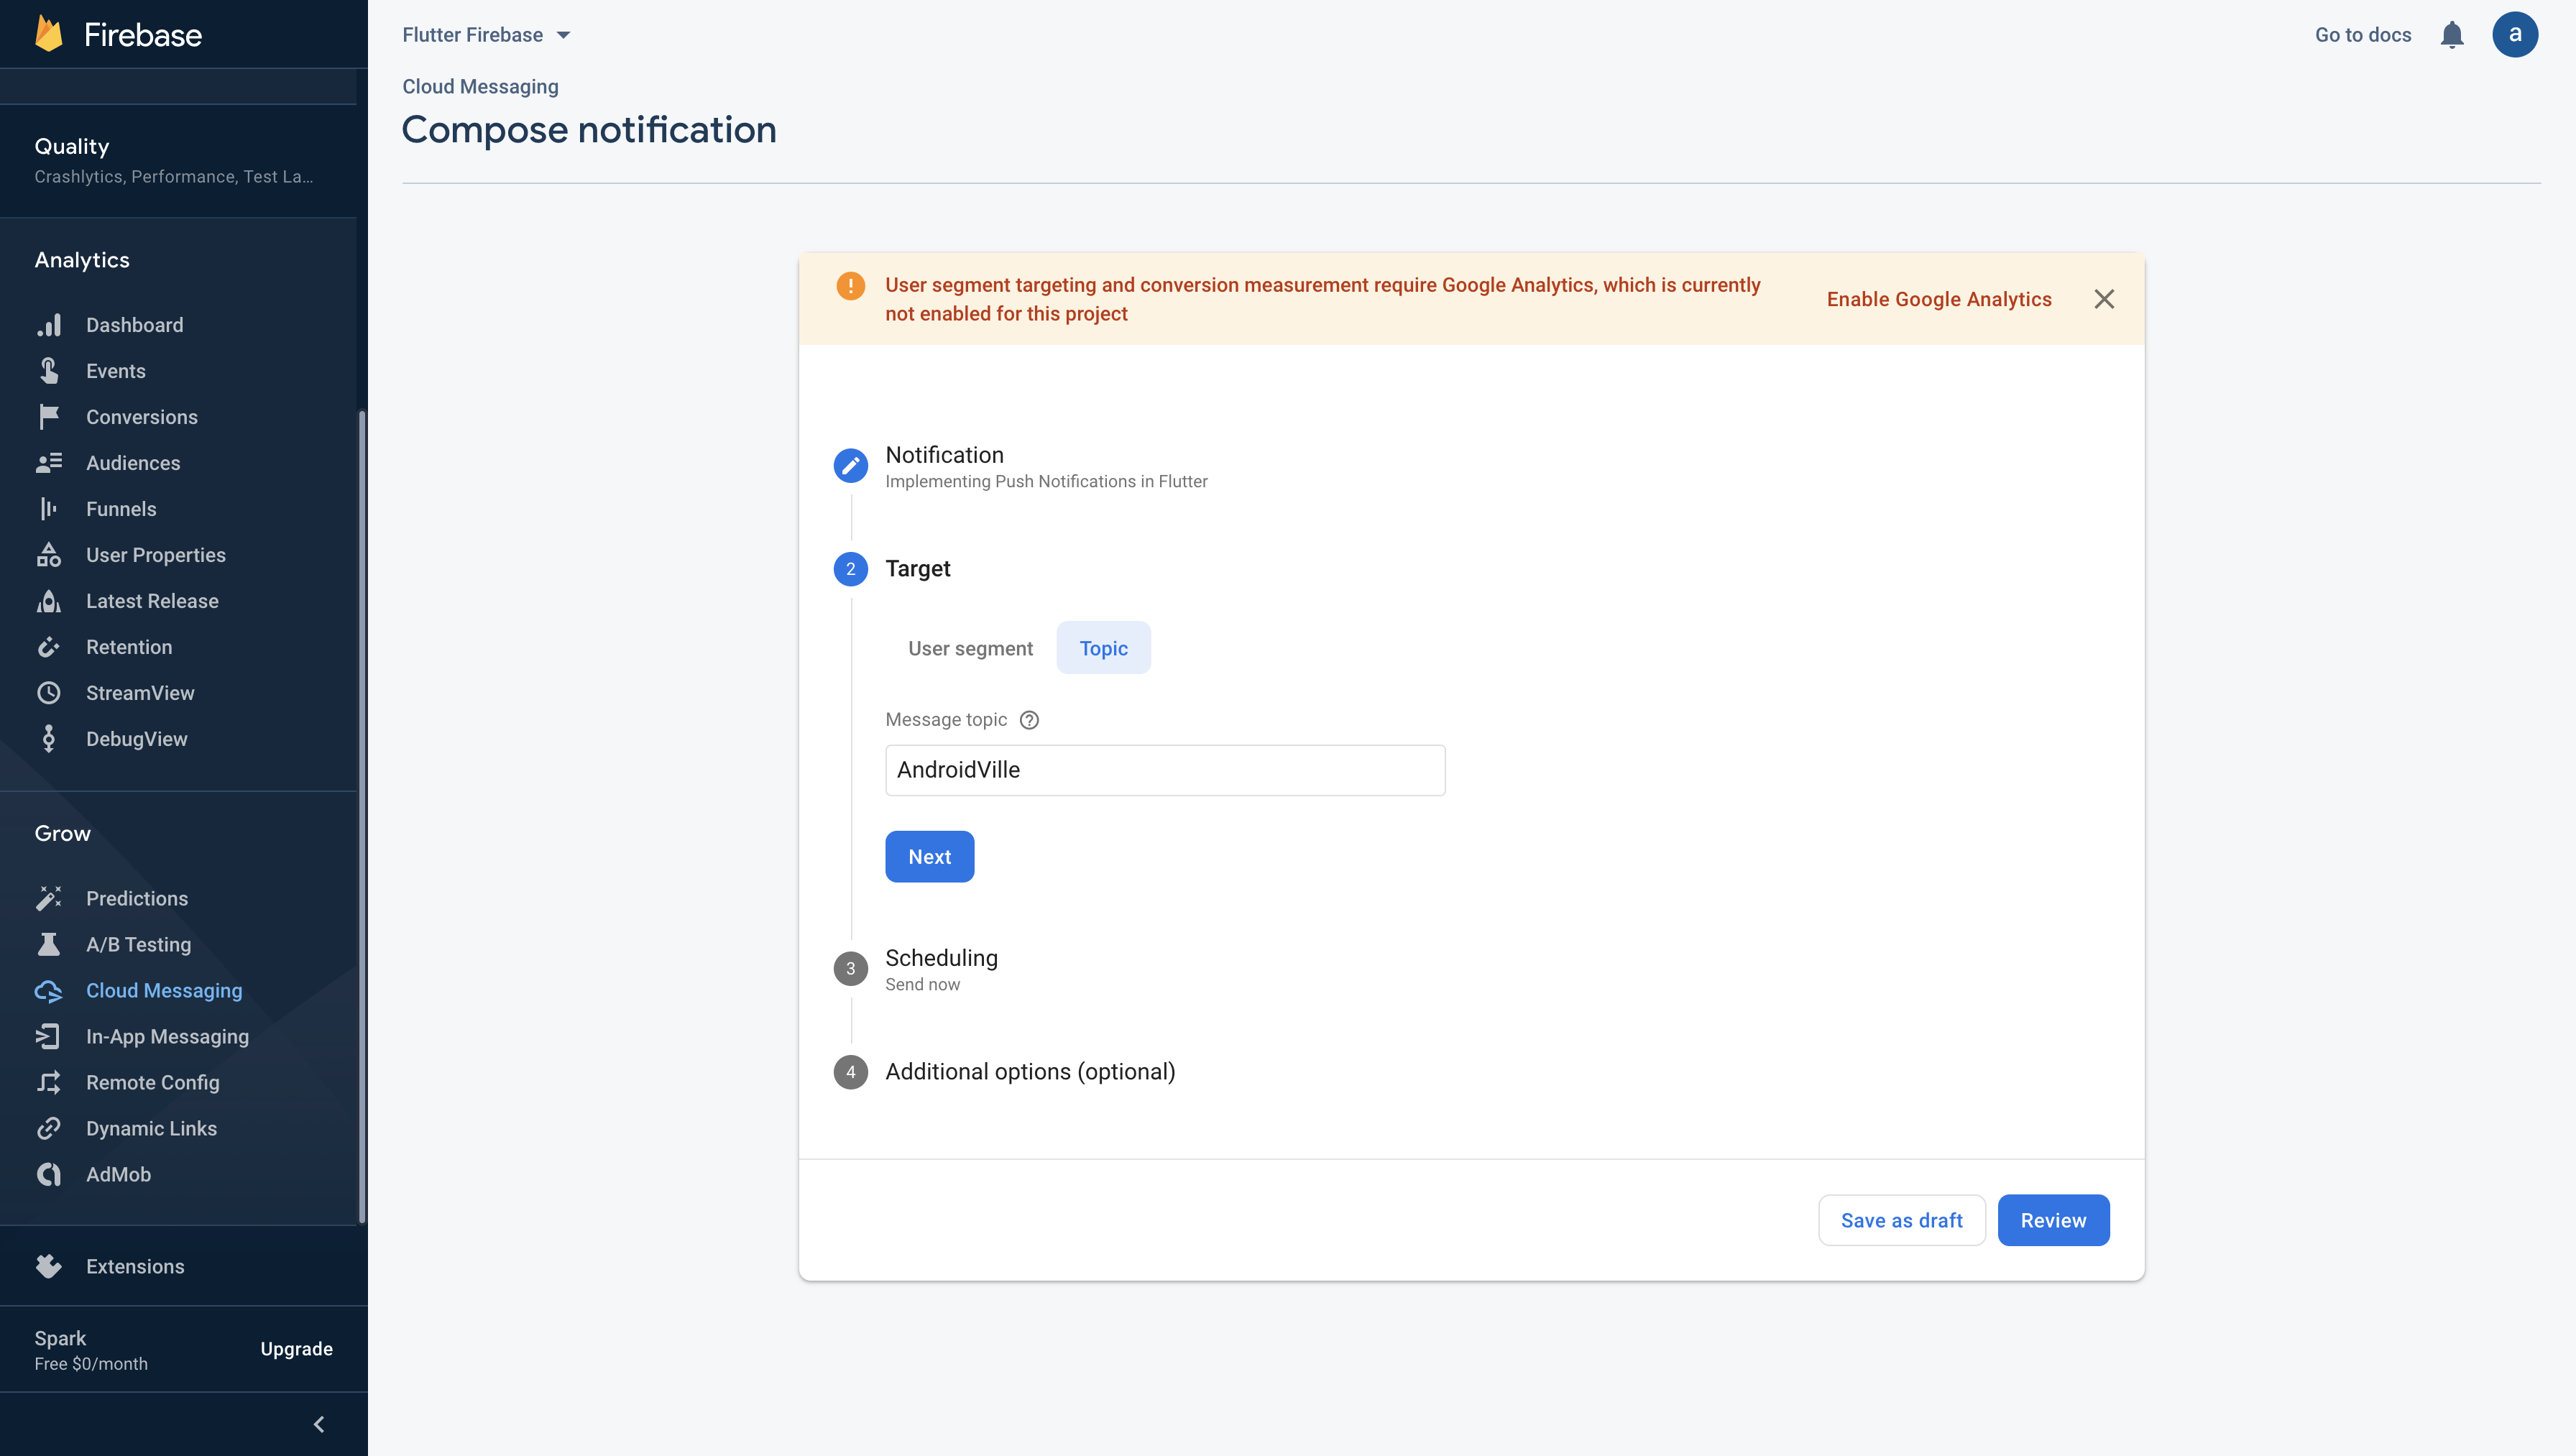
Select Review and then click Publish.
Flutter Push Notification in iOS
You’ve probably noticed that I’ve talked very less about iOS stuff here. This is because notifications in iOS work a bit differently.
First of all you’ll need to have an Apple Developer account which will cost you $99. Then you have to create certificates from the developer account required by apple to send push notifications in iOS.
There’s another caveat where you’ll have to request notification permission from the user for sending notifications. I’ve added that code in initState() of main.dart
There are 4-5 steps involved in setting up the APNs and start sending push notifications. A little native code that you can plug and play, but you won’t have to write any separate code in Flutter.
The main.dart file provided here, works for iOS as well as Android. Once you have the developer account ready, you can refer to these 5 steps to setup push notifications in iOS using firebase messaging.
This completes our tutorial on implementing push notifications in flutter using flutter firebase messaging. Do leave a comment down below if you have any questions.
Want to be a better developer ?!
AndroidVille is a community of Mobile Developers where we share knowledge related to Android Development, Flutter Development, React Native Tutorials, Java, Kotlin and much more.
We have a SLACK workspace where we share updates related to new job opportunities, articles on Mobile Development/updates from the industry. We also have channels to help you with any questions, dev-help that you require. Just post a question and people would be ready to help you out 🙂
Click on this link to join the AndroidVille SLACK workspace. It’s absolutely free!
If you like any article, do give it a share on Facebook, Linkedin. You can follow me on LinkedIn, Twitter, Quora, and Medium where I answer questions related to Mobile Development, especially Android and Flutter.
If you want to stay updated with all the latest articles, subscribe to the weekly newsletter by entering your email address in the form on the top right section of this page.