
In this flutter tutorial, we’ll take a look at how to use custom fonts in flutter. Font is essential in establishing your brand identity and default fonts do not always serve the purpose.
Flutter has a very elegant way of using custom fonts and it’s very easy to set it up. As for the font files, I’ll be downloading them from fonts.google.com
The three fonts I’ll be using are:
- RobotoCondensed
- Pangolin
- Sriracha
Adding the fonts to your flutter app
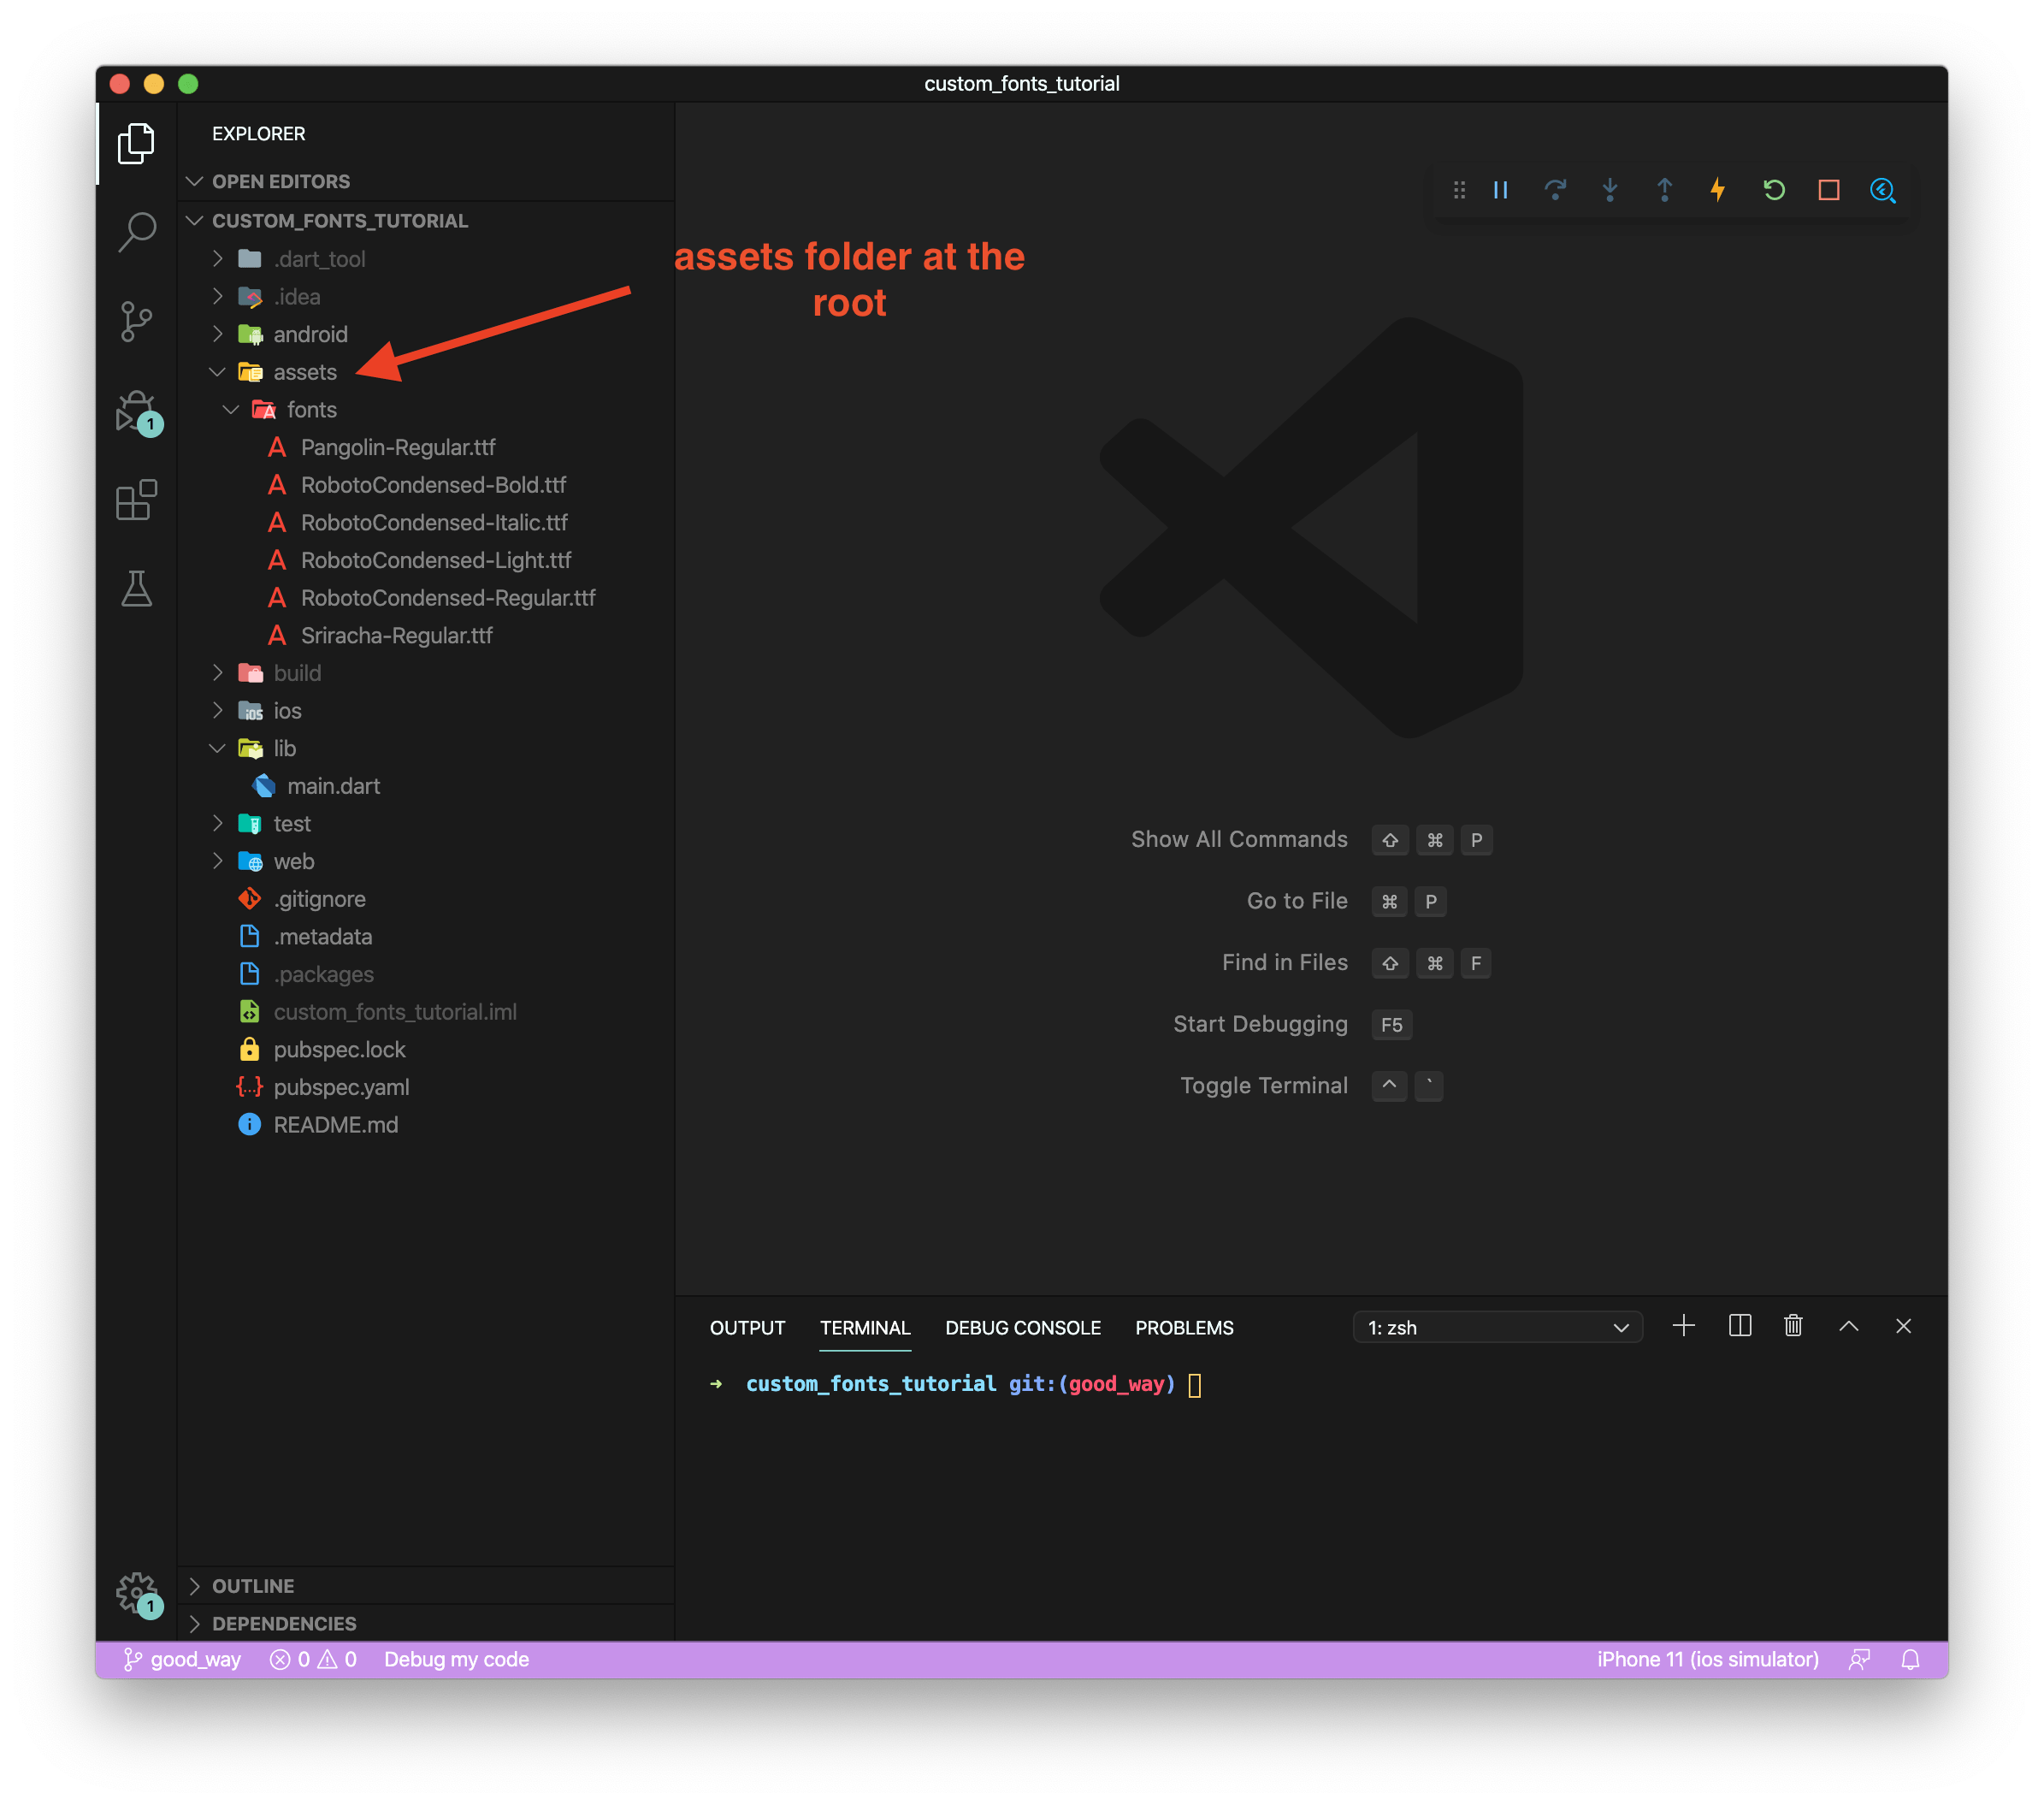
Create a folder in the root of your project (at the level of lib folder) called assets. This folder contains images, fonts for your app.
Then create another folder named fonts and add the font files in that folder. I’m using four variants of RobotoCondensed here.
Add the entry in Pubspec.yaml
To use the fonts, we’ll have to create an entry in pubspec.yaml file as below.
fonts:
  - family: RobotoCondensed
    fonts:
      - asset: assets/fonts/RobotoCondensed-Regular.ttf
      - asset: assets/fonts/RobotoCondensed-Bold.ttf
        weight: 900
      - asset: assets/fonts/RobotoCondensed-Light.ttf
        weight: 300
      - asset: assets/fonts/RobotoCondensed-Italic.ttf
  - family: Pangolin
    fonts:
      - asset: assets/fonts/Pangolin-Regular.ttf
  - family: Sriracha
    fonts:
      - asset: assets/fonts/Sriracha-Regular.ttf
The font family defines the name of the font. The options such as weight and italic are used to define the outline of the font. When you set the font style as bold or italic in code, it’ll refer to definitions here to select the appropriate font file. Make sure to have the proper indentation here.
Now there are two ways to use custom fonts in flutter. The good way and the bad way. Let’s see what they are.
Using custom fonts in flutter (the bad way!)
I’ll be creating a sample app to demonstrate this. First, add the following code to your main.dart file.
import 'package:flutter/material.dart';

void main() {
  runApp(MyApp());
}

class MyApp extends StatelessWidget {
  @override
  Widget build(BuildContext context) {
    return MaterialApp(
      title: 'Flutter Demo',
      theme: ThemeData(
        primarySwatch: Colors.blue,
        visualDensity: VisualDensity.adaptivePlatformDensity,
      ),
      debugShowCheckedModeBanner: false,
      home: FontsScreen(title: 'Flutter Demo Home Page'),
    );
  }
}

class FontsScreen extends StatefulWidget {
  FontsScreen({Key key, this.title}) : super(key: key);

  final String title;

  @override
  FontsScreenState createState() => FontsScreenState();
}

class FontsScreenState extends State<FontsScreen> {
  @override
  Widget build(BuildContext context) {
    return Scaffold(
      appBar: AppBar(
        title: Text(
          widget.title,
        ),
      ),
      body: Container(
        width: double.infinity,
        child: Column(
          mainAxisAlignment: MainAxisAlignment.spaceAround,
          crossAxisAlignment: CrossAxisAlignment.center,
          children: [
            Text(
              "This is the default font",
            ),
            Text(
              "This text has fontFamily Pangolin",
            ),
            Text(
              "This text has fontFamily Roboto",
            ),
            Text(
              "This text has fontFamily Sriracha",
            ),
          ],
        ),
      ),
    );
  }
}
Here we have three texts, one for each of the 3 custom fonts and one default font.
The style property of Text widget takes a TextStyle object which contains the options to style our text. We’ll use the fontFamily property to define the family of fonts to use as below.
Text(
  "This is the default font",
  style: TextStyle(fontSize: 22),
),
Text(
  "This text has fontFamily Pangolin",
  style: TextStyle(
    fontFamily: "Pangolin",
    fontSize: 22,
  ),
),
Text(
  "This text has fontFamily Roboto",
  style: TextStyle(
    fontFamily: "RobotoCondensed",
    fontSize: 22,
  ),
),
Text(
  "This text has fontFamily Sriracha",
  style: TextStyle(
    fontFamily: "Sriracha",
    fontSize: 22,
  ),
),
In addition to this, you can add options such as weight, style to make your font bold or italic. Likewise, we add the styles to the other three Text widgets using different families for each.
TextStyle(
                fontFamily: "RobotoCondensed",
                fontSize: 22,
                fontWeight: FontWeight.bold
              )
But as mentioned in the heading, this is not the most optimal way to do it.
What happens when you have multiple screens and want to use the same font and style at multiple places?
You’ll have to go around changing each one of them manually. And this as we know is not the best way to do things. There’s a better way to use custom fonts in flutter.
Using custom fonts in flutter (the good way!)
The best way to do it is by defining a textTheme for your app. Text there has some predefined properties such as bodyText1, bodyText2, headline1 etc… which we can alter to use our defined styles.
We’ll define the textTheme in the MaterialApp widget. It contains a property named theme which in turn takes a ThemeData object.
MaterialApp(
      title: 'Flutter Demo',
      theme: ThemeData(
          primarySwatch: Colors.blue,
          visualDensity: VisualDensity.adaptivePlatformDensity,
          textTheme: ThemeData.light().textTheme.copyWith(

              )),
      debugShowCheckedModeBanner: false,
      home: FontsScreen(title: 'Flutter Demo Home Page'),
    );
Here, we’ve copied the theme from an already existing light theme. But we’ll customise it to suite our needs.
We’ll define bodyText1, bodyText2 and headline 1 for different text widgets.
MaterialApp(
      title: 'Flutter Demo',
      theme: ThemeData(
          primarySwatch: Colors.blue,
          visualDensity: VisualDensity.adaptivePlatformDensity,
          textTheme: ThemeData.light().textTheme.copyWith(
                bodyText1:
                    TextStyle(fontFamily: "RobotoCondensed", fontSize: 22),
                bodyText2: TextStyle(fontFamily: "Pangolin", fontSize: 22),
                headline1: TextStyle(fontFamily: "Sriracha", fontSize: 22),
              )),
      debugShowCheckedModeBanner: false,
      home: FontsScreen(title: 'Flutter Demo Home Page'),
    );
We’ve allotted each of them a TextStyle object with different font families. Finally they can be used anywhere as below:
style: Theme.of(context).textTheme.bodyText1)
Now whenever you want to change a font family you’ll have to do it at a single place rather than going around changing all the texts that use it.
See, I told ya it was easy to use custom fonts in flutter 😛
Here’s the complete main.dart file for your reference:
import 'package:flutter/material.dart';

void main() {
  runApp(MyApp());
}

class MyApp extends StatelessWidget {
  @override
  Widget build(BuildContext context) {
    return MaterialApp(
      title: 'Flutter Demo',
      theme: ThemeData(
          primarySwatch: Colors.blue,
          visualDensity: VisualDensity.adaptivePlatformDensity,
          textTheme: ThemeData.light().textTheme.copyWith(
                bodyText1:
                    TextStyle(fontFamily: "RobotoCondensed", fontSize: 22),
                bodyText2: TextStyle(fontFamily: "Pangolin", fontSize: 22),
                headline1: TextStyle(fontFamily: "Sriracha", fontSize: 22),
              )),
      debugShowCheckedModeBanner: false,
      home: FontsScreen(title: 'Flutter Demo Home Page'),
    );
  }
}

class FontsScreen extends StatefulWidget {
  FontsScreen({Key key, this.title}) : super(key: key);

  final String title;

  @override
  FontsScreenState createState() => FontsScreenState();
}

class FontsScreenState extends State<FontsScreen> {
  @override
  Widget build(BuildContext context) {
    return Scaffold(
      appBar: AppBar(
        title: Text(
          widget.title,
        ),
      ),
      body: Container(
        width: double.infinity,
        child: Column(
          mainAxisAlignment: MainAxisAlignment.spaceAround,
          crossAxisAlignment: CrossAxisAlignment.center,
          children: [
            Text(
              "This is the default font",
              style: TextStyle(
                fontSize: 22,
              ),
            ),
            Text("This text has fontFamily Pangolin",
                style: Theme.of(context).textTheme.bodyText1),
            Text("This text has fontFamily Roboto",
                style: Theme.of(context).textTheme.bodyText2),
            Text(
              "This text has fontFamily Sriracha",
              style: Theme.of(context).textTheme.headline1,
            ),
          ],
        ),
      ),
    );
  }
}
Want to be a better developer ?!
AndroidVille is a community of Mobile Developers where we share knowledge related to Android Development, Flutter Development, React Native Tutorials, Java, Kotlin and much more.
We have a SLACK workspace where we share updates related to new job opportunities, articles on Mobile Development/updates from the industry. We also have channels to help you with any questions, dev-help that you require. Just post a question and people would be ready to help you out 🙂
Click on this link to join the AndroidVille SLACK workspace. It’s absolutely free!
If you like any article, do give it a share on Facebook, Linkedin. You can follow me on LinkedIn, Twitter, Quora, and Medium where I answer questions related to Mobile Development, especially Android and Flutter.
If you want to stay updated with all the latest articles, subscribe to the weekly newsletter by entering your email address in the form on the top right section of this page.