
We all know why it’s really important to architect your application properly, and hence there exist many architectural patterns for building applications such as MVP Architecture, MVVM, Clean Architecture, the new BLOC Architecture and many more.
In this post, we’ll take a look at BLOC Architecture in Flutter. We’ll understand what’s the problem with using setState() and how using bloc(s) is more efficient.
Note: This article assumes that you already have some knowledge about stateless and stateful widgets in flutter. If you don’t, here’s a quick guide that would help you get started with basics in flutter: Getting started with Flutter
Problem with existing flutter architecture
Let’s have a look at this piece of code:
class MyPage extends StatelessWidget {
final int accountId;
final int scopeId;
MyPage(this.accountId, this.scopeId);
Widget build(BuildContext context) {
return new MyWidget(accountId, scopeId);
}
}
class MyWidget extends StatelessWidget {
final int accountId;
final int scopeId;
MyWidget(this.accountId, this.scopeId);
Widget build(BuildContext context) {
// somewhere down the line
new MyOtherWidget(accountId, scopeId);
...
}
}
class MyOtherWidget extends StatelessWidget {
final int accountId;
final int scopeId;
MyOtherWidget(this.accountId, this.scopeId);
Widget build(BuildContext context) {
// rinse and repeat
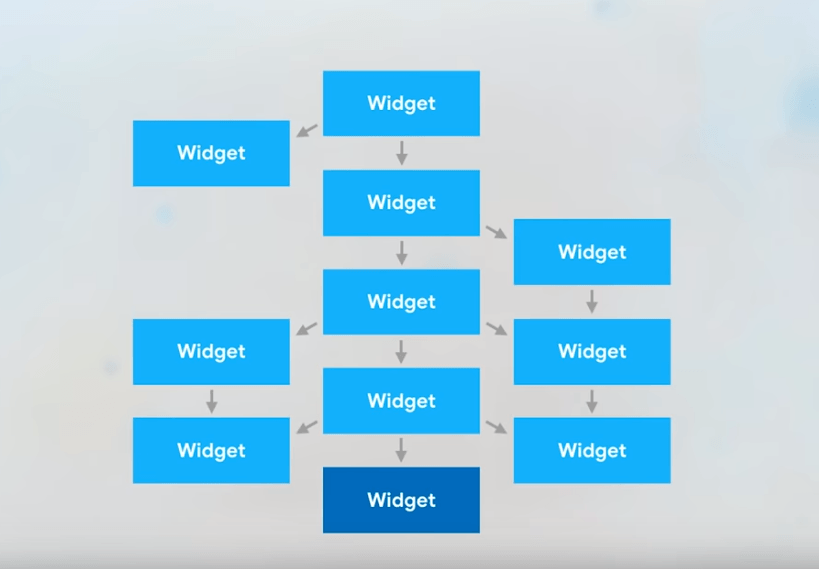
...This is an example of what you will do if you have to pass some information deep down in your widget hierarchy from up top. This can get really cumbersome and to add or remove a single parameter, you’d have to edit all the constructors.
This leads to code redundancy and ultimately, reduced productivity. What we want to do is, to update the piece of information at one place, and have it accessed down below. And in this process, we don’t want to update all our constructors.
Problem with setState()
What happens when you call setState() from a stateful widget in flutter?
Whenever you call setState() in your app, your stateful widget rebuilds all of it’s children with the updated state object. While this is not a problem when you have a smaller widget tree, it definitely get’s inefficient when your widget tree grows.
What we would instead like to do is to somehow rebuild only the widget that makes use of that information.
BLOC Architecture
Before diving straight into BLOC Architecture, let’s have a look at some of the important concepts which would help you a lot as you progress along in this article.
StreamController
StreamControllers can be thought of as pipelines where data can be added from one end, and is received from the other. They contain two ends:
- Stream: This is the end from which a widget can listen to the incoming data.
- Sink: This is the end from which the data is input into the stream.

It’s an elegant way of passing data within an app instead of having to duplicate the code at multiple places.
StreamControllers can be imported from dart:async. We’ll take a look at how to use streams and streamController in our BLOC Architecture.
Understanding Inherited Widgets
This is the most important section if you want to use BLOC Architecture in you flutter application. We know what happens if we try to pass data deep down the widget tree in flutter. We end up passing constructor parameters, and any change would require updating constructors at multiple locations.
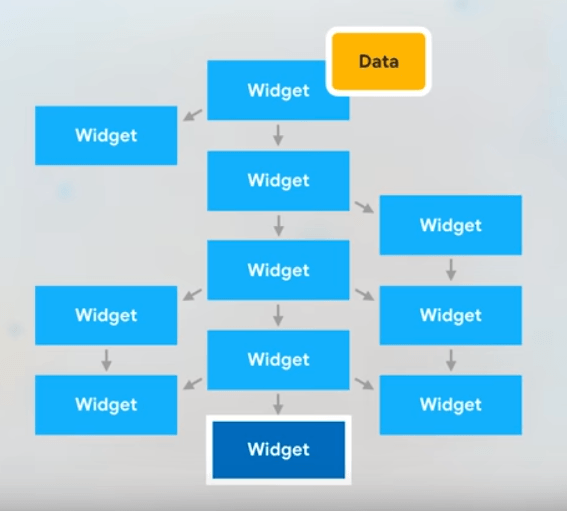
What we want to do instead, is to be able to access data from anywhere down below the widget tree, without disturbing the other widgets.
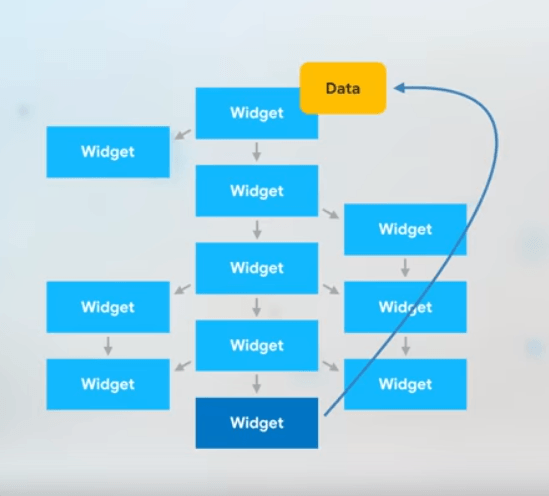
The engineers on the flutter team were aware of this problem and created Inherited Widgets. Inherited widgets allow you to access data from a child, anywhere above in the widget tree.
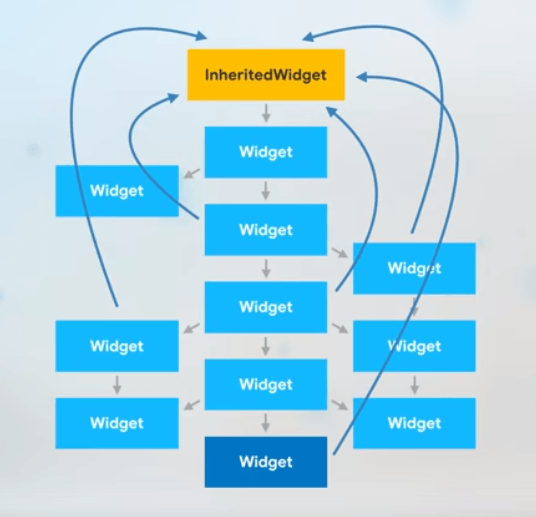
To create an InheritedWidget, all you need to do is extend your widget from the InheritedWidget class and override the updateShouldNotify() method.
updateShouldNotify as the name suggests, updates the child widgets of InheritedWidget if there are any changes in the data held by the InheritedWidget. If there is no change, the method should return false to avoid un-necessary rebuilding.
Although InheritedWidget is immutable and cannot be re-assigned, it’s internal properties can be changed. Like any other widget, it is associated to an Element which is immutable!
Here’s a great 4-minute video by Google Developers on Inherited Widgets which will help you understand InheritedWidgets a lot better.
Getting Started with BLOC Architecture
We’re all familiar with the default counter app which shows up when creating a new flutter project. In this example, we’ll be refactoring that counter application to use BLOC Architecture.
I’ve divided this process into the following broad steps:
- Creating a BlocProvider
- Creating our BLOC
- Using the BLOC in our app.
Creating a BlocProvider
Using BlocProvider we’ll be able to access our bloc anywhere below in our widget tree. It will be a StatefulWidget which will incorporate an InheritedWidget inside it. Any guesses why we’re not using the InheritedWidget directly?! The code below is referenced from this article by Didier Boelens.
Here’s the BlocProvider class:
import 'package:flutter/material.dart';

Type _typeOf<T>() => T;

abstract class BlocBase {
  void dispose();
}

class BlocProvider<T extends BlocBase> extends StatefulWidget {
  BlocProvider({
    Key key,
    @required this.child,
    @required this.bloc,
  }) : super(key: key);

  final Widget child;
  final T bloc;

  @override
  _BlocProviderState<T> createState() => _BlocProviderState<T>();

  static T of<T extends BlocBase>(BuildContext context) {
    final type = _typeOf<_BlocProviderInherited<T>>();
    _BlocProviderInherited<T> provider =
        context.ancestorInheritedElementForWidgetOfExactType(type)?.widget;
    return provider?.bloc;
  }
}

class _BlocProviderState<T extends BlocBase> extends State<BlocProvider<T>> {
  @override
  void dispose() {
    widget.bloc?.dispose();
    super.dispose();
  }

  @override
  Widget build(BuildContext context) {
    return new _BlocProviderInherited<T>(
      bloc: widget.bloc,
      child: widget.child,
    );
  }
}

class _BlocProviderInherited<T> extends InheritedWidget {
  _BlocProviderInherited({
    Key key,
    @required Widget child,
    @required this.bloc,
  }) : super(key: key, child: child);

  final T bloc;

  @override
  bool updateShouldNotify(_BlocProviderInherited oldWidget) => false;
}- Creating a generic: We create a generic type T for our Bloc class.
- Abstract BlocBase: This will be extended by our Bloc class that we’ll create later. The Bloc class will have to override the dispose() method in which it’d be required to close the streams.
- BlocProvider: We create a BlocProvider class which is a StatefulWidget. It would act as a wrapper for InheritedWidget class. It takes in key, child and a bloc as it’s constructor arguments. We’ll be creating a state for this widget called BlocProviderState.Here were creating a static ‘of’ method which will be accessed by the children below to get access to the bloc. It will search the entire widget tree and return the bloc to us.
- BlocProviderState: It is the state for our BlocProvider stateful widget. It simply returns an InheritedWidget by passing a child widget and a bloc. We create our own inherited widget now.
- BlocProivderInherited: This is our custom InheritedWidget. This is the place where we’ll be storing our bloc which will be made available down the widget tree.
One thing to note is that we’re using a stateful widget as a wrapper for our InheritedWidget. The reason for this is that inherited widget doesn’t provide us with a dispose method when it’s being destroyed. Hence, streams can remain open even after widget is destroyed. This is undesirable.
Hence, we wrap everything in a stateful widget and when the widget is destroyed, we call the dispose method on our bloc.
Creating our Bloc
Bloc can be understood as the Presenter in an MVP Architecture. It is what provides the sink and the stream to the widgets in order to communicate. Here we create a CounterBloc which is responsible for adding and updating data to our streams.
import 'dart:async';
import 'package:bloc_tutorial/BlocProvider.dart';


class CounterBloc extends BlocBase{

  StreamController streamController = StreamController<int>.broadcast();

  Sink get counterSink => streamController.sink;
  Stream<int> get counterStream => streamController.stream;

  int counter = 0;

  incrementCounter(){
    counterSink.add(++counter);
  }

  @override
  void dispose() {
    streamController.close();
  }

}
It contains a StreamController which is responsible for providing the sink and stream to the widgets. Bloc can also contain methods to manipulate the data and add it to the stream. In our case, we’re calling the incrementCounter() function whenever user clicks the FAB button.
Since, our bloc extends BlocBase which contains a method called dispose, it would have to override it. Dispose method is used for cleanup tasks such as closing streams and freeing up any other resources.
Creating the UI
This is where we bring it all together. Since we’re using BLOC Architecture, our root will be the BlocProvider. Here’s how our main.dart file looks like:
import 'package:bloc_tutorial/BlocProvider.dart';
import 'package:bloc_tutorial/CounterBloc.dart';
import 'package:flutter/material.dart';

void main() => runApp(MyApp());

class MyApp extends StatelessWidget {
  // This widget is the root of your application.
  @override
  Widget build(BuildContext context) {
    return BlocProvider(
      bloc: CounterBloc(),
      child: MaterialApp(
        title: 'Flutter Demo',
        theme: ThemeData(
          primarySwatch: Colors.blue,
        ),
        home: MyHomePage(title: 'Flutter Demo Home Page'),
      ),
    );
  }
}

class MyHomePage extends StatefulWidget {
  MyHomePage({Key key, this.title}) : super(key: key);

  final String title;

  @override
  _MyHomePageState createState() => _MyHomePageState();
}

class _MyHomePageState extends State<MyHomePage> {
  @override
  Widget build(BuildContext context) {
    final CounterBloc bloc = BlocProvider.of(context);
    return Scaffold(
      appBar: AppBar(
        title: Text(widget.title),
      ),
      body: _getStreamChild(),
      floatingActionButton: FloatingActionButton(
        onPressed: () {
          bloc.incrementCounter();
        },
        tooltip: 'Increment',
        child: Icon(Icons.add),
      ),
    );
  }

  Widget _getStreamChild() {
    final CounterBloc bloc = BlocProvider.of<CounterBloc>(context);
    return StreamBuilder(
      initialData: 0,
      stream: bloc.counterStream,
      builder: (BuildContext context, snapshot) {
        return Center(
          child: Text(
            "Clicked " + snapshot.data.toString() + " times!",
            style: TextStyle(fontSize: 18),
          ),
        );
      },
    );
  }
}
As the body of Scaffold, we create a widget which will be the StreamBuilder. StreamBuilder takes in a stream and an initial data. As our stream is updates, we’ll receive a snapshot of the updated data. Counter is updated by using the data from this snapshot.
Notice, in the onPressed method of floatingActionButton, we call bloc.incrementCounter() which increments the counter in our bloc. We do not directly call setState and increment the counter manually (which was the case in default app).
Now, only the widget using the Bloc will be updated instead of the entire widget tree! This is far more efficient than calling setState().
You can download the source code from github: https://github.com/Ayusch/Flutter-Bloc-Pattern
*Important*: I’ve created a SLACK workspace for mobile developers where we can share our learnings about everything latest in Tech, especially in Android Development, RxJava, Kotlin, Flutter, and overall mobile development in general.
Click on this link to join the slack workspace. It’s absolutely free!
Like what you read? Don’t forget to share this post on Facebook, Whatsapp, and LinkedIn.
You can follow me on LinkedIn, Quora, Twitter, and Instagram where I answer questions related to Mobile Development, especially Android and Flutter.
If you want to stay updated with all the latest articles, subscribe to the weekly newsletter by entering your email address in the form on the top right section of this page.
Pingback:Provider Pattern in Flutter – Avasta