
Whether you’re preparing for an interview or want to implement fragments in your app, you should know about the fragment lifecycle.
Most of us know android activity lifecycle pretty well, but not fragment lifecycle as such.
How does the fragment lifecycle interact with activity lifecycle? What’s the difference between adding a fragment vs replacing it ?
We’ll take a look at all these questions below.
Android Fragment Lifecycle
Fragment lifecycle in android mainly consists of these 8 methods:
- onCreate: called for initializing non-graphical components.
- onCreateView: called for inflating the xml layout of the fragment.
- onStart
- onResume
- onPause
- onStop
- onDestroyView
- onDestroy
These make up the fragment lifecycle in android. To study their call sequence, I created a sample project.
Creating an example app
We’ll analyse the fragment lifecycle in two ways. First by adding a fragment Dynamically and then Statically.
Create a new Project in Android Studio. This will be a basic project where we’ll just add basic log statements in all of the lifecycle methods.
In this project, add a fragment called LifecycleFragment and override the lifecycle methods. Also create a simple layout xml if not already created.
class LifecycleFragment : Fragment() {

    var LOG_TAG = "Androidville"

    companion object {
        @JvmStatic
        fun newInstance() = LifecycleFragment()
    }

    override fun onCreate(savedInstanceState: Bundle?) {
        super.onCreate(savedInstanceState)
        Log.d(LOG_TAG, "LifecycleFragment: onCreate() called")
    }

    override fun onCreateView(
        inflater: LayoutInflater, container: ViewGroup?,
        savedInstanceState: Bundle?
    ): View? {
        Log.d(LOG_TAG, "LifecycleFragment: onCreateView() called")
        return inflater.inflate(R.layout.fragment_lifecycle, container, false)
    }

    override fun onStart() {
        Log.d(LOG_TAG, "LifecycleFragment: onStart() called")
        super.onStart()
    }

    override fun onResume() {
        Log.d(LOG_TAG, "LifecycleFragment: onResume() called")
        super.onResume()
    }

    override fun onPause() {
        Log.d(LOG_TAG, "LifecycleFragment: onPause() called")
        super.onPause()
    }

    override fun onStop() {
        Log.d(LOG_TAG, "LifecycleFragment: onStop() called")
        super.onStop()
    }

    override fun onDestroy() {
        Log.d(LOG_TAG, "LifecycleFragment: onDestroy() called")
        super.onDestroy()
    }

    override fun onDestroyView() {
        Log.d(LOG_TAG, "LifecycleFragment: onDestroyView() called")
        super.onDestroyView()
    }

}
You’ll notice I’ve added log statements in all of these methods, this will help me in identifying the call sequence.
Here’s the layout file:
<?xml version="1.0" encoding="utf-8"?>
<RelativeLayout xmlns:android="http://schemas.android.com/apk/res/android"
    xmlns:tools="http://schemas.android.com/tools"
    android:layout_width="match_parent"
    android:layout_height="match_parent"
    tools:context=".LifecycleFragment">

    <TextView
        android:layout_width="wrap_content"
        android:layout_height="wrap_content"
        android:layout_centerInParent="true"
        android:text="Hello from Fragment!" />

</RelativeLayout>
Adding a Fragment Dynamically
Here is the code for MainActivity.kt to add a fragment dynamically:
class MainActivity : AppCompatActivity() {
    var TAG: String = "ANDROIDVILLE"
    var LOG_TAG = "Androidville"

    override fun onCreate(savedInstanceState: Bundle?) {
        super.onCreate(savedInstanceState)
        setContentView(R.layout.activity_main)
        Log.d(LOG_TAG, "MainActivity: onCreate() called")
        setupFragment()
    }

    private fun setupFragment() {
        supportFragmentManager.beginTransaction()
                .add(R.id.contentFrame, LifecycleFragment.newInstance(), TAG)
                .commit()
    }

    override fun onRestart() {
        Log.d(LOG_TAG, "MainActivity: onRestart() called")
        super.onRestart()
    }

    override fun onStart() {
        Log.d(LOG_TAG, "MainActivity: onStart() called")
        super.onStart()
    }

    override fun onResume() {
        Log.d(LOG_TAG, "MainActivity: onResume() called")
        super.onResume()
    }

    override fun onPause() {
        Log.d(LOG_TAG, "MainActivity: onPause() called")
        super.onPause()
    }

    override fun onStop() {
        Log.d(LOG_TAG, "MainActivity: onStop() called")
        super.onStop()
    }

    override fun onDestroy() {
        Log.d(LOG_TAG, "MainActivity: onDestroy() called")
        super.onDestroy()
    }
}
Here’s the layout activity_main.xml:
<?xml version="1.0" encoding="utf-8"?>
<RelativeLayout xmlns:android="http://schemas.android.com/apk/res/android"
    xmlns:app="http://schemas.android.com/apk/res-auto"
    xmlns:tools="http://schemas.android.com/tools"
    android:layout_width="match_parent"
    android:layout_height="match_parent"
    tools:context=".MainActivity">

    <FrameLayout
        android:id="@+id/contentFrame"
        android:layout_width="match_parent"
        android:layout_height="wrap_content" />

</RelativeLayout>
Adding a Fragment Statically
To add a fragment statically, we’ll just add a <fragment> element in the activity_main.xml file and set its name to the kotlin class.
Layout:
<?xml version="1.0" encoding="utf-8"?>
<RelativeLayout xmlns:android="http://schemas.android.com/apk/res/android"
    xmlns:tools="http://schemas.android.com/tools"
    android:layout_width="match_parent"
    android:layout_height="match_parent"
    tools:context=".MainActivity">

    <fragment
        android:id="@+id/lifecycle_fragment"
        android:name="com.example.androidfragmentlifecycleexample.LifecycleFragment"
        android:layout_width="match_parent"
        android:layout_height="match_parent" />

</RelativeLayout>
MainActivity.kt file:
class MainActivity : AppCompatActivity() {
    var TAG: String = "ANDROIDVILLE"
    var LOG_TAG = "Androidville"

    override fun onCreate(savedInstanceState: Bundle?) {
        super.onCreate(savedInstanceState)
        setContentView(R.layout.activity_main)
        Log.d(LOG_TAG, "MainActivity: onCreate() called")
    }

    override fun onRestart() {
        Log.d(LOG_TAG, "MainActivity: onRestart() called")
        super.onRestart()
    }

    override fun onStart() {
        Log.d(LOG_TAG, "MainActivity: onStart() called")
        super.onStart()
    }

    override fun onResume() {
        Log.d(LOG_TAG, "MainActivity: onResume() called")
        super.onResume()
    }

    override fun onPause() {
        Log.d(LOG_TAG, "MainActivity: onPause() called")
        super.onPause()
    }

    override fun onStop() {
        Log.d(LOG_TAG, "MainActivity: onStop() called")
        super.onStop()
    }

    override fun onDestroy() {
        Log.d(LOG_TAG, "MainActivity: onDestroy() called")
        super.onDestroy()
    }
}
Android Fragment Lifecycle callback sequence
Finally, let’s see what the lifecycle callback sequence is in the fragments when we run the app.
Dynamically added
When we add a fragment dynamically, the following callback sequence occurs.
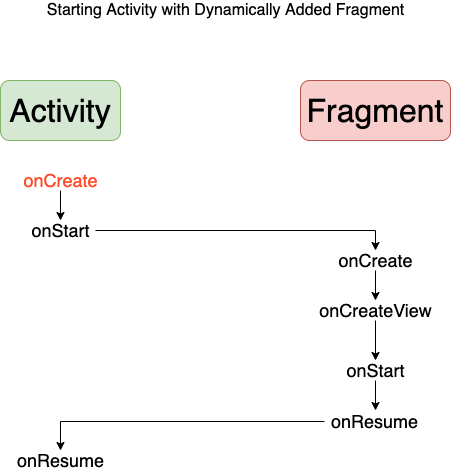
You can see here that the activity is eagerly created. Activity’s onCreate, onStart are called first.
Then fragment’s onCreate, onCreateView and onStart are called. Finally Activity and Fragment’s onResume is called respectively.
On exiting the app:
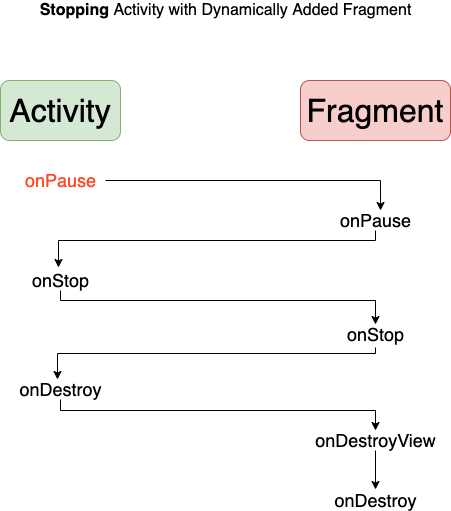
Here, the activity is destroyed first and then the fragment. So, onPause, onStop and onDestroy of activity are called first before fragment’s respectively.
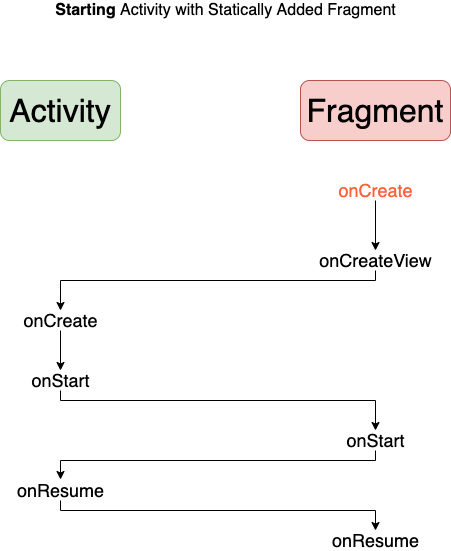
Statically added
I was also surprised when I saw this lifecycle callback sequence. When fragment is added to activity statically then fragment is eagerly created.
On exiting the app:
Same as static addition. Activity is destroyed first and then the fragment.
Add vs Replace a fragment
As the name suggests, when you add a fragment, it’s added on top of the one already in the container. But if you call replace, the fragment in the container will be replaced by the new one.
What this means is if you try to retrieve fragments by TAG in your activity, you won’t find it if you’ve replaced the fragment instead of adding over it.
Want to be a better developer ?!
AndroidVille is a community of Mobile Developers where we share knowledge related to Android Development, Flutter Development, React Native Tutorials, Java, Kotlin and much more.
We have a SLACK workspace where we share updates related to new job opportunities, articles on Mobile Development/updates from the industry. We also have channels to help you with any questions, dev-help that you require. Just post a question and people would be ready to help you out 🙂
Click on this link to join the AndroidVille SLACK workspace. It’s absolutely free!
If you like any article, do give it a share on Facebook, Linkedin. You can follow me on LinkedIn, Twitter, Quora, and Medium where I answer questions related to Mobile Development, especially Android and Flutter.
If you want to stay updated with all the latest articles, subscribe to the weekly newsletter by entering your email address in the form on the top right section of this page.
Pingback:Интересные материалы для Android-разработчика #234 - Подкасты Android Dev