

Before starting with this article, I recommend that, you to check out the Step Number 1 in my article on 5 Steps To become a better android developer. I talk about why and how Architecture is important for an Android App.
First things first: WHY DO YOU NEED AN ARCHITECTURE? WHY NOT WRITE EVERYTHING IN THE ACTIVITY ITSELF?
This question came into my mind in the initial stages of my android development journey. I had developed 2 apps, I had built beautiful UIs but there was one thing missing. MODULARITY
The code I wrote was not modular and hence not manageable. It was dreadful to look at that code after a week or so, and eventually it meant that I could not update my apps and add more features to it. What good is an app, if you can’t improve it based on customer feedback.
I realized I wasn’t doing something write, I googled this problem and for the first time I came across the term ARCHITECTURE. It promised the following deliverables:
- More manageable code
- More modularity
- Neat and clear MainActivity.java
- Scalable Android Apps
- Testable classes
- And finally, an upper hand among your competition/something to boast about XD
It solved all the problems I was facing until now, like how to write more manageable code, how to write more modular code, how to keep my classes clean, etc.
I knew it then, this was the skill that I wanted in my arsenal now and began deeply researching into what an Architecture is and how can I apply an Architecture in Android Apps.
First architecture I came across was the MVP Architecture. It was (and is) the recommended architecture to start with for beginners. It was easy, it solved all the problems, everyone recommended it, and so I went ahead with MVP Architecture.
So, what is MVP Architecture?
MVP Stands for Model-View-Presenter
It dates back to 1990s where it was developed at Tailgent who used if for their C++ based CommonPoint environment. But most notably it came into limelight when Microsoft began incorporating MVP into its examples for User Interface programming in the .NET framework.
It is an Architectural pattern which facilitates Unit Testing and promotes SEPARATION OF CONCERNS.
It has 3 components:
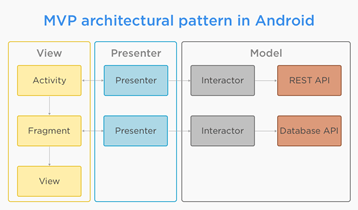
- Model – You can imagine model as the data store of your app. It includes everything, from Shared Preferences to SQLite Databases and Repositories for your network calls. It provides you with data to be displayed in the app.
No longer you need to make API calls in the Activity class, you can separate them in the Model and retrieve the results from there.
- View – It encompasses your Activities, Fragments and other Views. Whatever you see on the screen is a view.
It only cares about how the elements will be displayed on the screen. It gets its data from the presenter (which we’ll talk about next) and just populates the views on screen.
It does tasks such as: Showing a dialog box, when a button is clicked it notifies the presenter, it gets data from presenter and shows it in recyclerview, etc.
The list is endless, basically anything that you do which involves referring to layout elements is done in the View class.
- Presenter – This is the brain of your app. It is the middleman between the model and the view and can communicate with both.
When a user clicks on a button, the view notifies the presenter and the presenter can perform tasks such as Making an API call, fetching data from database, replacing fragments, fetching data from shared preference, starting a new activity etc.
All the business logic goes inside the presenter.
Basically, it’s the BOSS. Every action is notified to it by view and it can demand any data from the model.
MVP Architecture has the following features:
- Separation of concerns: It is the most sought-after thing in coding, you should not mush every line of code in a single file. You should separate your code into smaller logical segments where each segment can work as one single entity.
- Easier to debug: It enforces 3 layers of abstraction. This makes finding and fixing bugs easier.
For example, if your recyclerview is not displaying the correct data, or is not displaying any data at all, you know that you need to go and check in the presenter. You may have missed a parameter or may have passed the wrong parameter for the API call.
If your dialog box or progress bar is not showing during an API call you know you need to check with the view.
This saves a lot of time when testing and debugging your app. You know exactly where to look.
- Reusability: It makes the code more reusable. If you have same requirements in a new project as the previous one, just copy and reuse your presenter class (your layout demands can be different so cannot say about the view class).
If you use an SQLite database just copy the Model class which serves the data. Change the database and table names and you’re good to go. No need to rewrite the entire class.
You again save a lot of time this way.
- Unit/Integration Testing: It makes your classes testable. If you are familiar with Unit Testing you know that you need to mock some objects. With the MVP Architecture you can mock your view class and call and verify all the methods. This makes testing the presenter class really very easy.
- Scalability: Want to add a new feature?
Good, just change your layout accordingly as you would, and handle all the functionality in the presenter. There won’t be any conflict with your existing code.
How good is that!!
How to implement MVP Architecture in Android Applications
I will demonstrate how to implement MVP Architecture by building a simple application. Our Demo app will be a login system which would check if the username and password are valid, and if they are, it would mark the status as Logged In.
We’ll follow the below steps in sequence:
- Create LoginContract interface
- Create a model class which will provide login credentials
- Implement LoginContract.View on an activity
- Create a presenter
Create LoginContract Interface:
It is a contract which our View and Presenter have to abide by. It’s an interface which will contain 2 child interfaces:
- View
- Presenter
View will be implemented by our MainActivity and the Presenter Interface will be implemented by our presenter when we create it.
Here is how LoginContract interface looks:
public interface LoginContract {
interface View {
void initV();

void loginFailV(String message);

void loginSuccessV(String message);
}

interface Presenter {
void initP();

void loginClickedP(String userName, String password);
}
}
I have followed a naming convention where I append all method names by V if they are in View and P if they are in Presenter.
Create a Model class
Now we are going to create our model which will give us the data of authenticated user. A model class can be anything, an SQLite Database, Shared Preferences, Text File, API Call etc…
In our case it is a Shared Preference. Here’s how it looks:
public class AppPrefs {
private static SharedPreferences sharedPreferences;
private static final String PREF_FILE = "prefs";

private static final String USER_NAME = "user_name";
private static final String PASSWORD = "pass";

public static void init(Context context) {
sharedPreferences = context.getSharedPreferences(PREF_FILE, Context.MODE_PRIVATE);
}

public static String getUserName() {
return sharedPreferences.getString(USER_NAME, "");
}

public static String getPassword() {
return sharedPreferences.getString(PASSWORD, "");
}

public static void setUserName(String uName) {
sharedPreferences.edit().putString(USER_NAME, uName).apply();
}

public static void setPassword(String pass) {
sharedPreferences.edit().putString(PASSWORD, pass).apply();
}

}
AppPrefs will provide us with the username and password of the user which is already authenticated. We will use this to match against the entered username and password.
Implement LoginContract.View on Activity:
For the simplicity of this example, I am not dealing with fragments. You, can use fragments to increase modularity, but for this tutorial the aim is to show how to implement MVP Architecture. Hence, I would stick with MainActivity.java for my view.
MainActivity.java is our activity which will implement the View interface. Here’s how it looks like:
import android.support.v7.app.AppCompatActivity;

import android.os.Bundle;
import android.view.View;
import android.widget.Button;
import android.widget.EditText;
import android.widget.TextView;

import com.ayusch.blogexamples.LoginContract;
import com.ayusch.blogexamples.model.AppPrefs;
import com.ayusch.blogexamples.presenter.MainActivityPresenter;
import com.ayusch.blogexamples.R;

public class MainActivity extends AppCompatActivity implements LoginContract.View {
EditText et_name, et_password;
TextView tv_status;
Button btn_login;
LoginContract.Presenter mPresenter;

@Override
protected void onCreate(Bundle savedInstanceState) {
super.onCreate(savedInstanceState);
setContentView(R.layout.activity_main);

mPresenter = new MainActivityPresenter(this, this);
mPresenter.initP();
}

@Override
public void initV() {
AppPrefs.init(this);
AppPrefs.setUserName("ayusch");
AppPrefs.setPassword("ayusch123");

et_name = findViewById(R.id.et_name);
et_password = findViewById(R.id.et_password);
btn_login = findViewById(R.id.btn_login);
tv_status = findViewById(R.id.tv_status);

btn_login.setOnClickListener(new View.OnClickListener() {
@Override
public void onClick(View view) {
mPresenter.loginClickedP(et_name.getText().toString(), et_password.getText().toString());
}
});

}

@Override
public void loginFailV(String message) {
tv_status.setText(message);
}

@Override
public void loginSuccessV(String message) {
tv_status.setText(message);
}

}
The onCreate method is called as the activity starts, there we create an Instance of our presenter. This instance will be used to notify the presenter of any User Interactions such as Clicks, Touches etc.
We call mPresenter.initP() to start the initialization process. Here you can initialize your views (findViewById calls), initialize variables (as I have initialized my preferences to store “ayusch” as username and “ayusch123” as password).
The presenter will be notified when the login button is clicked. There’s a method in presenter which handles the click named “loginClickedP()” it checks with the database (shared pref in this case) that whether the user is authenticated or not and calls “loginFailV()” or “loginSuccessV()” accordingly.
Then, finally these methods update the displayed textview.
So, you see how the presenter is handling all the logic and the View is just updating the display. This is called separation of concerns.
Creating the Presenter
Create a new java class and call it MainActivityPresenter, this way we know which view is the presenter connected to. Here’s how it looks like:
import android.content.Context;

import com.ayusch.blogexamples.LoginContract;
import com.ayusch.blogexamples.model.AppPrefs;

public class MainActivityPresenter implements LoginContract.Presenter {
private final Context mContext;
LoginContract.View mView;

public MainActivityPresenter(Context context,LoginContract.View mView) {
this.mView = mView;
this.mContext = context;
}

@Override
public void initP() {
mView.initV();
}

@Override
public void loginClickedP(String userName, String password) {

if (userName.isEmpty() || password.isEmpty()) {
mView.loginFailV("Please enter all the details");
} else {
if (userName.equals(AppPrefs.getUserName()) && password.equals(AppPrefs.getPassword())) {
mView.loginSuccessV("Login Successful!!");
} else {
mView.loginFailV("Wrong username/password");
}
}

}
}
When the button is clicked “loginClickedP()” is called and it handles the logic to check whether the user is authenticated or not.
For this example: if the username entered is “ayusch” and the password entered is “ayusch123” then the login is successful. This check is done by presenter.
The presenter here is just handling the logic and not updating any views directly.
Here are the working images of the app:
So, do you see the beauty of this.
- The UI operations are separate from business logic.
- Data is separate from UI and Logic
- Code is modular
- Classes can be reused. After changing some parameters according to needs of the app, same classes can be used over and over again.
- It is easier to Unit Test. For those who are familiar with Unit Testing, you know what I am talking about.
- It is very convenient to add/remove features.
- Everything makes sense!!
Disclaimer: This tutorial was to demonstrate how MVP Architecture can be implemented in Android Applications. While I have been careful to use Best Practices as much as I could, for the sake of simplicity of this tutorial, I have omitted some best practices. Advancements can be made such as using fragments, calling lifecycle methods etc. But first I would suggest that you get a hang of what’s going on here and then go for implementing the best practices.
All the best!!
Like what you read ? Don’t forget to share this post as much as possible on Facebook, Whatsapp and LinkedIn. You can follow me on LinkedIn and GitHub.