
This post is the third part of the IntelliJ Plugin Development tutorial series. In the last two parts we learnt how to set up the project and how to handle user input in intellij plugin. In this part, we’ll take a look at persisting state in an intellij plugin. You can find the first two parts here:
- IntelliJ Plugin Development Tutorial Pt. 1 – Getting Started
- IntelliJ Plugin Development Tutorial Pt. 2 – Handling User Input
We’ll be building something that you can actually put to use and also share among your friends/colleagues, a plugin to trigger builds on Bitrise from within the IDE !
For those of you who don’t know what Bitrise is, I recommend checking this out. We’ll create a plugin to trigger builds from the IDE itself.
Also, it’s recommended to go through the previous 2 posts quickly (although not a necessity). They’ll help you out with some basics of the project structure and how to create a simple GUI interface.
1. Getting Started
Let’s start by creating a new project. Give it any name you want. I’m naming mine AndroidVille. Let the project be in the settings as explained in the previous post. We’ll be needing Java and Kotlin dependencies.
Next up, create a class called MyAction and extend it from AnAction. We’ll be using this to show our dialog and trigger API call based on user’s input.
import com.intellij.openapi.actionSystem.AnAction
import com.intellij.openapi.actionSystem.AnActionEvent

class MyAction : AnAction() {

    override fun actionPerformed(e: AnActionEvent) {


    }

}
Finally, we’ll need to register our action inside the plugin.xml file.
<idea-plugin>
    <id>com.ayusch.AndroidVillePlugin</id>
    <name>AndroidVille</name>
    <vendor email="contact@ayusch.com" url="http://ayusch.com">AndroidVille</vendor>

    <description>An automation plugin for AndroidVille. Use this for tasks such as triggering builds on BitRise</description>

    <!-- please see http://www.jetbrains.org/intellij/sdk/docs/basics/getting_started/plugin_compatibility.html
         on how to target different products -->
    <depends>com.intellij.modules.platform</depends>

    <actions>
        <group id="AndroidVillePlugin.TopMenu"
               text="AndroidVille"
               description="AndroidVille toolbar menu">
            <add-to-group group-id="MainMenu" anchor="last"/>
            <action id="MyAction" class="MyAction" text="Build on Bitrise" description="Persisting state in an intellij plugin"/>
        </group>
    </actions>
</idea-plugin>
2. Handling User Input
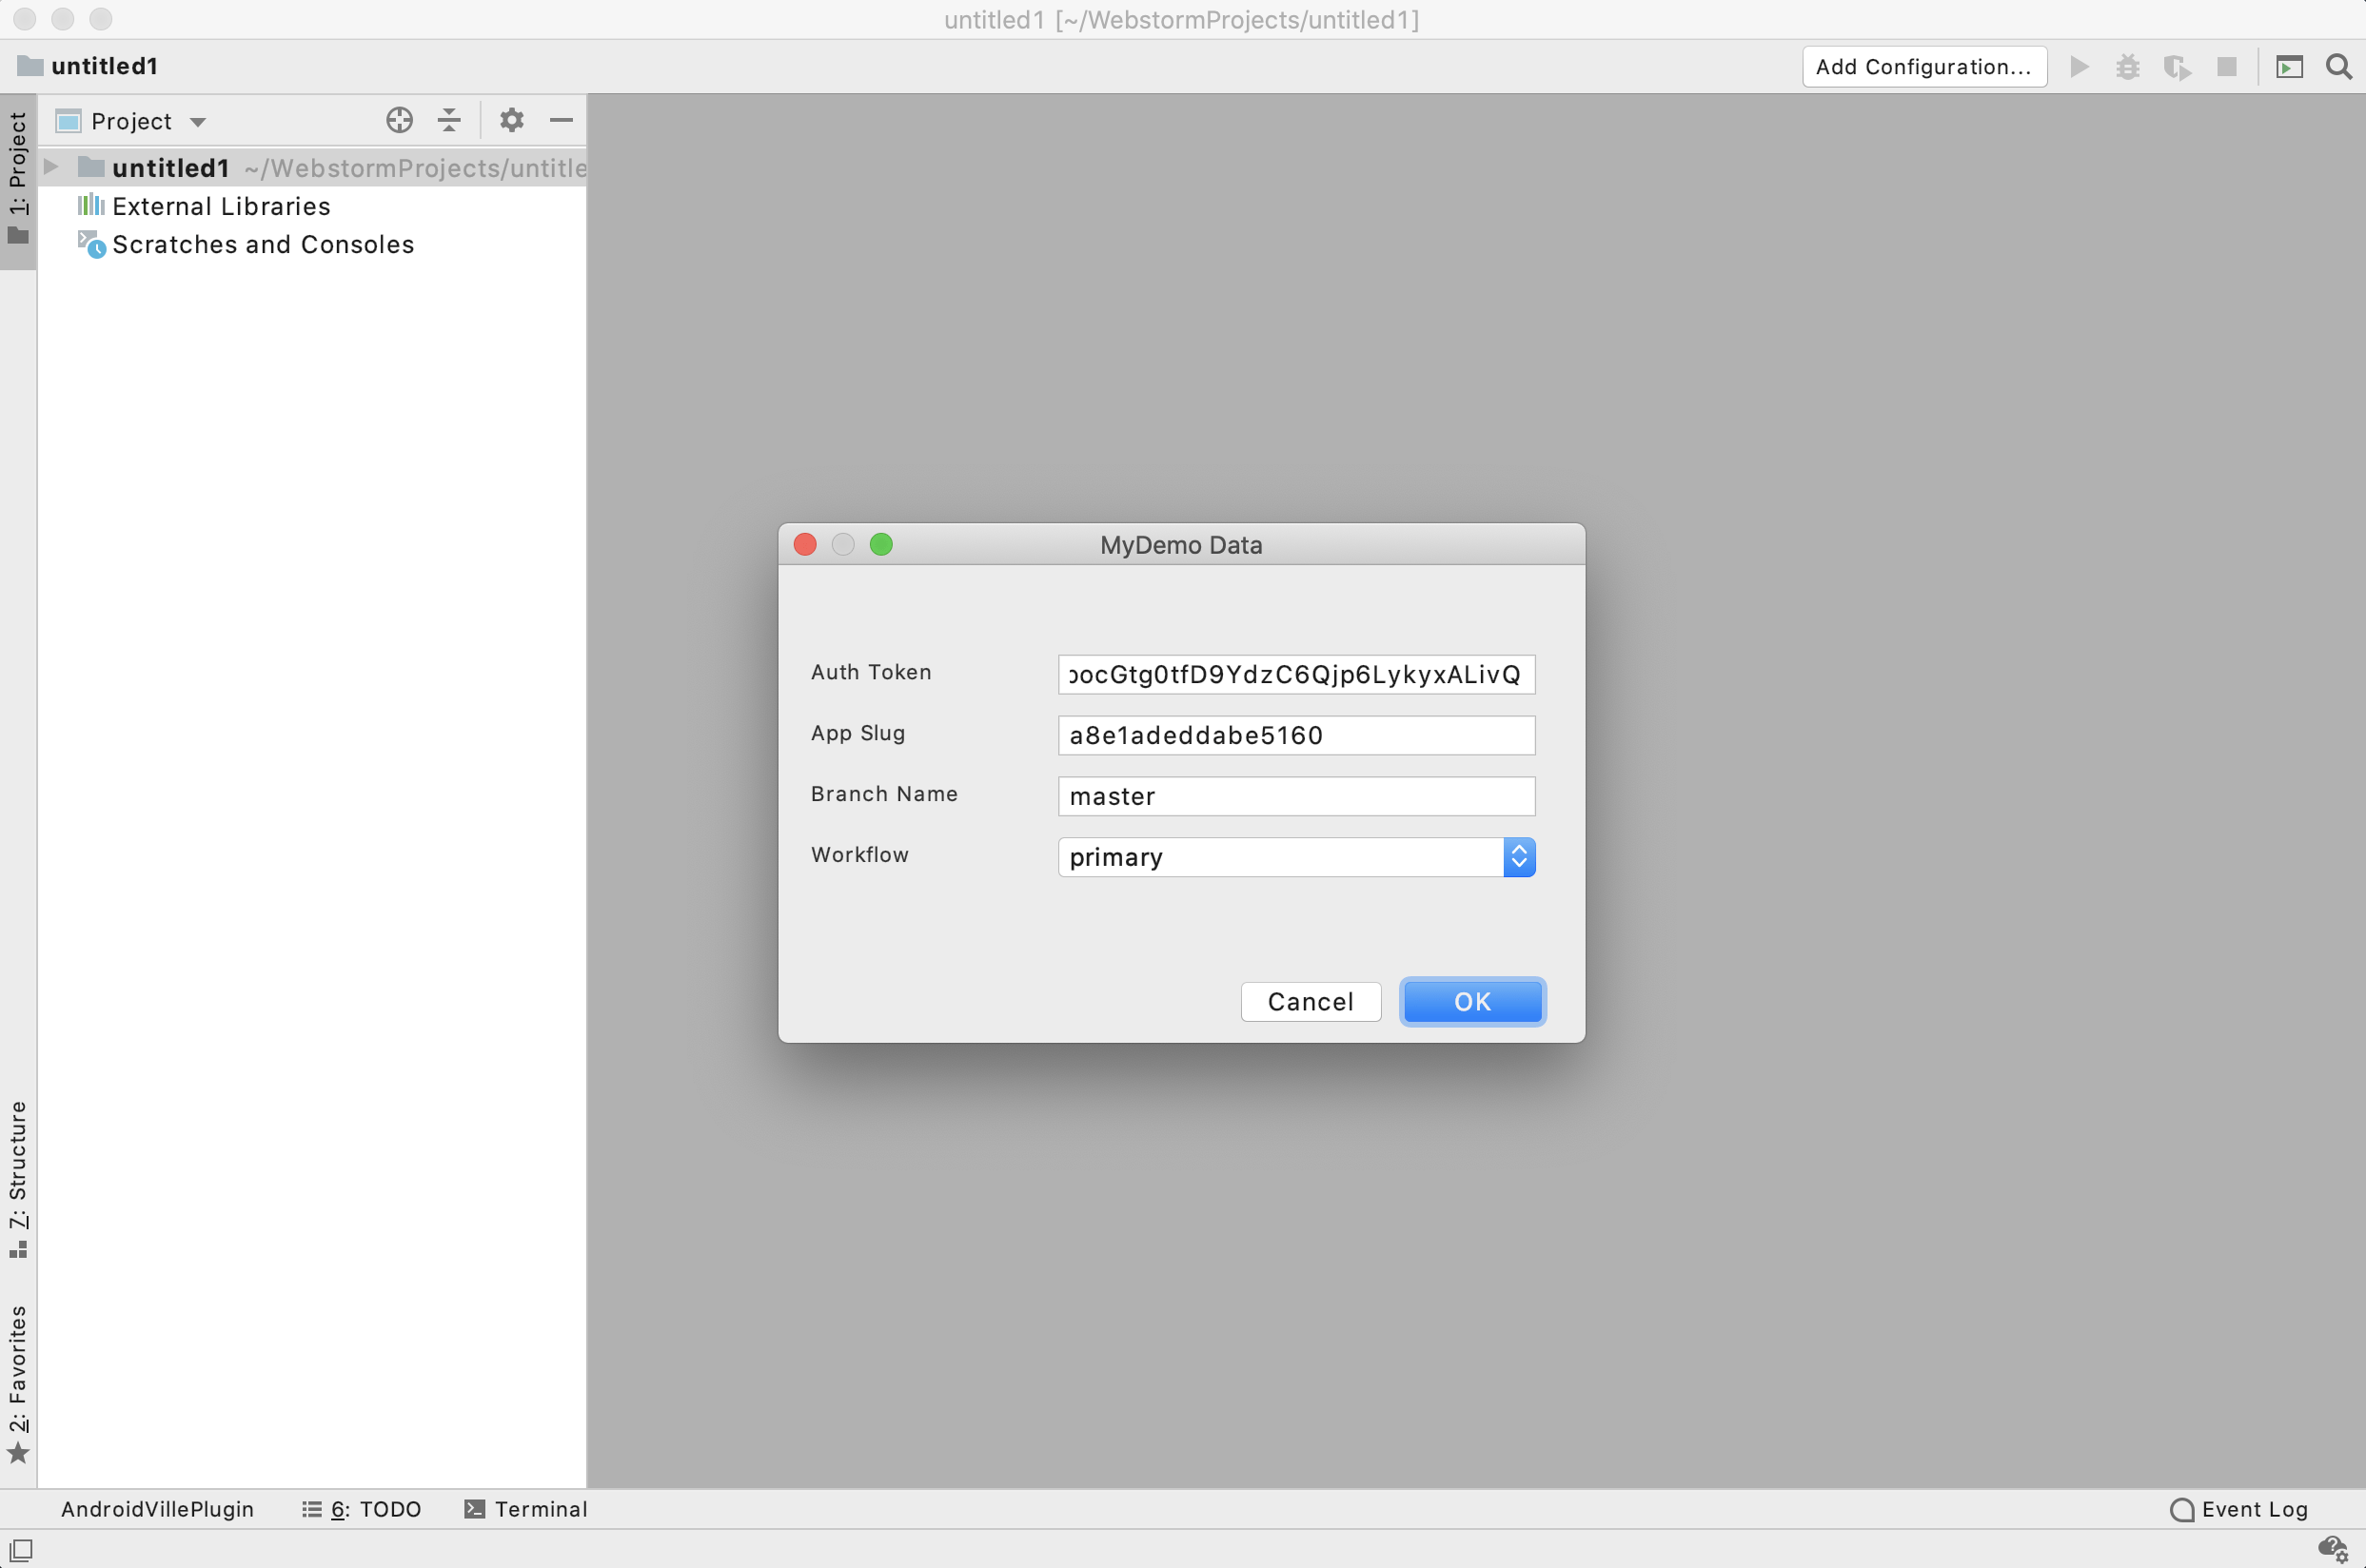
We’ll need 4 inputs from the user:
- Bitrise API Key: This can be generated from Account -> Security -> Generate
- App Slug: You can find this in the URL bar when you click on your app in bitrise. Let me know if you can’t find this and I’ll help you out.
- Branch Name: The branch for which you want to trigger a build.
- Workflow ID: The workflow for which you want to trigger a build.
As you can see, that’s a lot of input from the user. Of course it’s a bad UX. The user shouldn’t have to enter this every time he wants to trigger a build. But if you notice, some of these parameters would change rarely.
For example: API Key and App Slug would change rarely for a particular app. So we can persist such information so that user wouldn’t have to enter that every time. Going one step forward, we’ll save all of these 4 parameters, in case user just wants to re-trigger a build.
Let’s create a dialog with these 4 input fields. Create a class named MyDialogWrapper.kt and add the following:
import com.intellij.openapi.ui.DialogWrapper
import com.intellij.ui.components.JBLabel
import com.intellij.uiDesigner.core.AbstractLayout
import com.intellij.util.ui.GridBag
import com.intellij.util.ui.JBUI
import com.intellij.util.ui.UIUtil
import java.awt.Dimension
import java.awt.GridBagConstraints
import java.awt.GridBagLayout
import java.awt.Insets
import javax.swing.*


class MyDialogWrapper : DialogWrapper(true) {

    private val panel = JPanel(GridBagLayout())
    private val authToken = JTextField()
    private val branchName = JTextField()
    private val appSlug = JTextField()

    val workflowList = arrayOf("primary", "release-qa-android")
    private val comboBox: JComboBox<String> = JComboBox(workflowList)


    init {
        init()
        title = "MyDemo Data"
    }

    override fun createCenterPanel(): JComponent? {
        val gb = GridBag()
            .setDefaultWeightX(1.0)
            .setDefaultFill(GridBagConstraints.HORIZONTAL)
            .setDefaultInsets(Insets(0, 0, AbstractLayout.DEFAULT_VGAP, AbstractLayout.DEFAULT_HGAP))

        panel.preferredSize = Dimension(400, 200)

        panel.add(label("Auth Token"), gb.nextLine().next().weightx(0.2))
        panel.add(authToken, gb.next().weightx(0.8))

        panel.add(label("App Slug"), gb.nextLine().next().weightx(0.2))
        panel.add(appSlug, gb.next().weightx(0.8))

        panel.add(label("Branch Name"), gb.nextLine().next().weightx(0.2))
        panel.add(branchName, gb.next().weightx(0.8))

        panel.add(label("Workflow"), gb.nextLine().next().weightx(0.2))
        panel.add(comboBox, gb.next().weightx(0.8))


        return panel
    }


    override fun doOKAction() {
        if(authToken.text.isNullOrEmpty() || branchName.text.isNullOrEmpty() || appSlug.text.isNullOrEmpty()){
            JOptionPane.showMessageDialog(panel, "Please enter all the fields.")
            return
        }
        val authToken = authToken.text
        val branchName = branchName.text
        val appSlug = appSlug.text
        val selectedWorkflow = comboBox.selectedItem?.toString() ?: "primary"
    }

    private fun label(text: String): JComponent {
        val label = JBLabel(text)
        label.componentStyle = UIUtil.ComponentStyle.SMALL
        label.fontColor = UIUtil.FontColor.BRIGHTER
        label.border = JBUI.Borders.empty(0, 5, 2, 0)
        return label
    }

}
I’ve already covered how to build a dialog in depth, in my previous post. Go check it out here. You’ll also learn how to handle user input.
3. Creating our JavaBean/Data class
Now state can be created as a separate Java Bean (POJO) class/Kotlin Data class or stored inside the Service class itself. But for separation of concerns, we’ll create a new class to hold our state.
So create a data class in kotlin and include the four fields mentioned above. If you want any of these parameters to be excluded from state, just mark it with @Transient annotation.
data class MyState (
    var authToken: String = "",
    var branchName: String = "",
    var workflow: String = "primary",
    var appSlug: String = ""
)
4. Creating our Service class
This is where the meat of the code lies. This is the most important part in persisting state in an intellij plugin! This class will act as a service which’ll hold and provide us with the state (our stored values).
A service is loaded when the plugin calls getService method of ServiceManager class. This ensures that only one instance of the service is loaded, even if it is called multiple times. In our case, only job of the service is to provide us with the state of the plugin.
Create a file named AndroidVilleStateService.kt, and extend it from PersistentStateComponent. This interface expects a type parameter which is our data class. So pass in the type parameter as well:
import com.intellij.openapi.components.PersistentStateComponent
import com.intellij.openapi.components.ServiceManager


class AndroidVilleStateService : PersistentStateComponent<MyState> {


}
We’ll need to override two methods, getState() and loadState(). The getState method will return our state and loadState will set our state instance (we’ll have an instance of state in this class).
The getState() method is called whenever your state is saved. If the returned state is equal to the default state (from default constructor), nothing is stored. Else, the state is serialized in XML format and stored.
The loadState() method is called whenever a component is loaded or the state has been changed externally (like editing the XML file). This method then updates the UI.
We’ll need to create a static method getInstance() to make a call to service manager class and which loads our service. Using this, one can access the state property.
import com.intellij.openapi.components.PersistentStateComponent
import com.intellij.openapi.components.ServiceManager

class AndroidVilleStateService : PersistentStateComponent<MyState> {

    private var pluginState: MyState = MyState()


    override fun getState(): MyState? {
        return pluginState
    }

    override fun loadState(state: MyState) {
        pluginState = state
    }

    companion object {
        @JvmStatic
        fun getInstance(): PersistentStateComponent<MyState> {
            return ServiceManager.getService(AndroidVilleStateService::class.java)
        }
    }

}
Finally, in order to auto-populate the fields of your dialog (once they’ve been saved) add the following to your dialog wrapper class.
5. Specifying Storage name and Registering Service
Persisting state in an intellij plugin is done by serializing the data into an XML file. Now you can explicitly define the name of the file and also the root tag of your state. To do this, add the following annotation along with values at the top of your service class:
import com.intellij.openapi.components.PersistentStateComponent
import com.intellij.openapi.components.ServiceManager
import com.intellij.openapi.components.State
import com.intellij.openapi.components.Storage

@State(
    name = "demo",
    storages = [Storage("demo.xml")]
)
class AndroidVilleStateService : PersistentStateComponent<MyState> {

    private var pluginState: MyState = MyState()


    override fun getState(): MyState? {
        return pluginState
    }

    override fun loadState(state: MyState) {
        pluginState = state
    }

    companion object {
        @JvmStatic
        fun getInstance(): PersistentStateComponent<MyState> {
            return ServiceManager.getService(AndroidVilleStateService::class.java)
        }
    }

}- Name is a required parameter and will define the root tag of your xml.
- Storage is optional for project level values. It’ll just use the standard project file.
At last, like many other things, we’ll also need to register the service in our plugin.xml file. Add the following to plugin.xml:
<extensions defaultExtensionNs="com.intellij">
    <applicationService serviceImplementation="AndroidVilleStateService"/>

</extensions>
6. Making an API Call from plugin
Now it’s time to make an API call. I’m using OkHttp client for this.
Add the dependency for OkHttpClient in build.gradle file. I’m also using Jackson for serializing and de-serializing.
implementation "io.ktor:ktor-jackson:1.3.2"
implementation("com.squareup.okhttp3:okhttp:4.5.0")
Next up, create an API request and enqueue it (so it’s non-blocking). Since this post is focused on how to persist state in intellij plugin, I’ll not be going over making an API call in depth. But here is the code for making the API call:
private fun makeRequest() {
        val state = AndroidVilleStateService.getInstance().state
        val json = jacksonObjectMapper()
        val userData = Body(HookInfo("bitrise"), BuildParams(state?.branchName ?: "", state?.workflow ?: ""))
        val client = OkHttpClient()
        val requestBody = json.writeValueAsString(userData)

        val request = Request.Builder()
            .method("POST", requestBody.toRequestBody("application/json; charset=utf-8".toMediaType()))
            .header("Authorization", state?.authToken ?: "")
            .url("https://api.bitrise.io/v0.1/apps/${state?.appSlug}/builds")
            .build()

        client.newCall(request)
            .enqueue(object : Callback {
                override fun onFailure(call: Call, e: IOException) {
                    println(e.toString())
                }

                override fun onResponse(call: Call, response: Response) {
                    println(response.toString())
                    response.close()
                }
            })
    }
You can find all the endpoints and request bodies in the Bitrise API documentation for triggering and aborting builds.
At last, all you need to do is show your dialog when action is performed. Here is how your final MyAction.kt file would look like:
import com.fasterxml.jackson.module.kotlin.jacksonObjectMapper
import com.intellij.openapi.actionSystem.AnAction
import com.intellij.openapi.actionSystem.AnActionEvent
import okhttp3.*
import java.io.IOException
import okhttp3.RequestBody.Companion.toRequestBody
import okhttp3.MediaType.Companion.toMediaType

class MyAction : AnAction() {
    lateinit var toolWindow: ToolWindow
    lateinit var consoleView: ConsoleView

    override fun actionPerformed(e: AnActionEvent) {
        val wrapper = MyDialogWrapper()
        if (wrapper.showAndGet()) {
            val state = AndroidVilleStateService.getInstance().state
            if (state == null || state.authToken.isEmpty()) return
            makeRequest()
        }
    }

    private fun makeRequest() {
        val state = AndroidVilleStateService.getInstance().state
        val json = jacksonObjectMapper()
        val userData = Body(HookInfo("bitrise"), BuildParams(state?.branchName ?: "", state?.workflow ?: ""))
        val client = OkHttpClient()
        val requestBody = json.writeValueAsString(userData)

        val request = Request.Builder()
            .method("POST", requestBody.toRequestBody("application/json; charset=utf-8".toMediaType()))
            .header("Authorization", state?.authToken ?: "")
            .url("https://api.bitrise.io/v0.1/apps/${state?.appSlug}/builds")
            .build()

        client.newCall(request)
            .enqueue(object : Callback {
                override fun onFailure(call: Call, e: IOException) {
                    println(e.toString())
                }

                override fun onResponse(call: Call, response: Response) {
                    println(response.toString())
                    response.close()
                }
            })
    }
}
7. Running the Plugin
Finally, we’re at a point where we can run our plugin. Just click on the play button on the top and wait for your IDE to fire up.
If you want to know how to change the preferred IDE for testing, you can check out this previous post.
Enter all the values and hit the OK button. You’ll notice the response in the console window of IntelliJ. Now perform the action again, and Voila! all of your values are already persisted in your plugin.
8. Up Next:
In this part we learnt about persisting state in an intellij plugin. But it still has scope of improvement. We should show the user an output of his/her action inside his IDE. Ideally, we should show the user the output in a console window. So in final part of this series, we’ll take a look at how to create a console window for your plugin to display an output to the user.
Welcome to <AndroidVille/>
AndroidVille is a community of Mobile Developers where we share knowledge related to Android Development, Flutter Development, React Native Tutorials, Java, Kotlin and much more.
We have a SLACK workspace where we share updates related to new job opportunities, articles on Mobile Development/updates from the industry. We also have channels to help you with any questions, dev-help that you require. Just post a question and people would be ready to help you out 🙂
Click on this link to join the AndroidVille SLACK workspace. It’s absolutely free!
If you like any article, do give it a share on Facebook, Linkedin. You can follow me on LinkedIn, Twitter, Quora, and Medium where I answer questions related to Mobile Development, especially Android and Flutter.
If you want to stay updated with all the latest articles, subscribe to the weekly newsletter by entering your email address in the form on the top right section of this page.