
In this tutorial, we will see how we can calculate the area of a region by integrating Google Maps in an Android App.
Calculating area of a region on google map can be a very real requirement for people and organizations such as Surveyors, Architects, websites like 99 acres and so on. Calculating the area of very large regions such as geographical sites, monuments, bungalows is not practically possible with any measuring instruments.
Although there are ways of doing that, they can be cumbersome and if someone requires just a rough estimate of the area, the hassle is not worth it.
In such cases, this application can prove to be really helpful. It uses Google Maps to load the location and then with some customization, the user is able to mark the boundaries of the region whose area they want to estimate and the application would normalize the points according to coordinates on the earth and calculate an approximate area of the region.
We will be using MVP Architecture in this android app. If you aren’t familiar with MVP Architecture for Android, I highly recommend checking out this resource.
The entire development process for this Android App will be divided into 4 broad steps:
- Creating a Project on Google Cloud Platform & Enabling Maps API.
- Getting the API key
- Integrating Maps SDK in a new Android Application
- Adding customizations for calculating the area of a region
So, let’s start!!
Creating a Project on Google Cloud Platform
In order to use any API by Google, you’ll need to create a project on Google Cloud Platform. It has APIs such as Vision API for Image Recognition, Youtube Data API, Google Maps API and so on.
We will be working with Google Maps API in this tutorial. So, in order to create a new project, go https://cloud.google.com/
- Log in to your google account.
- Go to ‘Console’
- Near the Hamburger Icon on the top left, click on the dropdown arrow.
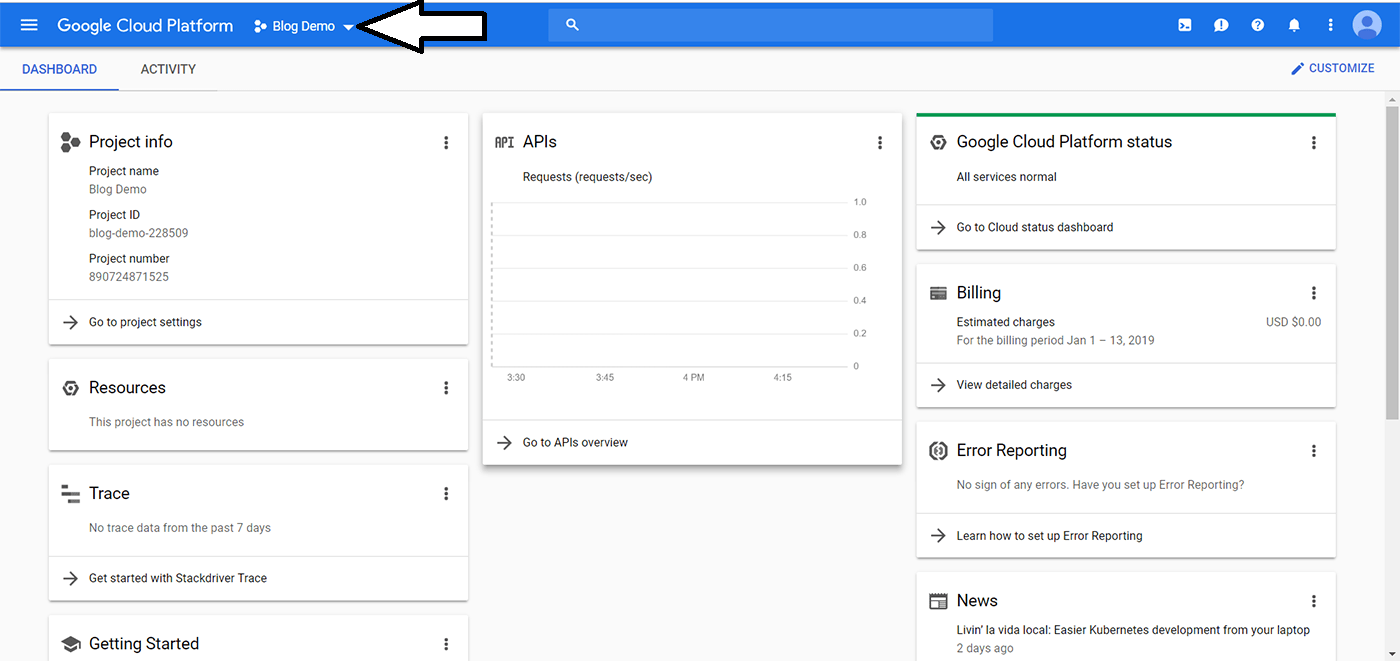
- Then Click ‘New Project’. Give it a name and click ‘Create’.
- Then from the same dropdown arrow, click on the newly created project to select it.
- Now we need to enable maps API. To do this, click on the Hamburger Icon on the top left corner, and then go to APIs & Services.
- Click ENABLE APIS AND SERVICES.
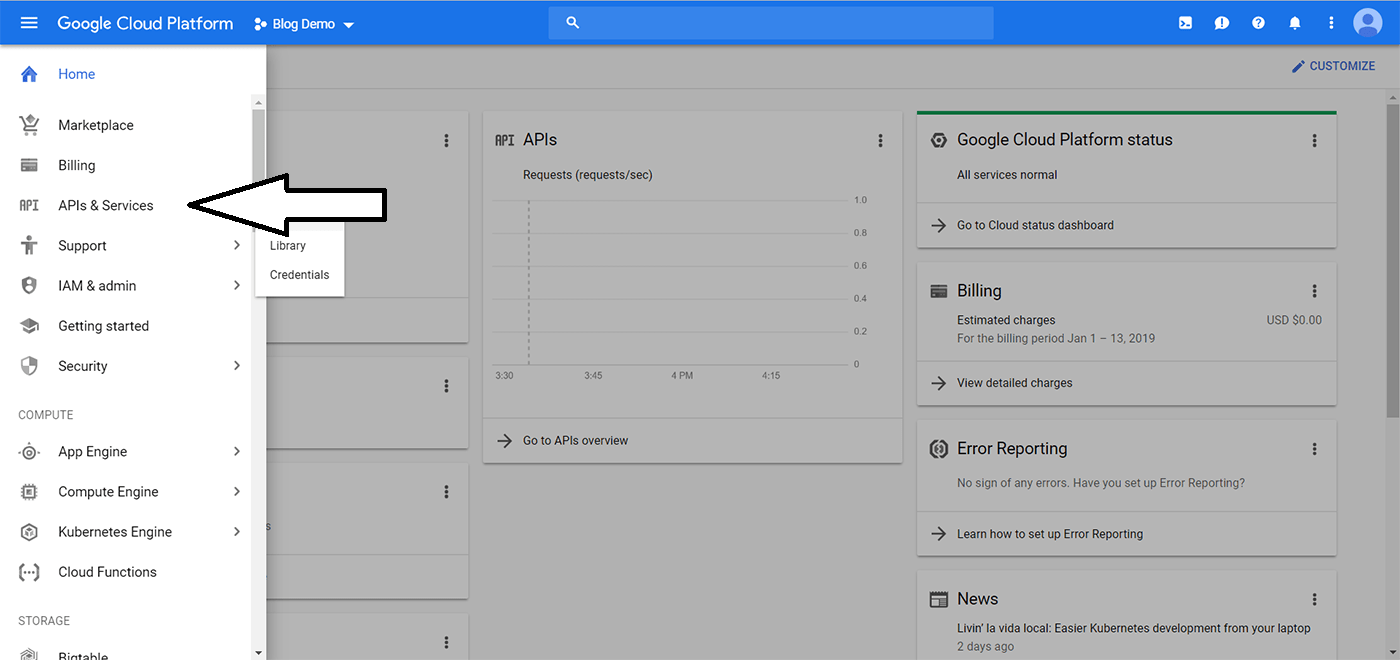
- Select Maps SDK for Android and then Click on Enable.
- Your Maps API is ready to be used in your android application!!
Getting the API key
Google will need to verify that the request is coming from a verified source and to do that, it provides the authorized user, an API key to verify the request. We will need to add this API key to our Android Application.
So, let’s go ahead and create an API key for our app.
- In Google Cloud Platform, go to console, then select your project and click on APIs & Services.
- On the left-hand side, click on ‘Credentials’
- Then click on ‘Create Credentials’ button in the center of the screen. You will get 4 options:
- API Key
- OAuth Client ID
- Service Account Key
- Help me choose
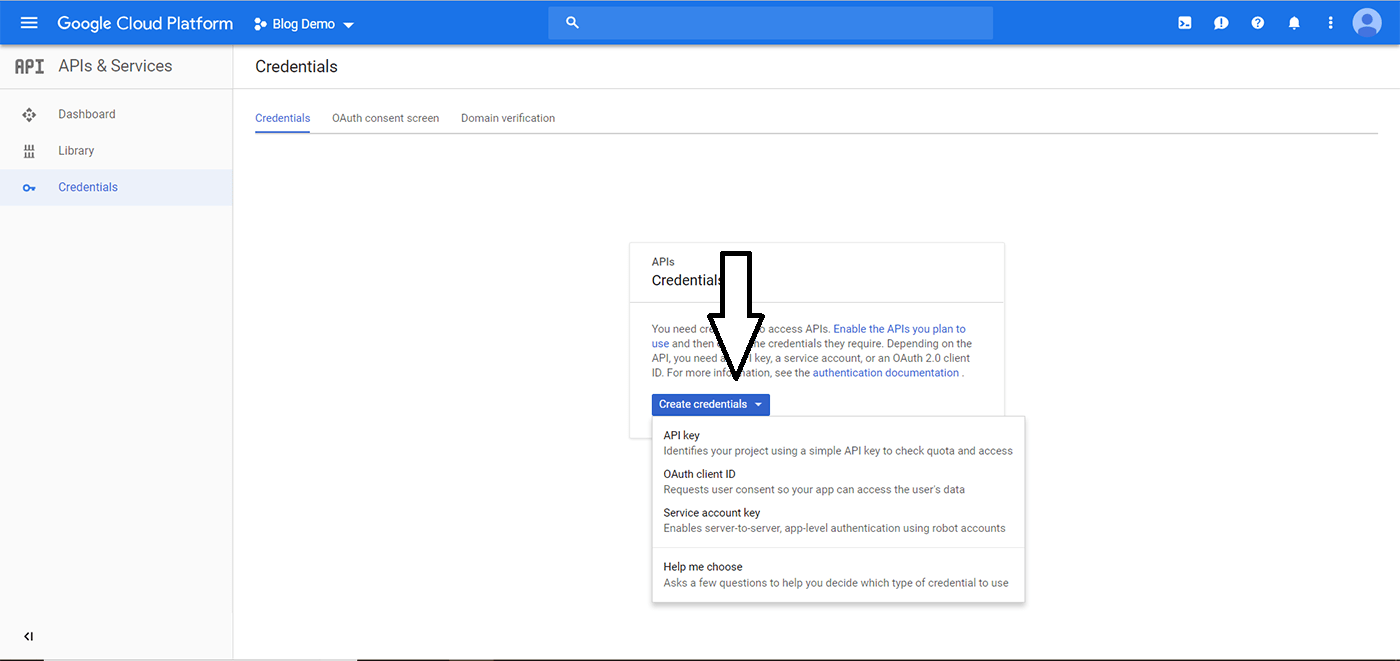
- Click on API Key.
- Now Google will create an API key for you which you will see in a popup. Copy that API key. We will add this to our android application when we begin adding Maps SDK to our App.
** Note: For the simplicity of this tutorial, I am not adding any restrictions to the API key, but when releasing an app into production, it is highly advisable to restrict the API key to your specific usages such as Android app, iOS app or a web application. **
Integrating the SDK in a new Android Application
Now we’ll begin coding our application in Android Studio.
Creating a new Android Application Project
- Begin by creating a new Android Application in Android Studio as always.
- Open app level build.gradle file and add the following dependency
implementation 'com.google.android.gms:play-services-maps:16.0.0'
- Now click on sync project and wait for Android Studio to download the dependencies and finish building.
- Once Android Studio has finished building, we are ready to add the API key to our app.
- Open AndroidManifest.xml and add the following tags inside <application> tag. Remember, these meta tags should be placed outside of any <activity> tag.
<meta-data
    android:name="com.google.android.gms.version"
    android:value="@integer/google_play_services_version" />
<meta-data
    android:name="com.google.android.geo.API_KEY"
android:value="YOUR API KEY GOES HERE" />- We have added the API key to our application.
With the setup almost done, we can now focus on creating the actual application. First, we need to add the map fragment provided by the Google Maps SDK into our main activity layout file. So, go to your layout file, in my case it is activity_main.xml, and add the following to your code:
<?xml version="1.0" encoding="utf-8"?>
<FrameLayout xmlns:android="http://schemas.android.com/apk/res/android"
    xmlns:app="http://schemas.android.com/apk/res-auto"
    xmlns:tools="http://schemas.android.com/tools"
    android:layout_width="match_parent"
    android:layout_height="match_parent"
    tools:context=".activities.MainActivity">


    <LinearLayout
        android:layout_width="match_parent"
        android:layout_height="match_parent"
        android:orientation="vertical">

        <TextView
            android:layout_width="match_parent"
            android:layout_height="wrap_content"
            android:background="@android:color/white"
            android:padding="4dp"
            android:text="Area:"
            android:textSize="16sp" />

        <TextView
            android:id="@+id/tv_area"
            android:layout_width="match_parent"
            android:layout_height="wrap_content"
            android:background="@android:color/white"
            android:padding="4dp"
            android:text="18 m^2"
            android:textSize="16sp" />

        <fragment xmlns:android="http://schemas.android.com/apk/res/android"
            xmlns:tools="http://schemas.android.com/tools"
            android:id="@+id/map"
            android:name="com.google.android.gms.maps.SupportMapFragment"
            android:layout_width="match_parent"
            android:layout_height="match_parent"
            tools:context=".MapsActivity" />
    </LinearLayout>

    <android.support.design.widget.FloatingActionButton
        android:layout_width="wrap_content"
        android:id="@+id/fab_undo"
        android:layout_height="wrap_content"
        android:layout_gravity="bottom|end"
        android:layout_margin="16dp"
        app:backgroundTint="@android:color/white"
        app:elevation="2dp"
        app:fabSize="normal"
        app:rippleColor="@android:color/darker_gray"
        app:srcCompat="@drawable/ic_undo_black_24dp" />

</FrameLayout>
This adds a map fragment to your layout. On top of the map fragment, we are also adding a floating action button to undo our last marked point. The use of this button would be clear as we move on with the tutorial.
Setting Up MVP Architecture
Although you can write all of your code in one single activity, but as your application gets bigger, it would be impossible to manage it and you’d eventually end up giving up on the application (as I did a few years ago :P).
So, I recommend that you read through this tutorial to understand MVP Architecture and once your understand how presenter, view and model work, you’re good to go again.
Here is the code for View and Presenter interface:
public interface MapsContract {
    interface View extends BaseView<Presenter> {

        void loadMap();

        void showLocationPermissionNeeded();

        void addMarkerToMap(MarkerOptions options, LatLng latLng);
    }

    interface Presenter extends BasePresenter{

        void locationPermissionGranted();
        void locationPermissionRefused();

        void requestGps();

        void addMarker(LatLng latLng);
    }

}
Here is the BasePresenter and Base View:
public interface BasePresenter {
    void start();
}
public interface BaseView <T>{
void setPresenter(T presenter);
Activity getViewActivity();
}**Note: These go in separate files**
Now implement MapsContract.View on your MainActivity.java and override it’s methods.
Also, create a MapsPresenter.java and implement MapsContract.Presenter and override it’s methods.
This is how our MainActivity and MapsPresenter look as of now:
public class MainActivity extends AppCompatActivity implements MapsContract.View, OnMapReadyCallback {

    MapsContract.Presenter mPresenter;
    private TextView areaTextView;

    @Override
    protected void onCreate(Bundle savedInstanceState) {
        super.onCreate(savedInstanceState);
        setContentView(R.layout.activity_main);
        mPresenter = new MapsPresenter(this);
        areaTextView = findViewById(R.id.tv_area);
    }

    @Override
    public void setPresenter(MapsContract.Presenter presenter) {
        mPresenter = presenter;
        mPresenter.start();
    }

    @Override
    public Activity getViewActivity() {
        return this;
    }

    @Override
    public void loadMap() {

    }

    @Override
    public void showLocationPermissionNeeded() {
    }

    @Override
    public void addMarkerToMap(MarkerOptions options, LatLng latLng) {

    }

}
public class MapsPresenter implements MapsContract.Presenter, GoogleApiClient.ConnectionCallbacks, GoogleApiClient.OnConnectionFailedListener {
MapsContract.View mView;
MapsPresenter(MapsContract.View view) {
mView = view;
view.setPresenter(this);
}
@Override
public void start() {
}
@Override
public void locationPermissionGranted() {
}
@Override
public void locationPermissionRefused() {
}
@Override
public void requestGps() {
}
@Override
public void addMarker(LatLng latLng) {
}
}Setting Up Maps
Now we need to find the fragment in MainActivity.java and load the map. To do this, head over to MainActivity.java and find the map fragment by id as below:
@Override
public void loadMap() {
    SupportMapFragment fragment = (SupportMapFragment) getSupportFragmentManager().findFragmentById(R.id.map);
    fragment.getMapAsync(this);
}
We also load the map asynchronously.
To implement the callbacks, press alt+enter on the red squiggly line under ‘this’ and select implement methods.
Now try and run the app on your device/emulator. You’ll see that our map isn’t functioning yet!!
Permissions
You’ll notice that the fragment has been added successfully and you’ll see the google logo, but you won’t be seeing the map yet. This is because we haven’t asked the user for permission to their location.
Since Android M, it is compulsory to ask permissions from the user at runtime instead of only once while downloading the application.
So, we’ll be adding some runtime permissions now.
First, we’ll add the permission in our AndroidManifest.xml for users below Android M.
<uses-permission android:name="android.permission.ACCESS_FINE_LOCATION" />
Now in our presenter, we’ll check if the permission has already been granted:
@Override
public void start() {
    checkPermission();
}

private void checkPermission() {
    if (Build.VERSION.SDK_INT >= Build.VERSION_CODES.M) {

        if (mView.getViewActivity().checkSelfPermission(android.Manifest.permission.ACCESS_FINE_LOCATION) != PackageManager.PERMISSION_GRANTED) {
            if (mView.getViewActivity().shouldShowRequestPermissionRationale(android.Manifest.permission.ACCESS_FINE_LOCATION)) {
                Toast.makeText(mView.getViewActivity(), "Please grant location permission", Toast.LENGTH_SHORT).show();
                mView.getViewActivity().requestPermissions(new String[]{android.Manifest.permission.ACCESS_FINE_LOCATION}, Config.PERMISSION_LOCATION);
            } else {
                mView.getViewActivity().requestPermissions(new String[]{android.Manifest.permission.ACCESS_FINE_LOCATION}, Config.PERMISSION_LOCATION);
            }
        } else {
            mView.loadMap();
        }

    } else {
        mView.loadMap();
    }
}
If not, then we will check if we have already asked for this permission before, for this we use shouldShowRequestPermissionRationale() method.
If we haven’t asked for this permission before then we can directly go to requestPermissions() method.
**Note: Since this is required only above Android M, we have placed a wrapper to check if the version is above M, if not, then we directly load the map**
If the user had chosen the don’t ask again option previously, we won’t be able to ask for the permission anymore and this method would return false, else, we’ll show an explanation and ask the permission again.
The result of our asking the permission is obtained in onRequestPermissionResult method which we will override in our activity.
@Override
public void onRequestPermissionsResult(int requestCode, @NonNull String[] permissions, @NonNull int[] grantResults) {
    switch (requestCode) {
        case Config.PERMISSION_LOCATION: {
            if (grantResults.length > 0
                    && grantResults[0] == PackageManager.PERMISSION_GRANTED) {
                mPresenter.locationPermissionGranted();
            } else {
                mPresenter.locationPermissionRefused();
            }
            return;
        }
    }
}
If the user has granted the permission, we’re good to go, else, we need to disable that feature.
Requesting to Enable GPS in Android Application
With runtime permissions aside, we now need the user to enable their GPS so that we can access their current location and zoom in the map accordingly.
To do this, we need to add another dependency in our app level build.gradle file:
implementation 'com.google.android.gms:play-services-location:16.0.0'
Now sync project with gradle files and wait for the gradle build to finish. Once done, we’ll start requesting GPS from the user. Add this code below to the presenter:
@Override
public void requestGps() {
    GoogleApiClient mGoogleApiClient = new GoogleApiClient.Builder(mView.getViewActivity())
            .addApi(LocationServices.API)
            .addConnectionCallbacks(this)
            .addOnConnectionFailedListener(this).build();
    mGoogleApiClient.connect();

    LocationRequest locationRequest = LocationRequest.create()
            .setPriority(LocationRequest.PRIORITY_HIGH_ACCURACY)
            .setNumUpdates(5)
            .setInterval(100);

    LocationSettingsRequest.Builder builder = new LocationSettingsRequest.Builder()
            .addLocationRequest(locationRequest).setAlwaysShow(true);
    PendingResult<LocationSettingsResult> result =
            LocationServices.SettingsApi.checkLocationSettings(mGoogleApiClient, builder.build());
    result.setResultCallback(new ResultCallback<LocationSettingsResult>() {
        @Override
        public void onResult(@NonNull LocationSettingsResult locationSettingsResult) {
            final Status status = locationSettingsResult.getStatus();
            switch (status.getStatusCode()) {
                case LocationSettingsStatusCodes.SUCCESS:

                    break;
                case LocationSettingsStatusCodes.RESOLUTION_REQUIRED:
                    try {
                        // Show the dialog by calling startResolutionForResult(),
                        // and check the result in onActivityResult().
                        status.startResolutionForResult(mView.getViewActivity(),
                                Config.CHECK_GPS_ON_SETTING);
                    } catch (IntentSender.SendIntentException e) {
                        e.printStackTrace();
                    }
                    break;
                case LocationSettingsStatusCodes.SETTINGS_CHANGE_UNAVAILABLE:
                    break;
            }
        }
    });
}
I’ll explain what’s going on here!!
GoogleApiClient is used to access google play services such as Google Sign-In, Google Drive, etc. In this case, we’ll be accessing the location services also provided under google play services.
What happens is this:
- First, a client is created to establish a connection with location services.
- Second, we configure the location services as to what will be the frequency of updates and quality of services.
- Third, we check whether we are able to receive location updates from the play services. If not, then GPS is not enabled and we plan our next move accordingly.
- Generally, if the user’s GPS is not enabled, we take them to the settings activity and ask them to enable the location. If the user enables the location, we return to the onActivityResult method with SUCCESS else we need to carry on without location updates.
So, in order to check whether user finally enabled the location or not, head over to MainActivity.java and add this code below:
@Override
protected void onActivityResult(int requestCode, int resultCode, @Nullable Intent data) {
    switch (requestCode) {
        case Config.CHECK_GPS_ON_SETTING: {
            switch (resultCode) {
                case RESULT_OK:

                case RESULT_CANCELED:

                    break;
                default:
                    break;
            }
            break;
        }
    }
}
If the permission was granted, we call mPresenter.locationPermissionGranted(), else mPresenter.locationPermissionDenied().
Adding customizations for calculating the Area of a region
No,w this is the easy part. Once we have the permission, GPS setup and our map loaded, we can now continue with more exciting features such as drawing a polygon as the user places markers on the screen and calculating area.
Adding/Removing the markers
Now we’ll begin adding markers on the screen as the user touches any location on the map. To do this head over to onMapReady callback and add an onMapClickListener to your map:
@SuppressLint("MissingPermission")
@Override
public void onMapReady(GoogleMap googleMap) {
    mMap = googleMap;
    mMap.setMyLocationEnabled(true);
    mMap.setOnMapClickListener(new GoogleMap.OnMapClickListener() {
        @Override
        public void onMapClick(LatLng latLng) {
            mPresenter.addMarker(latLng);
        }
    });

}
Whenever the user clicks on the map, we ask the presenter to add a marker, it configures the marker and returns the configured marker options which can be used to place the marker on the screen. Head over to MapsPresenter and add the following code:
@Override
public void addMarker(LatLng latLng) {
    Activity activity = mView.getViewActivity();
    @IdRes int icon = R.drawable.ic_add_location_light_green_500_36dp;
    BitmapDescriptor bitmap = BitmapDescriptorFactory.fromBitmap(getBitmapFromDrawable(activity, icon));
    MarkerOptions options = new MarkerOptions().position(latLng).icon(bitmap).draggable(true);
    mView.addMarkerToMap(options,latLng);
}

private static Bitmap getBitmapFromDrawable(Context context, int icon) {
    Drawable drawable = ContextCompat.getDrawable(context, icon);
    Bitmap obm = Bitmap.createBitmap(drawable.getIntrinsicWidth(), drawable.getIntrinsicHeight(), Bitmap.Config.ARGB_8888);
    Canvas canvas = new Canvas(obm);
    drawable.setBounds(0, 0, canvas.getWidth(), canvas.getHeight());
    drawable.draw(canvas);
    return obm;
}
To add a marker we use addMarker method that the map object provides. Then we add the marker and point to their respective lists and finally draw the polygon on the screen.
@Override
public void addMarkerToMap(MarkerOptions options, LatLng latLng) {
    Marker marker = mMap.addMarker(options);
    marker.setTag(latLng);
    markerList.add(marker);
    points.add(latLng);
    drawPolygon();
}

private void drawPolygon() {
    if (polygon != null) {
        polygon.remove();
    }
    PolygonOptions polygonOptions = new PolygonOptions();
    polygonOptions.fillColor(Color.argb(0, 0, 0, 0));
    polygonOptions.strokeColor(Color.argb(255, 0, 0, 0));
    polygonOptions.strokeWidth(10);
    polygonOptions.addAll(points);
    polygon = mMap.addPolygon(polygonOptions);
}
Now we add a drag listener to the marker in case the user changes his mind and decides to change the location of an already placed marker. To update the location, we find the marker in the list and update it’s lat long in the points list.
@SuppressLint("MissingPermission")
@Override
public void onMapReady(GoogleMap googleMap) {
    mMap = googleMap;
    mMap.setMyLocationEnabled(true);
    mMap.setOnMapClickListener(new GoogleMap.OnMapClickListener() {
        @Override
        public void onMapClick(LatLng latLng) {
            mPresenter.addMarker(latLng);
        }
    });

    mMap.setOnMarkerDragListener(new GoogleMap.OnMarkerDragListener() {
        @Override
        public void onMarkerDragStart(Marker marker) {

        }

        @Override
        public void onMarkerDrag(Marker marker) {
            updateMarkerLocation(marker,false);
        }

        @Override
        public void onMarkerDragEnd(Marker marker) {
            updateMarkerLocation(marker,true);
        }
    });

}

private void updateMarkerLocation(Marker marker, boolean calculate) {
    LatLng latLng = (LatLng) marker.getTag();
    int position = points.indexOf(latLng);
    points.set(position, marker.getPosition());
    marker.setTag(marker.getPosition());
    drawPolygon();
    if (calculate)
        setAreaLength(points);
}
Finally, we give the user an option to remove their last-placed marker. We place an on click listener to the Floating Action Button and upon clicking it, remove the marker from the markerList and update the points list as well.
@Override
protected void onCreate(Bundle savedInstanceState) {
    super.onCreate(savedInstanceState);
    setContentView(R.layout.activity_main);
    mPresenter = new MapsPresenter(this);
    areaTextView = findViewById(R.id.tv_area);
    FloatingActionButton fabundo = findViewById(R.id.fab_undo);
    fabundo.setOnClickListener(new View.OnClickListener() {
        @Override
        public void onClick(View view) {
            if (points.size() > 0) {
                Marker marker = markerList.get(markerList.size() - 1);
                marker.remove();
                markerList.remove(marker);
                points.remove(points.size() - 1);
                if (points.size() > 0) {
                    drawPolygon();
                }
            }
        }
    });
}
Calculating the area
This part is fairly easy, we create a utility class named SphericalUtil and MathUtil. Here is the code for both of them.
public class SphericalUtil {

    private SphericalUtil() {}

    /**
     * Returns the heading from one LatLng to another LatLng. Headings are
     * expressed in degrees clockwise from North within the range [-180,180).
     * @return The heading in degrees clockwise from north.
     */
    public static double computeHeading(LatLng from, LatLng to) {
        // http://williams.best.vwh.net/avform.htm#Crs
        double fromLat = toRadians(from.latitude);
        double fromLng = toRadians(from.longitude);
        double toLat = toRadians(to.latitude);
        double toLng = toRadians(to.longitude);
        double dLng = toLng - fromLng;
        double heading = atan2(
                sin(dLng) * cos(toLat),
                cos(fromLat) * sin(toLat) - sin(fromLat) * cos(toLat) * cos(dLng));
        return wrap(toDegrees(heading), -180, 180);
    }

    /**
     * Returns the LatLng resulting from moving a distance from an origin
     * in the specified heading (expressed in degrees clockwise from north).
     * @param from     The LatLng from which to start.
     * @param distance The distance to travel.
     * @param heading  The heading in degrees clockwise from north.
     */
    public static LatLng computeOffset(LatLng from, double distance, double heading) {
        distance /= EARTH_RADIUS;
        heading = toRadians(heading);
        // http://williams.best.vwh.net/avform.htm#LL
        double fromLat = toRadians(from.latitude);
        double fromLng = toRadians(from.longitude);
        double cosDistance = cos(distance);
        double sinDistance = sin(distance);
        double sinFromLat = sin(fromLat);
        double cosFromLat = cos(fromLat);
        double sinLat = cosDistance * sinFromLat + sinDistance * cosFromLat * cos(heading);
        double dLng = atan2(
                sinDistance * cosFromLat * sin(heading),
                cosDistance - sinFromLat * sinLat);
        return new LatLng(toDegrees(asin(sinLat)), toDegrees(fromLng + dLng));
    }

    /**
     * Returns the location of origin when provided with a LatLng destination,
     * meters travelled and original heading. Headings are expressed in degrees
     * clockwise from North. This function returns null when no solution is
     * available.
     * @param to       The destination LatLng.
     * @param distance The distance travelled, in meters.
     * @param heading  The heading in degrees clockwise from north.
     */
    public static LatLng computeOffsetOrigin(LatLng to, double distance, double heading) {
        heading = toRadians(heading);
        distance /= EARTH_RADIUS;
        // http://lists.maptools.org/pipermail/proj/2008-October/003939.html
        double n1 = cos(distance);
        double n2 = sin(distance) * cos(heading);
        double n3 = sin(distance) * sin(heading);
        double n4 = sin(toRadians(to.latitude));
        // There are two solutions for b. b = n2 * n4 +/- sqrt(), one solution results
        // in the latitude outside the [-90, 90] range. We first try one solution and
        // back off to the other if we are outside that range.
        double n12 = n1 * n1;
        double discriminant = n2 * n2 * n12 + n12 * n12 - n12 * n4 * n4;
        if (discriminant < 0) {
            // No real solution which would make sense in LatLng-space.
            return null;
        }
        double b = n2 * n4 + sqrt(discriminant);
        b /= n1 * n1 + n2 * n2;
        double a = (n4 - n2 * b) / n1;
        double fromLatRadians = atan2(a, b);
        if (fromLatRadians < -PI / 2 || fromLatRadians > PI / 2) {
            b = n2 * n4 - sqrt(discriminant);
            b /= n1 * n1 + n2 * n2;
            fromLatRadians = atan2(a, b);
        }
        if (fromLatRadians < -PI / 2 || fromLatRadians > PI / 2) {
            // No solution which would make sense in LatLng-space.
            return null;
        }
        double fromLngRadians = toRadians(to.longitude) -
                atan2(n3, n1 * cos(fromLatRadians) - n2 * sin(fromLatRadians));
        return new LatLng(toDegrees(fromLatRadians), toDegrees(fromLngRadians));
    }

    /**
     * Returns the LatLng which lies the given fraction of the way between the
     * origin LatLng and the destination LatLng.
     * @param from     The LatLng from which to start.
     * @param to       The LatLng toward which to travel.
     * @param fraction A fraction of the distance to travel.
     * @return The interpolated LatLng.
     */
    public static LatLng interpolate(LatLng from, LatLng to, double fraction) {
        // http://en.wikipedia.org/wiki/Slerp
        double fromLat = toRadians(from.latitude);
        double fromLng = toRadians(from.longitude);
        double toLat = toRadians(to.latitude);
        double toLng = toRadians(to.longitude);
        double cosFromLat = cos(fromLat);
        double cosToLat = cos(toLat);

        // Computes Spherical interpolation coefficients.
        double angle = computeAngleBetween(from, to);
        double sinAngle = sin(angle);
        if (sinAngle < 1E-6) {
            return new LatLng(
                    from.latitude + fraction * (to.latitude - from.latitude),
                    from.longitude + fraction * (to.longitude - from.longitude));
        }
        double a = sin((1 - fraction) * angle) / sinAngle;
        double b = sin(fraction * angle) / sinAngle;

        // Converts from polar to vector and interpolate.
        double x = a * cosFromLat * cos(fromLng) + b * cosToLat * cos(toLng);
        double y = a * cosFromLat * sin(fromLng) + b * cosToLat * sin(toLng);
        double z = a * sin(fromLat) + b * sin(toLat);

        // Converts interpolated vector back to polar.
        double lat = atan2(z, sqrt(x * x + y * y));
        double lng = atan2(y, x);
        return new LatLng(toDegrees(lat), toDegrees(lng));
    }

    /**
     * Returns distance on the unit sphere; the arguments are in radians.
     */
    private static double distanceRadians(double lat1, double lng1, double lat2, double lng2) {
        return arcHav(havDistance(lat1, lat2, lng1 - lng2));
    }

    /**
     * Returns the angle between two LatLngs, in radians. This is the same as the distance
     * on the unit sphere.
     */
    static double computeAngleBetween(LatLng from, LatLng to) {
        return distanceRadians(toRadians(from.latitude), toRadians(from.longitude),
                toRadians(to.latitude), toRadians(to.longitude));
    }

    /**
     * Returns the distance between two LatLngs, in meters.
     */
    public static double computeDistanceBetween(LatLng from, LatLng to) {
        return computeAngleBetween(from, to) * EARTH_RADIUS;
    }

    /**
     * Returns the length of the given path, in meters, on Earth.
     */
    public static double computeLength(List<LatLng> path) {
        if (path.size() < 2) {
            return 0;
        }
        double length = 0;
        LatLng prev = path.get(0);
        double prevLat = toRadians(prev.latitude);
        double prevLng = toRadians(prev.longitude);
        for (LatLng point : path) {
            double lat = toRadians(point.latitude);
            double lng = toRadians(point.longitude);
            length += distanceRadians(prevLat, prevLng, lat, lng);
            prevLat = lat;
            prevLng = lng;
        }
        return length * EARTH_RADIUS;
    }

    /**
     * Returns the area of a closed path on Earth.
     * @param path A closed path.
     * @return The path's area in square meters.
     */
    public static double computeArea(List<LatLng> path) {
        return abs(computeSignedArea(path));
    }

    /**
     * Returns the signed area of a closed path on Earth. The sign of the area may be used to
     * determine the orientation of the path.
     * "inside" is the surface that does not contain the South Pole.
     * @param path A closed path.
     * @return The loop's area in square meters.
     */
    public static double computeSignedArea(List<LatLng> path) {
        return computeSignedArea(path, EARTH_RADIUS);
    }

    /**
     * Returns the signed area of a closed path on a sphere of given radius.
     * The computed area uses the same units as the radius squared.
     * Used by SphericalUtilTest.
     */
    static double computeSignedArea(List<LatLng> path, double radius) {
        int size = path.size();
        if (size < 3) { return 0; }
        double total = 0;
        LatLng prev = path.get(size - 1);
        double prevTanLat = tan((PI / 2 - toRadians(prev.latitude)) / 2);
        double prevLng = toRadians(prev.longitude);
        // For each edge, accumulate the signed area of the triangle formed by the North Pole
        // and that edge ("polar triangle").
        for (LatLng point : path) {
            double tanLat = tan((PI / 2 - toRadians(point.latitude)) / 2);
            double lng = toRadians(point.longitude);
            total += polarTriangleArea(tanLat, lng, prevTanLat, prevLng);
            prevTanLat = tanLat;
            prevLng = lng;
        }
        return total * (radius * radius);
    }

    /**
     * Returns the signed area of a triangle which has North Pole as a vertex.
     * Formula derived from "Area of a spherical triangle given two edges and the included angle"
     * as per "Spherical Trigonometry" by Todhunter, page 71, section 103, point 2.
     * See http://books.google.com/books?id=3uBHAAAAIAAJ&pg=PA71
     * The arguments named "tan" are tan((pi/2 - latitude)/2).
     */
    private static double polarTriangleArea(double tan1, double lng1, double tan2, double lng2) {
        double deltaLng = lng1 - lng2;
        double t = tan1 * tan2;
        return 2 * atan2(t * sin(deltaLng), 1 + t * cos(deltaLng));
    }
}
class MathUtil {
/**
* The earth's radius, in meters.
* Mean radius as defined by IUGG.
*/
static final double EARTH_RADIUS = 6371009;
/**
* Restrict x to the range [low, high].
*/
static double clamp(double x, double low, double high) {
return x < low ? low : (x > high ? high : x);
}
/**
* Wraps the given value into the inclusive-exclusive interval between min and max.
* @param n The value to wrap.
* @param min The minimum.
* @param max The maximum.
*/
static double wrap(double n, double min, double max) {
return (n >= min && n < max) ? n : (mod(n - min, max - min) + min);
}
/**
* Returns the non-negative remainder of x / m.
* @param x The operand.
* @param m The modulus.
*/
static double mod(double x, double m) {
return ((x % m) + m) % m;
}
/**
* Returns mercator Y corresponding to latitude.
* See http://en.wikipedia.org/wiki/Mercator_projection .
*/
static double mercator(double lat) {
return log(tan(lat * 0.5 + PI/4));
}
/**
* Returns latitude from mercator Y.
*/
static double inverseMercator(double y) {
return 2 * atan(exp(y)) - PI / 2;
}
/**
* Returns haversine(angle-in-radians).
* hav(x) == (1 - cos(x)) / 2 == sin(x / 2)^2.
*/
static double hav(double x) {
double sinHalf = sin(x * 0.5);
return sinHalf * sinHalf;
}
/**
* Computes inverse haversine. Has good numerical stability around 0.
* arcHav(x) == acos(1 - 2 * x) == 2 * asin(sqrt(x)).
* The argument must be in [0, 1], and the result is positive.
*/
static double arcHav(double x) {
return 2 * asin(sqrt(x));
}
// Given h==hav(x), returns sin(abs(x)).
static double sinFromHav(double h) {
return 2 * sqrt(h * (1 - h));
}
// Returns hav(asin(x)).
static double havFromSin(double x) {
double x2 = x * x;
return x2 / (1 + sqrt(1 - x2)) * .5;
}
// Returns sin(arcHav(x) + arcHav(y)).
static double sinSumFromHav(double x, double y) {
double a = sqrt(x * (1 - x));
double b = sqrt(y * (1 - y));
return 2 * (a + b - 2 * (a * y + b * x));
}
/**
* Returns hav() of distance from (lat1, lng1) to (lat2, lng2) on the unit sphere.
*/
static double havDistance(double lat1, double lat2, double dLng) {
return hav(lat1 - lat2) + hav(dLng) * cos(lat1) * cos(lat2);
}
}These classes are actually a part of another library by Goolge: https://github.com/googlemaps/android-maps-utils
This is a utility library by Google to customize and work with Google Maps. But since this contains many other features we don’t require, we only copy the 2 files we need from the library. It doesn’t’ make sense to import the whole library and bloat the application.
Finally, in our MainActivity.java we update the area according to lat-long which we have stored in our array list.
Conclusion
Our app is up and running. It can be used to compute the area of any region shown on the google map.
As an extension to the project, I leave you with the task of adding features such as ‘free hand drawing to mark the region’ since marking complex shapes can be difficult with multiple taps.
Let me know if I should publish this as an independent library ????
Like what you read? Don’t forget to share this post on Facebook, Whatsapp, and LinkedIn.
You can follow me on LinkedIn, Quora, Twitter, and Instagram where I answer questions related to Mobile Development, especially Android and Flutter.
If you want to stay updated with all the latest articles, subscribe to the weekly newsletter by entering your email address in the form on the top right section of this page.