
In this post on Augmented Reality App Development using ARCore, we’ll take a look at how to use Cloud Anchors. This is the 4th post in our Augmented Reality App development articles. If you’re new to ARCore, I’d suggest taking a look at some of the articles given below.
The first article would give you a gist of what is ARCore and how it helps in developing Augmented Reality Applications.
Now that you’ve read the articles above, you’ll have an overview of what is ARCore and where Sceneform SDK comes into the picture. With this out of the way, now let’s have a look at how to use Cloud Anchors API by Google!
This post will be divided in the following sections:
- Enabling Cloud Anchors API.
- Adding the API key and Manifest Permissions.
- Importing Sceneform Assets.
- Writing the Cloud Anchors Application.
Enabling Cloud Anchors API
To host and retrieve anchors from the cloud, we’ll need to use the Cloud Anchors API. Follow these simple steps to enable the API.
- Go to: https://console.cloud.google.com and login with your Google Account or Create one.
- Create a project on the Cloud Platform and name it anything you want.
- Once you’ve created the project, click on the three horizontal lines in the top left corner of the screen.
- Select APIs & Serivces and then click on “Enable APIs & Services”.
- Search for “Cloud Anchor” and the ARCore Cloud Anchor API will show up. You’ll need to click on it and click the enable button.
- Then from the menu on your left, click on “Credentials”. Here you’ll create the API credentials.
- Click on “Create Credentials” and follow the simple steps the come along. At the end, you’ll have your API key!
Adding the API key and Manifest Permissions
Now with the API key enabled, it’s time to fire up the Android Studio. Create a new Android Studio project with an empty activity.
Open AndroidManifest.xml and add the following permissions outside the <application> tag:
<uses-permission android:name="android.permission.CAMERA"/>
<uses-permission android:name="android.permission.INTERNET"/>
<uses-feature android:name="android.hardware.camera.ar" android:required="true"/>
Now add the following meta-data directly below your <application> tag:
<meta-data
        android:name="com.google.ar.core"
        android:value="required"/>
<meta-data
        android:name="com.google.android.ar.API_KEY"
        android:value="AIzaSyABZAwXzsTegM-yOADwFsGluWrSYNoMJbo"/>
Don’t forget to add your API key to the above tag.
To develop an Augmented Reality application using ARCore, you’ll need to use the Sceneform Plugin and Sceneform SDK. The article below will show you how to enable Sceneform Plugin for Android Studio:
Check how to enable Sceneform Plugin:
https://developers.google.com/ar/develop/java/sceneform/
Once the plugin is enabled, add the following dependencies to the app level build.gradle file:
implementation 'com.google.ar:core:1.10.0'
implementation 'com.google.ar.sceneform.ux:sceneform-ux:1.10.0'
implementation 'com.google.android.material:material:1.0.0'
Now we’re ready to import a 3D model into our android app.
Importing Sceneform Assets
We’ll download the 3D assets from poly.google.com, it’s a great tool to download .obj files for sceneform. Select any 3D model and download it in the .obj format. You’ll get a zip donwloaded to your computer.
Right click the app package in Android Studio and click on New → Package and name it “sampledata”. Extract the .zip file in this folder.
Once you’ve extracted the files, find the .obj file and right click on it. Select “Import Sceneform Asset” and follow the steps to finish importing the 3D model in your app.
Writing the Cloud Anchors Applications
We’re now ready to code our Augmented Reality application using Sceneform SDK. Create a new class and extend it from ArFragment. Then override the `getSessionConfiguration()` method and add the following code:
class CloudAnchorFragment : ArFragment() {

    override fun getSessionConfiguration(session: Session?): Config {
        planeDiscoveryController.setInstructionView(null)
        val config: Config = super.getSessionConfiguration(session)
        config.cloudAnchorMode = Config.CloudAnchorMode.ENABLED
        return config
    }

}
Using planeDiscoveryController we set the instructionView as null. This will prevent any tutorial from blocking our view. Then we enable the CloudAnchorsMode. For this, we get the session configuration and set cloudAnchorsMode to Enabled. Finally, we return the custom configuration.
Creating the layout
We need to add this custom ArFragment into our Activity’s layout file. We’ll also add two additional buttons. One to clear any objects on the screen and other to resolve the anchor. Apart from that we’ll have the custom ArFragment covering the entire screen.
Add the following code to your layout file:
<?xml version="1.0" encoding="utf-8"?>
<RelativeLayout xmlns:android="http://schemas.android.com/apk/res/android"
    xmlns:tools="http://schemas.android.com/tools"
    android:layout_width="match_parent"
    android:layout_height="match_parent"
    tools:context=".MainActivity">


    <fragment
        android:id="@+id/ar_fragment"
        android:name="com.example.cloudanchors.CloudAnchorFragment"
        android:layout_width="match_parent"
        android:layout_height="match_parent" />

    <LinearLayout
        android:layout_width="match_parent"
        android:layout_height="match_parent">

        <Button
            android:id="@+id/btn_clear"
            android:layout_width="wrap_content"
            android:layout_height="wrap_content"
            android:text="Clear" />

        <Button
            android:id="@+id/btn_resolve"
            android:layout_width="wrap_content"
            android:layout_height="wrap_content"
            android:text="Resolve" />
    </LinearLayout>


</RelativeLayout>
With this we’ve completed our layout file. We’re ready to render Augmented Reality scenes on the screen.
Methods to add a 3D model to the Scene
If you’ve ready the previous articles, you’ll know that we use 2 methods to add a 3D object to the Augmented Reality scene. First method loads a 3D model from .obj file into Renderable object from Sceneform SDK. The other method actually places that renderable to our scene.
So, add the following methods to your MainAcitivity.java file
private fun cloudAnchor(newAnchor: Anchor?) {
    cloudAnchor?.detach()
    cloudAnchor = newAnchor
    appAnchorState = AppAnchorState.NONE
    snackbarHelper.hide(this)
}

private fun placeObject(fragment: ArFragment, anchor: Anchor, model: Uri) {
    ModelRenderable.Builder()
        .setSource(fragment.context, model)
        .build()
        .thenAccept { renderable ->
            addNodeToScene(fragment, anchor, renderable)
        }
        .exceptionally {
            val builder = AlertDialog.Builder(this)
            builder.setMessage(it.message).setTitle("Error!")
            val dialog = builder.create()
            dialog.show()
            return@exceptionally null
        }
}

private fun addNodeToScene(fragment: ArFragment, anchor: Anchor, renderable: ModelRenderable) {
    val node = AnchorNode(anchor)
    val transformableNode = TransformableNode(fragment.transformationSystem)
    transformableNode.renderable = renderable
    transformableNode.setParent(node)
    fragment.arSceneView.scene.addChild(node)
    transformableNode.select()
}
Read the above mentioned articles to find out what these methods do in detail.
Hosting Cloud Anchors
We’re now ready to host our anchors to the cloud. First, we’ll add a listener to detect touches on the plane and place an anchor + 3D model to the scene.
arFragment.setOnTapArPlaneListener { hitResult, plane, _ ->
    if (plane.type != Plane.Type.HORIZONTAL_UPWARD_FACING || appAnchorState != AppAnchorState.NONE) {
        return@setOnTapArPlaneListener
    }

    val anchor = arFragment.arSceneView.session?.hostCloudAnchor(hitResult.createAnchor())


    placeObject(arFragment, cloudAnchor!!, Uri.parse("model.sfb"))

}
The hostCloudAnchors method begins the process of hosting an Anchor to the cloud. It returns an Anchor with state TASK_IN_PROGRESS. Next, we add a method to set the global anchor to refer to the hosted anchor. It also set’s the anchor’s state to NONE.
private fun cloudAnchor(newAnchor: Anchor?) {
    cloudAnchor?.detach()
    cloudAnchor = newAnchor
    appAnchorState = AppAnchorState.NONE
    snackbarHelper.hide(this)
}
To maintain the state of the Anchor, we need to create an Enum and a global variable to keep track of current state of the anchor.
class MainActivity : AppCompatActivity() {

    lateinit var arFragment: CloudAnchorFragment
    var cloudAnchor: Anchor? = null

    enum class AppAnchorState {
        NONE,
        HOSTING,
        HOSTED,
        RESOLVING,
        RESOLVED
    }
     ...
Now whenever we touch the scene, we’ll start hosting the anchor. Hence, we need to update the current anchor, and it’s state as well. Add the following code in your setOnTapArPlaneListener
override fun onCreate(savedInstanceState: Bundle?) {
    super.onCreate(savedInstanceState)
    setContentView(R.layout.activity_main)

    arFragment.setOnTapArPlaneListener { hitResult, plane, _ ->
        if (plane.type != Plane.Type.HORIZONTAL_UPWARD_FACING || appAnchorState != AppAnchorState.NONE) {
            return@setOnTapArPlaneListener
        }

        val anchor = arFragment.arSceneView.session?.hostCloudAnchor(hitResult.createAnchor())
        cloudAnchor(anchor)

        appAnchorState = AppAnchorState.HOSTING
        snackbarHelper.showMessage(this, "Hosting anchor")

        placeObject(arFragment, cloudAnchor!!, Uri.parse("model.sfb"))

    }

}
Next, we need to check regularly, whether the anchor was successfully hosted to the cloud. If not, then we need to notify the user of failure. To do this, we add an onUpdateListener to the scene. This method will check if the anchor is hosted or not, for each camera frame.
override fun onCreate(savedInstanceState: Bundle?) {
    super.onCreate(savedInstanceState)
    setContentView(R.layout.activity_main)

    arFragment = supportFragmentManager.findFragmentById(R.id.ar_fragment) as CloudAnchorFragment
    arFragment.arSceneView.scene.addOnUpdateListener(this::onUpdateFrame)

    ....

}

fun onUpdateFrame(frameTime: FrameTime) {
    checkUpdatedAnchor()
}

@Synchronized
private fun checkUpdatedAnchor() {
    if (appAnchorState != AppAnchorState.HOSTING && appAnchorState != AppAnchorState.RESOLVING)
        return

    val cloudState: CloudAnchorState = cloudAnchor?.cloudAnchorState!!

    if (appAnchorState == AppAnchorState.HOSTING) {
        if (cloudState.isError) {
            snackbarHelper.showMessageWithDismiss(this, "Error hosting anchor...")
            appAnchorState = AppAnchorState.NONE
        } else if (cloudState == CloudAnchorState.SUCCESS) {
            val shortCode = storageManager.nextShortCode(this)
            storageManager.storeUsingShortCode(this, shortCode, cloudAnchor?.cloudAnchorId)
            snackbarHelper.showMessageWithDismiss(this, "Anchor hosted: $shortCode")
            appAnchorState = AppAnchorState.HOSTED
        }
    } else if (appAnchorState == AppAnchorState.RESOLVING) {
        if (cloudState.isError) {
            snackbarHelper.showMessageWithDismiss(this, "Error resolving anchor...")
            appAnchorState = AppAnchorState.NONE
        } else if (cloudState == CloudAnchorState.SUCCESS) {
            snackbarHelper.showMessageWithDismiss(this, "Anchor resolved...")
            appAnchorState = AppAnchorState.RESOLVED
        }
    }

}
This method might look long, but it’s only job is to check for the current state of cloud anchor HOSTING/RESOLVING and checking whether hosting is successful or failure. Then it set’s the current state accordingly.
We’ve used a class StorageHelper to store anchor ID in sharedPreferences. You can use other methods of storage such as Firebase, FireStore, or your custom solutions. But aim of this article is to show how to store Augmented Reality anchors on cloud. Hence, for local storage we’ll use Shared Preferences.
/** Helper class for managing on-device storage of cloud anchor IDs. */
public class StorageManager {
    private static final String NEXT_SHORT_CODE = "next_short_code";
    private static final String KEY_PREFIX = "anchor;";
    private static final int INITIAL_SHORT_CODE = 142;

    /** Gets a new short code that can be used to store the anchor ID. */
    int nextShortCode(Activity activity) {
        SharedPreferences sharedPrefs = activity.getPreferences(Context.MODE_PRIVATE);
        int shortCode = sharedPrefs.getInt(NEXT_SHORT_CODE, INITIAL_SHORT_CODE);
        // Increment and update the value in sharedPrefs, so the next code retrieved will be unused.
        sharedPrefs.edit().putInt(NEXT_SHORT_CODE, shortCode + 1)
                .apply();
        return shortCode;
    }

    /** Stores the cloud anchor ID in the activity's SharedPrefernces. */
    void storeUsingShortCode(Activity activity, int shortCode, String cloudAnchorId) {
        SharedPreferences sharedPrefs = activity.getPreferences(Context.MODE_PRIVATE);
        sharedPrefs.edit().putString(KEY_PREFIX + shortCode, cloudAnchorId).apply();
    }

    /**
     * Retrieves the cloud anchor ID using a short code. Returns an empty string if a cloud anchor ID
     * was not stored for this short code.
     */
    String getCloudAnchorID(Activity activity, int shortCode) {
        SharedPreferences sharedPrefs = activity.getPreferences(Context.MODE_PRIVATE);
        return sharedPrefs.getString(KEY_PREFIX + shortCode, "");
    }
}
Resolving Anchors
Last thing that we need to do is, resolved the hosted anchors. To do this, we’ll add the onClickListeners to our two buttons: Clear and Resolve.
For the clear button, we’ll just call the cloudAnchors method and pass null to it.
btn_clear.setOnClickListener {
    cloudAnchor(null)
}
For resolve button, we’ll show a dialog box on click. It’ll have an EditText for entering the short code of the anchor. When the user submits the shortcode, we’ll resolve the anchor and show the object!
First we’ll need a dialogFragment. I’ve created one for you:
public class ResolveDialogFragment extends DialogFragment {

    interface OkListener {
        void onOkPressed(String dialogValue);
    }

    private OkListener okListener;
    private EditText shortCodeField;

    /** Sets a listener that is invoked when the OK button on this dialog is pressed. */
    void setOkListener(OkListener okListener) {
        this.okListener = okListener;
    }

    /**
     * Creates a simple layout for the dialog. This contains a single user-editable text field whose
     * input type is retricted to numbers only, for simplicity.
     */
    private LinearLayout getDialogLayout() {
        Context context = getContext();
        LinearLayout layout = new LinearLayout(context);
        shortCodeField = new EditText(context);
        shortCodeField.setInputType(InputType.TYPE_CLASS_NUMBER);
        shortCodeField.setLayoutParams(
                new LayoutParams(LayoutParams.MATCH_PARENT, LayoutParams.WRAP_CONTENT));
        shortCodeField.setFilters(new InputFilter[]{new InputFilter.LengthFilter(8)});
        layout.addView(shortCodeField);
        layout.setLayoutParams(new LayoutParams(LayoutParams.MATCH_PARENT, LayoutParams.WRAP_CONTENT));
        return layout;
    }

    @Override
    public Dialog onCreateDialog(Bundle savedInstanceState) {
        AlertDialog.Builder builder = new AlertDialog.Builder(getActivity());
        builder
                .setView(getDialogLayout())
                .setTitle("Resolve Anchor")
                .setPositiveButton(
                        "OK",
                        (dialog, which) -> {
                            Editable shortCodeText = shortCodeField.getText();
                            if (okListener != null && shortCodeText != null && shortCodeText.length() > 0) {
                                // Invoke the callback with the current checked item.
                                okListener.onOkPressed(shortCodeText.toString());
                            }
                        })
                .setNegativeButton("Cancel", (dialog, which) -> {});
        return builder.create();
    }
}
Add this to your project and call it when user clicks the resolve button as shown below:
btn_resolve.setOnClickListener {
    if (cloudAnchor != null) {
        snackbarHelper.showMessageWithDismiss(this, "Please clear the anchor")
        return@setOnClickListener
    }

    val dialog = ResolveDialogFragment()
    dialog.setOkListener(this::onResolveOkPressed)
    dialog.show(supportFragmentManager, "Resolve")
}
Here’s the onResolveOkMethod:
fun onResolveOkPressed(dialogVal: String) {
    val shortCode = dialogVal.toInt()
    val cloudAnchorId = storageManager.getCloudAnchorID(this, shortCode)
    val resolvedAnchor = arFragment.arSceneView.session?.resolveCloudAnchor(cloudAnchorId)
    cloudAnchor(resolvedAnchor)
    placeObject(arFragment, cloudAnchor!!, Uri.parse("model.sfb"))
    snackbarHelper.showMessage(this, "Now resolving anchor...")
    appAnchorState = AppAnchorState.RESOLVING
}
It get’s the shortcode and resolves the object onto our Augmented Reality scene.
Notice that we’ve also used the SnackBarHelper class a lot. It’s another class by Google to manage snackbars in Android. Here’s the link to it: SnackbarHelper
And we’re done!
This is how your final MainActivity.java class will look like:
class MainActivity : AppCompatActivity() {

    lateinit var arFragment: CloudAnchorFragment
    var cloudAnchor: Anchor? = null

    enum class AppAnchorState {
        NONE,
        HOSTING,
        HOSTED,
        RESOLVING,
        RESOLVED
    }

    var appAnchorState = AppAnchorState.NONE
    var snackbarHelper = SnackbarHelper()
    var storageManager = StorageManager()

    override fun onCreate(savedInstanceState: Bundle?) {
        super.onCreate(savedInstanceState)
        setContentView(R.layout.activity_main)

        arFragment = supportFragmentManager.findFragmentById(R.id.ar_fragment) as CloudAnchorFragment
        arFragment.arSceneView.scene.addOnUpdateListener(this::onUpdateFrame)
        arFragment.planeDiscoveryController.hide()
        arFragment.planeDiscoveryController.setInstructionView(null)

        btn_clear.setOnClickListener {
            cloudAnchor(null)
        }

        btn_resolve.setOnClickListener {
            if (cloudAnchor != null) {
                snackbarHelper.showMessageWithDismiss(this, "Please clear the anchor")
                return@setOnClickListener
            }

            val dialog = ResolveDialogFragment()
            dialog.setOkListener(this::onResolveOkPressed)
            dialog.show(supportFragmentManager, "Resolve")
        }

        arFragment.setOnTapArPlaneListener { hitResult, plane, _ ->
            if (plane.type != Plane.Type.HORIZONTAL_UPWARD_FACING || appAnchorState != AppAnchorState.NONE) {
                return@setOnTapArPlaneListener
            }

            val anchor = arFragment.arSceneView.session?.hostCloudAnchor(hitResult.createAnchor())
            cloudAnchor(anchor)

            appAnchorState = AppAnchorState.HOSTING
            snackbarHelper.showMessage(this, "Hosting anchor")

            placeObject(arFragment, cloudAnchor!!, Uri.parse("model.sfb"))

        }

    }

    fun onResolveOkPressed(dialogVal: String) {
        val shortCode = dialogVal.toInt()
        val cloudAnchorId = storageManager.getCloudAnchorID(this, shortCode)
        val resolvedAnchor = arFragment.arSceneView.session?.resolveCloudAnchor(cloudAnchorId)
        cloudAnchor(resolvedAnchor)
        placeObject(arFragment, cloudAnchor!!, Uri.parse("model.sfb"))
        snackbarHelper.showMessage(this, "Now resolving anchor...")
        appAnchorState = AppAnchorState.RESOLVING
    }

    fun onUpdateFrame(frameTime: FrameTime) {
        checkUpdatedAnchor()
    }

    @Synchronized
    private fun checkUpdatedAnchor() {
        if (appAnchorState != AppAnchorState.HOSTING && appAnchorState != AppAnchorState.RESOLVING)
            return

        val cloudState: CloudAnchorState = cloudAnchor?.cloudAnchorState!!

        if (appAnchorState == AppAnchorState.HOSTING) {
            if (cloudState.isError) {
                snackbarHelper.showMessageWithDismiss(this, "Error hosting anchor...")
                appAnchorState = AppAnchorState.NONE
            } else if (cloudState == CloudAnchorState.SUCCESS) {
                val shortCode = storageManager.nextShortCode(this)
                storageManager.storeUsingShortCode(this, shortCode, cloudAnchor?.cloudAnchorId)
                snackbarHelper.showMessageWithDismiss(this, "Anchor hosted: $shortCode")
                appAnchorState = AppAnchorState.HOSTED
            }
        } else if (appAnchorState == AppAnchorState.RESOLVING) {
            if (cloudState.isError) {
                snackbarHelper.showMessageWithDismiss(this, "Error resolving anchor...")
                appAnchorState = AppAnchorState.NONE
            } else if (cloudState == CloudAnchorState.SUCCESS) {
                snackbarHelper.showMessageWithDismiss(this, "Anchor resolved...")
                appAnchorState = AppAnchorState.RESOLVED
            }
        }

    }

    private fun cloudAnchor(newAnchor: Anchor?) {
        cloudAnchor?.detach()
        cloudAnchor = newAnchor
        appAnchorState = AppAnchorState.NONE
        snackbarHelper.hide(this)
    }

    private fun placeObject(fragment: ArFragment, anchor: Anchor, model: Uri) {
        ModelRenderable.Builder()
            .setSource(fragment.context, model)
            .build()
            .thenAccept { renderable ->
                addNodeToScene(fragment, anchor, renderable)
            }
            .exceptionally {
                val builder = AlertDialog.Builder(this)
                builder.setMessage(it.message).setTitle("Error!")
                val dialog = builder.create()
                dialog.show()
                return@exceptionally null
            }
    }

    private fun addNodeToScene(fragment: ArFragment, anchor: Anchor, renderable: ModelRenderable) {
        val node = AnchorNode(anchor)
        val transformableNode = TransformableNode(fragment.transformationSystem)
        transformableNode.renderable = renderable
        transformableNode.setParent(node)
        fragment.arSceneView.scene.addChild(node)
        transformableNode.select()
    }

}
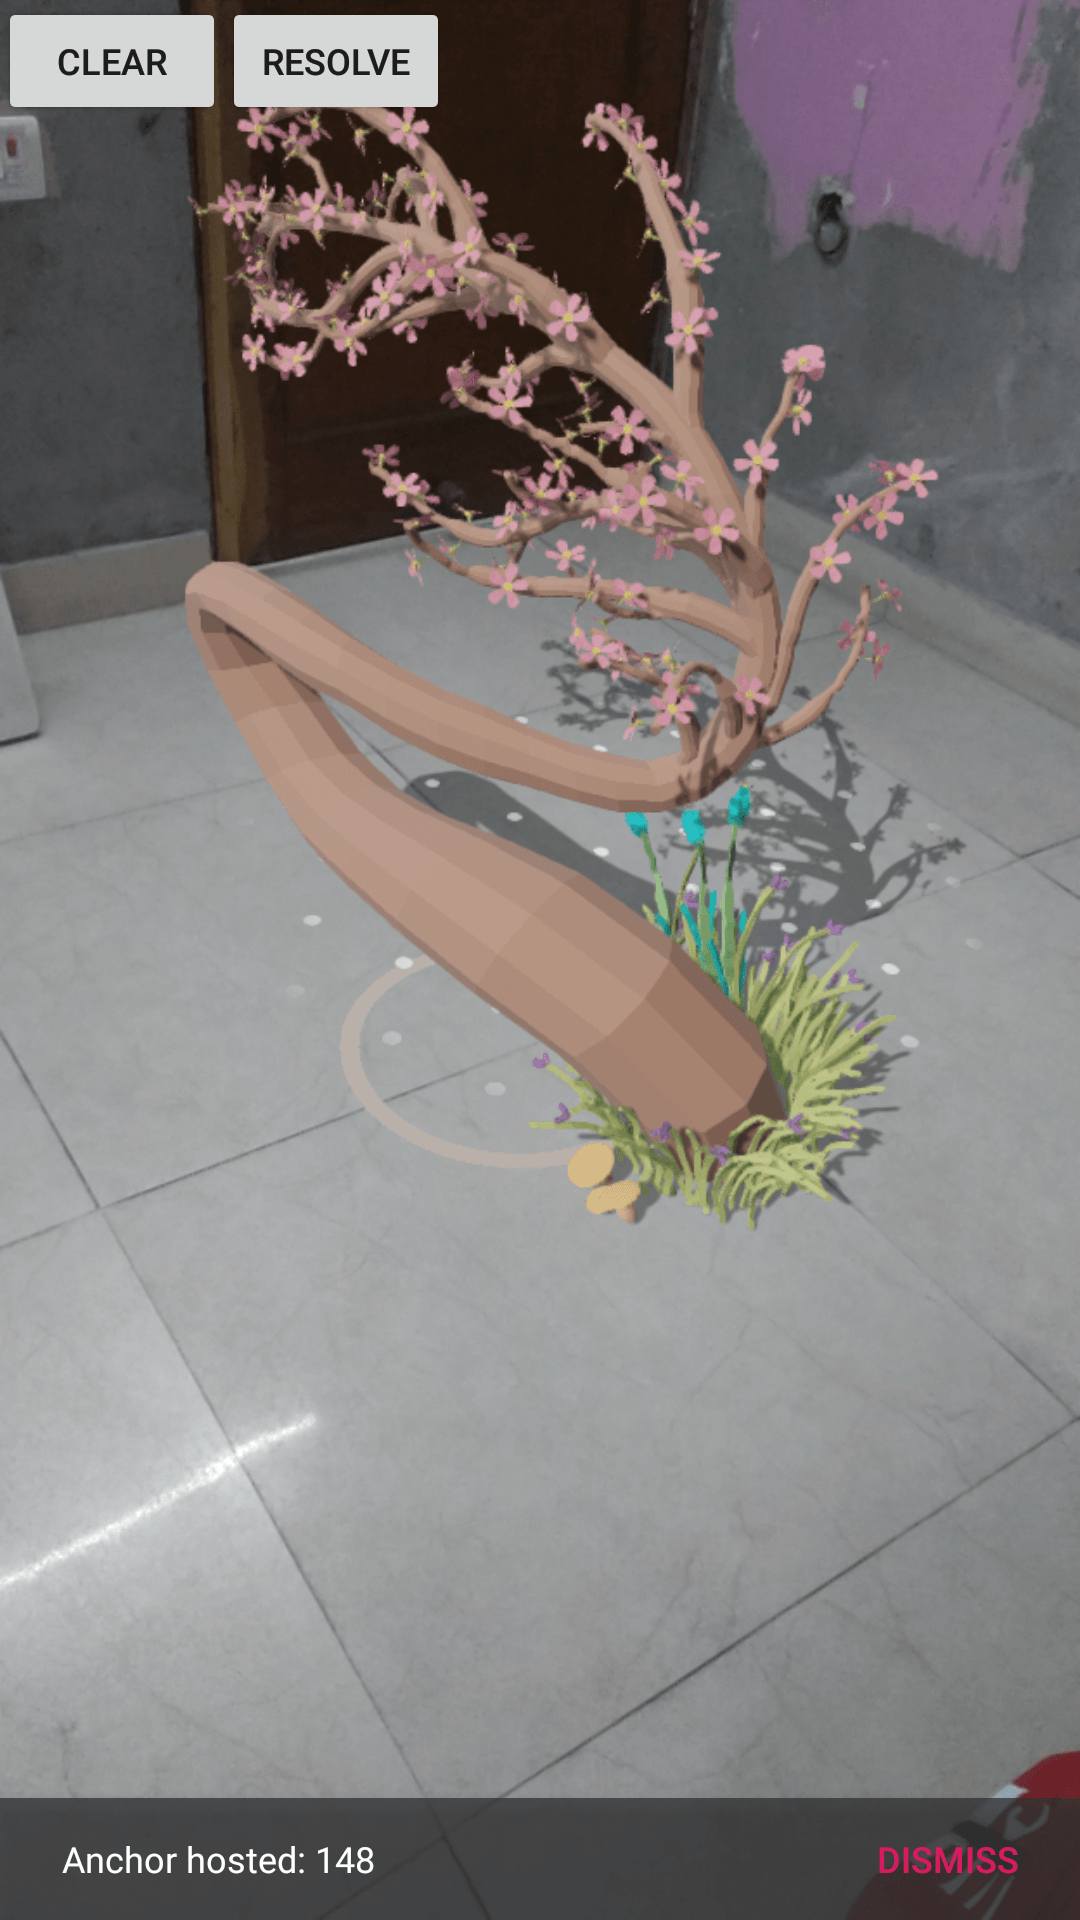
Here’s how the final result looks like:
Conclusion
This article will help you host CloudAnchors using Google Cloud Anchors API. Let me know if you’ll face any problems and I’ll be happy to help 🙂
*Important*: Join the AndroidVille SLACK workspace for mobile developers where people share their learnings about everything latest in Tech, especially in Android Development, RxJava, Kotlin, Flutter, and mobile development in general.
Click on this link to join the workspace. It’s absolutely free!
Like what you read? Don’t forget to share this post on Facebook, Whatsapp, and LinkedIn.
You can follow me on LinkedIn, Quora, Twitter, and Instagram where I answer questions related to Mobile Development, especially Android and Flutter.
If you want to stay updated with all the latest articles, subscribe to the weekly newsletter by entering your email address in the form on the top right section of this page.