
In this tutorial, you’ll learn how to place 3D models in the real world by setting the anchor as a specific scene instead of a regular plane. ARCore by Google, lets you augment 2D images which can be recognized by arcore to then place 3D models over them.
You provide some reference images and ARCore tracking determines where those images are physically located in the environment. Augmented Images are already in wide usage such as books, newspapers, magazines etc.
But before you dive deeper into this tutorial, you must check out the following articles as a prerequisite to this one:
Once you’re done with these two, you’ll have a basic understanding of some terminology in ARCore and Sceneform such as Scene, Anchor, Node, TransformableNode etc.
What are Augmented Images?
According to developer docs, Augmented Images in ARCore lets you build AR apps that can respond to 2D images, such as posters or product packaging, in the user’s environment. You provide a set of reference images, and ARCore tracking tells you where those images are physically located in an AR session, once they are detected in the camera view.
Basically, using augmented images, you can turn a simple 2D image into an augmented image which can be recognized by your app and be then used to place a 3D model above it.
When you might want to use Augmented Images?
Here are some restrictions which you might want to consider before using Augmented Images:
- Your use case must not involve scanning more than 20 images simultaneously. Since ARCore can only track up to 20 images at once.
- Size of the physical counterpart in the real world must be more than 15cm X 15cm and flat.
- You don’t want to track moving objects. ARCore cannot track moving images, although it can start tracking once the image stops.
- ARCore uses feature points in the reference image and can store feature point information for up to 1000 images.
Choosing a good reference image
Here are some tips to choose a good reference image to improve detectability by arcore:
- Augmented Images support PNG, JPEG and JPG formats.
- Detection is based on points of high contrast and so both color and black/white images are detected, regardless of whether a color or black/white reference image is used.
- Image’s resolution must be at least 300 X 300 pixels.
- Using high-res images does not mean improved performance.
- Images with repetitive features such as patterns, polka dots must be avoided.
- Use arcoreimg tool to evaluate how good your reference image is. A score of at least 75 is recommended.
How to use the arcoreimg tool:
- Download the arcore sdk for android from this link:
- Extract the zip contents of the zip file anywhere you like.
- Navigate to the extracted folder and go to tools -> arcoreimg -> windows (linux/macos whatever you use)
- Open command prompt at this location.
- Now enter this command:
arcoreimg.exe eval-img --input_image_path=dog.png
Replace dog.png with the complete path to your image.
Getting started with Augmented Images Application
Now that you’ve familiarized yourself with ARCore and Sceneform and have selected a good reference image with a score of 75+, it’s time to start coding the application!!
Create a custom fragment
We will be creating a custom fragment to add to our activity. We need a custom fragment as we will be altering some properties of the default fragment.
Create a class named “CustomArFragment” and extend it from ArFragment. Here is the code for CustomArFragment:
package com.ayusch.augmentedimages;

import android.util.Log;

import com.google.ar.core.Config;
import com.google.ar.core.Session;
import com.google.ar.sceneform.ux.ArFragment;

public class CustomArFragment extends ArFragment {

    @Override
    protected Config getSessionConfiguration(Session session) {
        getPlaneDiscoveryController().setInstructionView(null);
        Config config = new Config(session);
        config.setUpdateMode(Config.UpdateMode.LATEST_CAMERA_IMAGE);
        session.configure(config);
        getArSceneView().setupSession(session);


        return config;
    }


}
First of all, we are setting the plane discovery instruction to null. By doing this, we turn off that hand icon which appears just after the fragment is initialized which instructs the user to move his phone around. We don’t need it any more as we are not detecting random planes but a specific image.
Next, we set the update mode for the session to LATEST_CAMERA_IMAGE. This ensures that your update listener is called whenever the camera frame updates. It configures the behavior of update method.
Setting up the Augmented Images Database
Add your chosen reference image (which you want to detect in the physical world) in the assets folder. If your assets folder doesn’t exist, create one. Now we will be adding augmented images to our database which will then be detected in the real world.
We’ll set up this database as soon as the fragment (scene) is created. Then we check for the success and failure of this call and set the log accordingly. Add the following code to your custom fragment:
if ((((MainActivity) getActivity()).setupAugmentedImagesDb(config, session))) {
    Log.d("SetupAugImgDb", "Success");
} else {
    Log.e("SetupAugImgDb","Faliure setting up db");
}
This is what the CustomArFragment would look like:
package com.ayusch.augmentedimages;

import android.util.Log;

import com.google.ar.core.Config;
import com.google.ar.core.Session;
import com.google.ar.sceneform.ux.ArFragment;

public class CustomArFragment extends ArFragment {

    @Override
    protected Config getSessionConfiguration(Session session) {
        getPlaneDiscoveryController().setInstructionView(null);
        Config config = new Config(session);
        config.setUpdateMode(Config.UpdateMode.LATEST_CAMERA_IMAGE);
        session.configure(config);
        getArSceneView().setupSession(session);

        if ((((MainActivity) getActivity()).setupAugmentedImagesDb(config, session))) {
            Log.d("SetupAugImgDb", "Success");
        } else {
            Log.e("SetupAugImgDb","Faliure setting up db");
        }

        return config;
    }


}
We will soon be creating the setupAugmentedImagesDb method in the MainActivity. Now with the CustomArFragment created, let’s add it to our activity_main.xml, here’s the code for your activity_main.xml:
<?xml version="1.0" encoding="utf-8"?>
<android.support.constraint.ConstraintLayout xmlns:android="http://schemas.android.com/apk/res/android"
    xmlns:app="http://schemas.android.com/apk/res-auto"
    xmlns:tools="http://schemas.android.com/tools"
    android:layout_width="match_parent"
    android:layout_height="match_parent"
    tools:context=".MainActivity">

    <fragment
        android:id="@+id/sceneform_fragment"
        android:name="com.ayusch.augmentedimages.CustomArFragment"
        android:layout_width="match_parent"
        android:layout_height="match_parent" />


</android.support.constraint.ConstraintLayout>
Notice that we set the name of this fragment to our CustomArFragment. This is necessary to ensure that the added fragment is our custom fragment. This will ensure that permission handling and session initializations are taken care of.
Adding an image to the Augmented Images Database
Here, we will set up our images database, find the reference image in the real world and then add a 3D model accordingly.
Let’s start by setting up our database. Create a public function setupAugmentedImagesDb in the MainActivity.java class:
public boolean setupAugmentedImagesDb(Config config, Session session) {
    AugmentedImageDatabase augmentedImageDatabase;
    Bitmap bitmap = loadAugmentedImage();
    if (bitmap == null) {
        return false;
    }

    augmentedImageDatabase = new AugmentedImageDatabase(session);
    augmentedImageDatabase.addImage("tiger", bitmap);
    config.setAugmentedImageDatabase(augmentedImageDatabase);
    return true;
}

private Bitmap loadAugmentedImage() {
    try (InputStream is = getAssets().open("blanket.jpeg")) {
        return BitmapFactory.decodeStream(is);
    } catch (IOException e) {
        Log.e("ImageLoad", "IO Exception", e);
    }

    return null;
}
We also have loadAugmentedImage method which loads the image from the assets folder and returns a bitmap.
In setupAugmentedImagesDb, we first initialize our database for this session and then add an image to this database. We will name our image “tiger”. Then we set the database for this session configuration and return true, indicating that the image is added successfully.
Detecting the reference images in the real world
Now we will start detecting our reference images in the real world. In order to do so, we will add a listener to our scene which will be called every time a frame is created, and that frame will be analyzed to find our reference image.
Add this line in the onCreate method of MainActivity.java
arFragment.getArSceneView().getScene().addOnUpdateListener(this::onUpdateFrame);
Now add the onUpdateFrame method to MainActivity:
@RequiresApi(api = Build.VERSION_CODES.N)
private void onUpdateFrame(FrameTime frameTime) {
    Frame frame = arFragment.getArSceneView().getArFrame();

    Collection<AugmentedImage> augmentedImages = frame.getUpdatedTrackables(AugmentedImage.class);
    for (AugmentedImage augmentedImage : augmentedImages) {
        if (augmentedImage.getTrackingState() == TrackingState.TRACKING) {
            if (augmentedImage.getName().equals("tiger") && shouldAddModel) {
                placeObject(arFragment, augmentedImage.createAnchor(augmentedImage.getCenterPose()), Uri.parse("Mesh_BengalTiger.sfb"));
                shouldAddModel = false;
            }
        }
    }
}
In the first line, we get the frame from the scene. A frame can be imagined as a snapshot in the middle of a video. If you are familiar with how video works, you might be knowing that they are a series of still pictures flipped one after the another really fast, giving the impression of the motion picture. We are extracting one of those pictures.
Once we have the frame, we analyze for our reference image. We extract a list of all the items ARCore has tracked using frame.getUpdatedTrackables. This is a collection of all the detected images. We then loop over the collection and check if our image “tiger” is present in the frame.
If we find a match, then we go ahead and place a 3D model over the detected image.
Note: I have added, shouldAddModel to ensure that we add the model only once.
Placing a 3D model over reference image
Now that we have detected our image in the real world, we can start adding 3D models over it. We will copy the placeObject and addNodeToScene methods from our previous project, and add them here.
Although I have previously explained what these methods do line by line, here is an overview:
- PlaceObject: This method is used to build a renderable from the provided Uri. Once the renderable is built, it is passed into addNodeToScene method where the renderable is attached to a node and that node is placed onto the scene.
- AddNodeToScene: This method creates an AnchorNode from the received anchor, creates another node on which the renderable is attached, then adds this node to the AnchorNode and adds the AnchorNode to the scene.
Here is our final MainActivity.java class:
package com.ayusch.augmentedimages;

import android.graphics.Bitmap;
import android.graphics.BitmapFactory;
import android.net.Uri;
import android.os.Build;
import android.support.annotation.RequiresApi;
import android.support.v7.app.AppCompatActivity;
import android.os.Bundle;
import android.util.Log;
import android.widget.Toast;

import com.google.ar.core.Anchor;
import com.google.ar.core.AugmentedImage;
import com.google.ar.core.AugmentedImageDatabase;
import com.google.ar.core.Config;
import com.google.ar.core.Frame;
import com.google.ar.core.Session;
import com.google.ar.core.TrackingState;
import com.google.ar.sceneform.AnchorNode;
import com.google.ar.sceneform.FrameTime;
import com.google.ar.sceneform.rendering.ModelRenderable;
import com.google.ar.sceneform.rendering.Renderable;
import com.google.ar.sceneform.ux.ArFragment;
import com.google.ar.sceneform.ux.TransformableNode;

import java.io.IOException;
import java.io.InputStream;
import java.util.Collection;

public class MainActivity extends AppCompatActivity {
    ArFragment arFragment;
    boolean shouldAddModel = true;

    @Override
    protected void onCreate(Bundle savedInstanceState) {
        super.onCreate(savedInstanceState);
        setContentView(R.layout.activity_main);
        arFragment = (CustomArFragment) getSupportFragmentManager().findFragmentById(R.id.sceneform_fragment);
        arFragment.getPlaneDiscoveryController().hide();
        arFragment.getArSceneView().getScene().addOnUpdateListener(this::onUpdateFrame);
    }


    @RequiresApi(api = Build.VERSION_CODES.N)
    private void placeObject(ArFragment arFragment, Anchor anchor, Uri uri) {
        ModelRenderable.builder()
                .setSource(arFragment.getContext(), uri)
                .build()
                .thenAccept(modelRenderable -> addNodeToScene(arFragment, anchor, modelRenderable))
                .exceptionally(throwable -> {
                            Toast.makeText(arFragment.getContext(), "Error:" + throwable.getMessage(), Toast.LENGTH_LONG).show();
                            return null;
                        }

                );
    }

    @RequiresApi(api = Build.VERSION_CODES.N)
    private void onUpdateFrame(FrameTime frameTime) {
        Frame frame = arFragment.getArSceneView().getArFrame();

        Collection<AugmentedImage> augmentedImages = frame.getUpdatedTrackables(AugmentedImage.class);
        for (AugmentedImage augmentedImage : augmentedImages) {
            if (augmentedImage.getTrackingState() == TrackingState.TRACKING) {
                if (augmentedImage.getName().equals("tiger") && shouldAddModel) {
                    placeObject(arFragment, augmentedImage.createAnchor(augmentedImage.getCenterPose()), Uri.parse("Mesh_BengalTiger.sfb"));
                    shouldAddModel = false;
                }
            }
        }
    }

    public boolean setupAugmentedImagesDb(Config config, Session session) {
        AugmentedImageDatabase augmentedImageDatabase;
        Bitmap bitmap = loadAugmentedImage();
        if (bitmap == null) {
            return false;
        }

        augmentedImageDatabase = new AugmentedImageDatabase(session);
        augmentedImageDatabase.addImage("tiger", bitmap);
        config.setAugmentedImageDatabase(augmentedImageDatabase);
        return true;
    }

    private Bitmap loadAugmentedImage() {
        try (InputStream is = getAssets().open("blanket.jpeg")) {
            return BitmapFactory.decodeStream(is);
        } catch (IOException e) {
            Log.e("ImageLoad", "IO Exception", e);
        }

        return null;
    }

    private void addNodeToScene(ArFragment arFragment, Anchor anchor, Renderable renderable) {
        AnchorNode anchorNode = new AnchorNode(anchor);
        TransformableNode node = new TransformableNode(arFragment.getTransformationSystem());
        node.setRenderable(renderable);
        node.setParent(anchorNode);
        arFragment.getArSceneView().getScene().addChild(anchorNode);
        node.select();
    }


}
Now run your app. You should see a screen as shown below. Move around our phone a bit over the reference object. ARCore will detect the feature points and as soon as it detects the reference image in the real world, it will add your 3D model onto it.
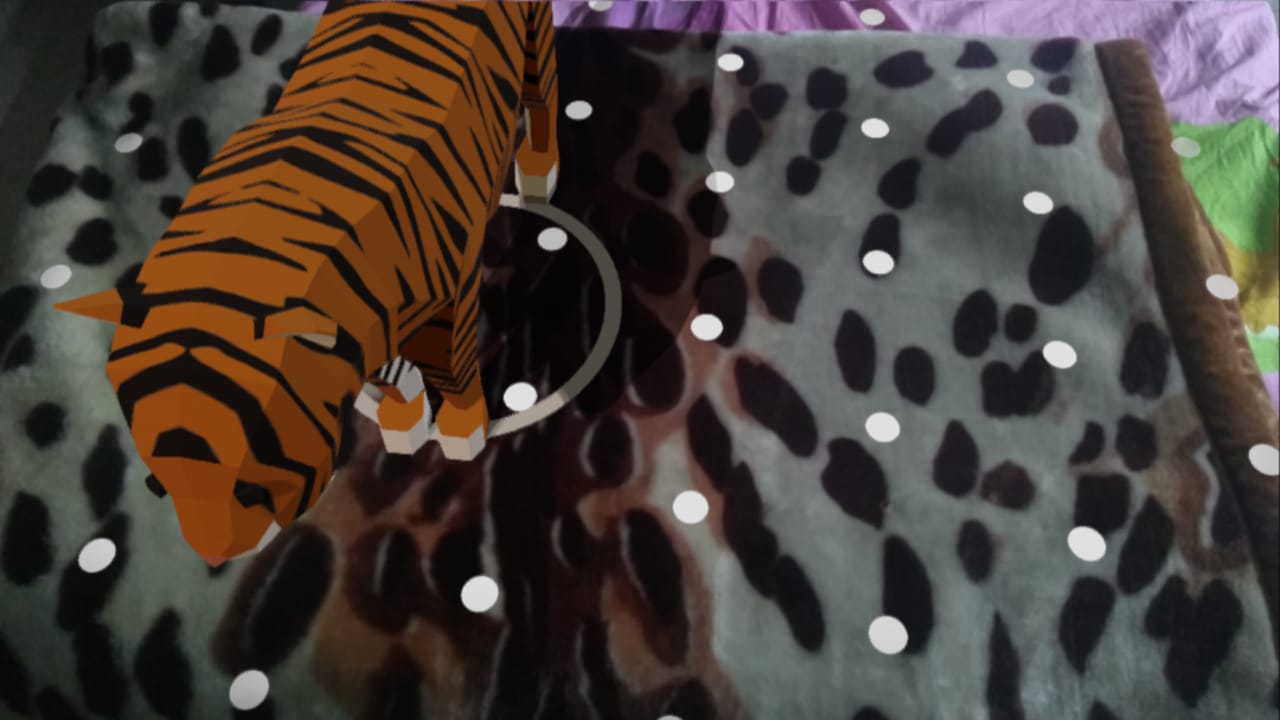
With this, we have created our very first Augmented Images app using ARCore by Google and Sceneform SDK!!
If you want to stay updated with all the latest articles, subscribe to the weekly newsletter by entering your email address in the form on the top right section of this page.
Like what you read? Don’t forget to share this post on Facebook, Whatsapp and LinkedIn.
You can follow me on LinkedIn, Quora, Twitter and Instagram where I answer questions related to Mobile Development, especially Android and Flutter.
Pingback:How to Build an Augmented Images Application with ARCore - AI+ NEWS
Pingback:全网最全AR学习开发资源汇总 – AR新世界